
Вовед
Thank you for choosing the Genius GLT-85.4D 4-Channel Class-D Car Amplifier. This compact, high-performance amplifier is designed to deliver exceptional audio quality and power efficiency for your vehicle's sound system. This manual provides essential information for proper installation, operation, and maintenance of your amplifier. Please read it thoroughly before attempting installation or use.
Информации за безбедност
Секогаш почитувајте ги следниве безбедносни мерки за време на инсталацијата и работата:
- Disconnect the vehicle's negative battery terminal before any electrical work to prevent short circuits.
- Ensure all wiring is properly insulated to prevent damage and electrical hazards.
- Монтирајте го amplifier securely in a dry, well-ventilated area, away from direct sunlight, heat sources, and moisture.
- Користете соодветен калибар за поврзување на напојувањето, заземјувањето и звучниците како што е наведено во ова упатство.
- Не ракувајте со amplifier if it is damaged or malfunctioning. Refer to the troubleshooting section or seek professional assistance.
- Чувајте го ampлафира подалеку од деца.
Содржина на пакетот
Проверете дали сите артикли се присутни во пакувањето:
- Genius GLT-85.4D 4-Channel Ampживописен
- Монтажни хардвери (завртки)
- Упатство за употреба (овој документ)
Производот завршиview
The Genius GLT-85.4D is a compact 4-channel Class-D amplifier designed for high efficiency and powerful audio output. Its nanotechnology and SMD components contribute to its small size and robust performance.
Ampлафијатор Топ View

Оваа слика го прикажува врвот view of the Genius GLT-85.4D amplifier, highlighting its compact design and the "GENIUS AUDIO" branding along with the model number "GLT-85.4D" and "1000wMax" power rating.
Control Panel Layout (Input Side)
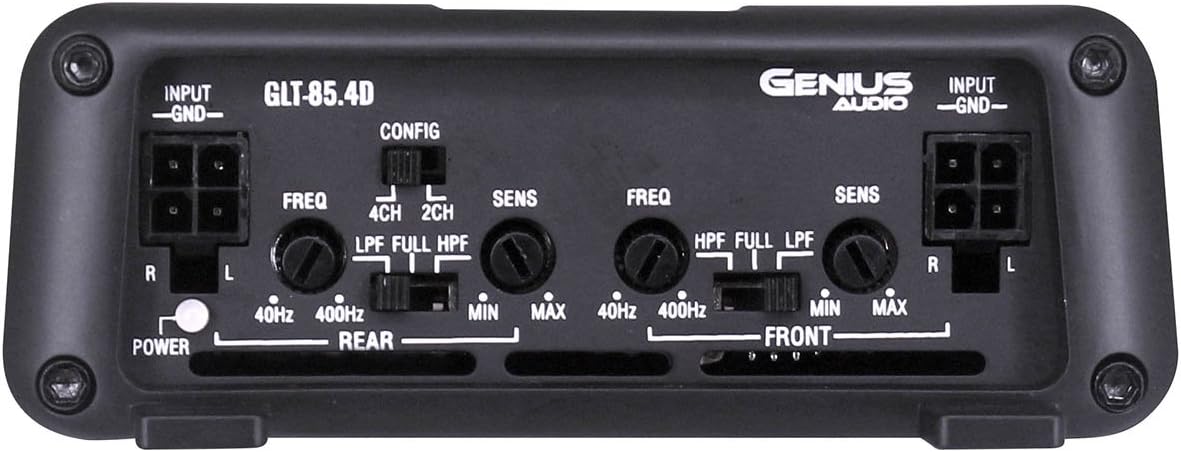
This image displays the input side of the GLT-85.4D amplifier, detailing the various controls and connections. It includes RCA input terminals (R, L) for both Rear and Front channels, gain controls (SENS MIN/MAX), frequency adjustment knobs (FREQ 40Hz-400Hz), and crossover switches (LPF, FULL, HPF) for both Rear and Front channels. A configuration switch (CONFIG 4CH, 2CH) is also visible, along with the Power indicator light.
Power and Speaker Terminal Layout (Output Side)

This image shows the output side of the GLT-85.4D amplifier, featuring the power and speaker terminals. From left to right, it includes the GROUND terminal, REMOTE turn-on terminal, +12V power terminal, and speaker output terminals for REAR BRIDGED (L+, L-, R+, R-) and FRONT BRIDGED (L+, L-, R+, R-) connections. The "4 Channel 'CLASS D' 2 ohm Stable Stereo Bridgeable MOSFET" text indicates key ampможности за лифирање.
Поставување и инсталација
Proper installation is crucial for optimal performance and safety. If you are unsure about any step, consult a professional installer.
Локација за монтирање
- Choose a location that is dry, well-ventilated, and protected from direct sunlight, excessive heat, and moisture.
- Обезбедете доволен проток на воздух околу ampладилник за правилно ладење.
- Монтирајте го amplifier securely to a solid surface using the provided mounting hardware to prevent movement during vehicle operation.
Приклучоци за жици
Пред да направите какви било поврзувања, исклучете го негативниот терминал на батеријата на возилото.
- Кабел за напојување (+12V): Run a heavy-gauge power cable (e.g., 8 AWG or thicker, depending on total system power) directly from the positive terminal of the vehicle's battery to the +12V terminal on the amplifier. Install an in-line fuse holder with an appropriate fuse (not supplied) within 18 inches (45 cm) of the battery.
- Заземјувачка жица (GND): Connect a heavy-gauge ground cable (same gauge as power wire) from the GND terminal on the ampповрзете го олабавувачот со чиста, необоена метална површина на шасијата на возилото. Обезбедете цврста врска со низок отпор.
- Remote Turn-On Wire (REMOTE): Connect a remote turn-on wire (typically 18 AWG) from your head unit's remote output to the REMOTE terminal on the ampладилник. Оваа жица го сигнализира ampосигурувач за вклучување и исклучување со вашата главна единица.
- RCA влезни кабли: Поврзете ги RCA каблите од пред-приклучокот на вашата главна единицаamp outputs (Front and Rear) to the corresponding RCA input jacks on the ampживописен.
- Жици за звучници: Поврзете ги звучниците со amplifier's speaker output terminals. Ensure correct polarity (+ to + and - to -). The GLT-85.4D supports 2-ohm stereo and 4-ohm bridged configurations. Refer to the "Power and Speaker Terminal Layout" image for terminal identification.
Забелешка: For bridged operation, connect the speaker to the designated bridged terminals (e.g., L+ and R- for a single channel in bridged mode). Consult a wiring diagram for specific bridged configurations.
Упатства за работа
Почетно вклучување
- Откако ќе се направат и потврдат сите врски, повторно поврзете го негативниот терминал на батеријата на возилото.
- Вклучете ја главната единица. amplifier's power indicator light should illuminate.
- Започнете со amplifier's gain (SENS) controls set to minimum.
- Play a familiar piece of music at a moderate volume level on your head unit.
Прилагодување на контролите
- Gain (SENS): Slowly increase the gain control for each channel until you hear distortion, then back off slightly. The gain control matches the ampВлезната чувствителност на ладилникот кон излезниот волумен на главната единицаtage. It is not a volume control.
- Crossover (LPF/FULL/HPF):
- LPF (нископропусен филтер): Allows only frequencies below the set point to pass. Typically used for subwoofers.
- HPF (високопропусниот филтер): Allows only frequencies above the set point to pass. Typically used for full-range speakers to prevent low-frequency distortion.
- ЦЕЛО: Овозможува да поминат сите фреквенции.
- Configuration (CONFIG 4CH/2CH): This switch determines how the input signals are routed to the ampзалажувачки канали.
- 4 CH: Uses all four RCA inputs (Front L/R, Rear L/R) to drive the four output channels independently.
- 2 CH: Uses only the Front L/R RCA inputs and internally routes them to all four output channels. Useful if your head unit only has two pre-amp outputs but you want to power four speakers.
Препорака: Fine-tune settings gradually and listen carefully to avoid speaker damage or poor sound quality.
Одржување
- Чувајте го ampИсчистете го ладилникот со бришење со мека, сува крпа. Не користете јаки хемикалии или абразивни средства за чистење.
- Обезбедете дека на ampЛадечките перки на lifier се без прашина и остатоци за да се одржи правилно дисипација на топлината.
- Периодично проверувајте ги сите жичени врски за затегнатост и корозија.
Решавање проблеми
| Проблем | Можна причина | Решение |
|---|---|---|
| Без струја / Ampлафијачот не се вклучува |
|
|
| Нема звук |
|
|
| Искривен звук |
|
|
| Ampлафијач Прегрее |
|
|
Спецификации
| Карактеристика | Детал |
|---|---|
| Модел | GLT-85.4D |
| Канали | 4 |
| Ampпожива класа | Класа-Д |
| Max Power @ 12.6V | 1700 W |
| RMS Power Output (4 Ohm Stereo @ 12.6V) | 85W x 4 |
| RMS Power Output (2 Ohm Stereo @ 12.6V) | 120W x 4 |
| RMS Power Output (4 Ohm Bridged @ 12.6V) | 240W x 2 |
| Minimum Supply Voltage | 8.5V |
| Максимална понуда Voltage | 16.8V |
| Idle Current Consumption @ 12.6VDC | 0.66 А |
| Musical Max Current Consumption @ 12.6VDC | 31 А |
| Димензии (Д x Ш x В) | 11.02 x 7.99 x 2.76 инчи |
| Тежина на ставката | 3.5 фунти |
Гаранција и поддршка
For warranty information, technical support, or service inquiries, please refer to the official Genius Audio webлокација или контактирајте го нивниот оддел за корисничка поддршка. Чувајте ја сметката како доказ за купување за гаранциски побарувања.
Службен Webсајт: Genius Audio Store on Amazon