EVERSECU B08B4RSS7J
EVERSECU 4-Camera Wireless Vehicle Backup System with 7-inch Monitor Instruction Manual
Model: B08B4RSS7J
Вовед
This manual provides comprehensive instructions for the installation, operation, and maintenance of your EVERSECU 4-Camera Wireless Vehicle Backup System. This system is designed to enhance safety and convenience for various vehicles, including RVs, SUVs, vans, pickups, trucks, and trailers, by providing clear rear, side, and front views.
The system features a 7-inch color monitor and four wireless cameras, offering a robust solution for parking assistance and general vehicle maneuvering. Please read this manual thoroughly before installation and use to ensure proper functionality and safety.

Image: The complete EVERSECU 4-Camera Wireless Vehicle Backup System, showing the 7-inch monitor, four wireless cameras, and a remote control.
Содржина на пакетот
Проверете дали сите артикли наведени подолу се вклучени во вашиот пакет. Доколку недостасуваат или се оштетени некои компоненти, ве молиме контактирајте ја службата за корисници.
- 4 x Wireless Car Backup Cameras
- 1 x 7-inch Color Car Monitor
- 5 x Antennas (4 for cameras, 1 for monitor)
- 4 x Power Cables for Cameras
- 1 x далечински управувач
- 1 x Monitor Mount Bracket
- 1 x Упатство за употреба (овој документ)

Image: All components included in the product package, laid out for inspection. This includes the monitor, cameras, antennas, power cables, remote, and mounting bracket.
Технички спецификации
7-инчен безжичен монитор
- Фреквенција на работа: 2400-2483.5 MHz (Standard: 2370Mhz)
- Формат на компресија: MPEG 4 video
- Пренесувајте фреквенција: 18 dBm
- Брзина на пренос: 12 Mbps
- FHSS: Спектар на ширење на фреквентен скокање
- Hopping Rate: 1200 / С
- Големина на екранот: 7-inch 16:9 widescreen
- Резолуција: 800 RGB x 480 dots
- Систем: PAL / NTSC
- Оперативен волtage: 12V / 24V DC
- Потрошувачка на енергија: ≤8.64W
- Работна температура: -10 ℃ до +65 ℃
- Изборна карактеристика: Аудио поддршка
2.4GHz Wireless Camera
- Стандард: NTSC: 510 * 492 pixels, PAL: 510 * 582 pixels
- Резолуција: 420 ТВЛ
- Објектив: 2.5 мм
- Минимално осветлување: 0 лукс (вклучено LED)
- Инфрацрвени светла: 18 ЕЕЗ
- Растојание за ноќно гледање: 15 метри
- Водоотпорна оцена: IP67
- Viewагол: 120°
- Оперативен волtage: 12V / 24V DC
- Работна температура: -20 ℃ до +70 ℃
- Материјал на школка: Алуминиум
- Материјал за монтирање: Метал
Општо
- Тежина на ставката: 3.76 фунти
- Батерии: 1 CR2 battery required (included for remote controller)
Поставување и инсталација
Proper installation is crucial for optimal performance. This system is suitable for RVs, SUVs, vans, pickups, trucks, and trailers. Consider the placement of cameras for rear, side, or front views based on your vehicle type and needs.
1. Camera Placement and Mounting
Determine the desired locations for each of the four cameras. Common placements include the rear of the vehicle for backup, and sides for blind spot monitoring. Ensure the chosen locations provide a clear line of sight and are protected from direct impact.
- Mount each camera securely using the provided metal brackets.
- Прилагодете го аголот на камерата за да го постигнете посакуваното viewинг област.

Image: An illustration demonstrating typical wireless camera placements on a truck and trailer, highlighting the 2.4G wireless signal range.
2. Powering the Cameras
Each camera requires a 12V-24V DC power supply. Connect the camera power cables to a suitable power source on your vehicle.
- For rear cameras, connect to the vehicle's reversing light circuit so the camera activates when reverse gear is engaged.
- For side or front cameras, connect to a constant 12V-24V power source or an accessory circuit that can be switched on/off as needed.
- Ensure all connections are secure and properly insulated to prevent short circuits and water damage.
3. Инсталација на монитор
Install the 7-inch monitor in a location that provides a clear view for the driver without obstructing the driving view или воздушни перничиња.
- Attach the monitor to the mount bracket.
- Secure the mount bracket to the dashboard or windshield using the provided adhesive pad or screws.
- Прилагодете го аголот на мониторот за оптимално viewинг.
4. Напојување на мониторот
The monitor can be powered via the included DC car charger or by wiring it directly to your vehicle's 12V/24V electrical system.
- Адаптер за запалка: Вклучете го полначот за автомобил во приклучокот за запалка на вашето возило.
- Direct Wiring: Connect the DC power cable to a switched 12V/24V power source (e.g., ignition-controlled circuit) to ensure the monitor turns on and off with the vehicle.
5. Поврзување со антена
Screw the antennas onto the designated ports on both the cameras and the monitor. Ensure they are tightened securely for optimal wireless signal transmission.
Операција
Once installed and powered, the system will automatically attempt to connect to the cameras. The monitor will display the camera feed.
Префрлување камера Views
- The 7-inch monitor supports 4-channel video input.
- Користете го V1/V2 button on the monitor or the remote controller to cycle through the connected camera views (Camera 1, Camera 2, Camera 3, Camera 4).
- The system typically displays one camera view во исто време.
Функции на далечинскиот управувач
The included remote controller allows for convenient adjustment of monitor settings and camera switching without directly touching the monitor.
- Копче за вклучување: Го вклучува или исклучува мониторот.
- Channel Switch Buttons: Selects the desired camera channel (V1, V2, V3, V4).
- Копче за мени: Accesses monitor settings (brightness, contrast, color, etc.).
- Копчиња за навигација: Се користи за навигација низ опциите на менито и прилагодување на вредностите.
Одржување
Regular maintenance ensures the longevity and optimal performance of your backup camera system.
- Cleaning Cameras: Периодично чистете ги леќите на фотоапаратот со мека, дamp крпа за отстранување на нечистотија, прашина или дамки од вода што може да го заматат viewИзбегнувајте абразивни средства за чистење.
- Cleaning Monitor: Use a soft, dry cloth to clean the monitor screen. For stubborn smudges, a screen-safe cleaning solution can be applied to the cloth (not directly to the screen).
- Проверете ги врските: Regularly inspect all power cables and antenna connections for signs of wear, corrosion, or looseness. Secure any loose connections.
- Хидроизолација: While cameras are IP67 waterproof, ensure that power cable entry points are sealed to prevent water ingress, especially after installation or maintenance.
- Замена на батерија: Replace the CR2 battery in the remote controller when its functionality diminishes.
Решавање проблеми
If you encounter issues with your EVERSECU backup camera system, refer to the following common problems and solutions:
No Image on Monitor / Black Screen
- Проверете ја моќноста: Ensure the monitor is receiving power. Verify the car charger is securely plugged in or direct wiring is correctly connected to a live circuit. Check the vehicle's fuse box if necessary.
- Моќност на камерата: Confirm that the cameras are powered on. Check their power connections to the vehicle's electrical system.
- Антенска врска: Ensure all antennas are securely attached to both the monitor and cameras.
- Избор на канал: Use the V1/V2 button on the monitor or remote to cycle through all camera channels.
Weak or Intermittent Signal / Fuzzy Picture
- Опструкции: Wireless signals can be affected by metal objects, vehicle structure, or other electronic devices. Try to minimize obstructions between the camera and monitor.
- Растојание: The effective wireless range is up to 50 meters in an open environment and up to 25 meters with obstacles. For longer vehicles like trailers, signal degradation may occur. Consider repositioning cameras or monitor for better line of sight.
- Ориентација на антената: Ensure antennas are oriented vertically for best reception.
- Пречки: Other 2.4GHz wireless devices (Wi-Fi, Bluetooth) can cause interference. Try to operate the system away from such sources if possible.
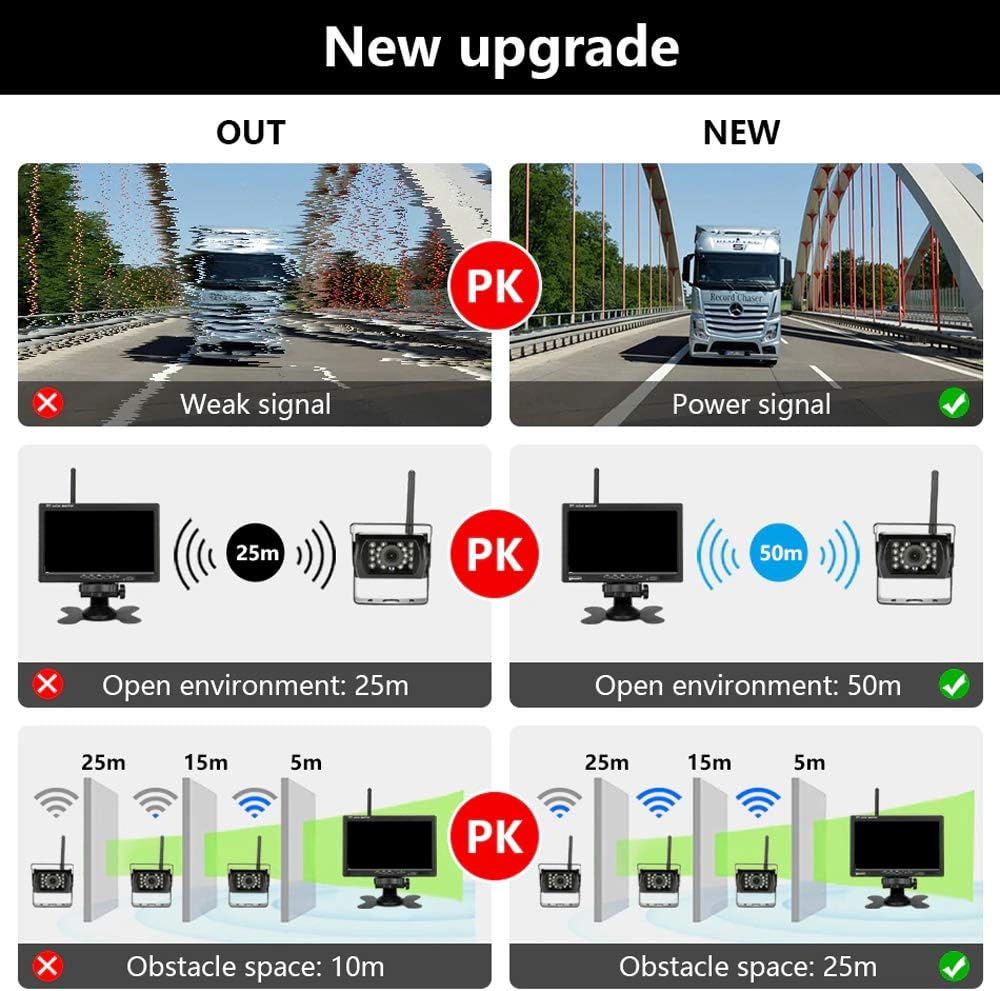
Image: A visual comparison illustrating the impact of signal strength and obstacles on wireless transmission range, showing improved performance with a stronger signal and reduced obstacles.
Сликата е наопаку или огледална
- Access the monitor's menu settings using the remote control. Look for options related to "Mirror Image" or "Flip Image" and adjust as needed.
Remote Controller Not Working
- Батерија: Replace the CR2 battery in the remote controller.
- Линија на погледот: Ensure there is a clear line of sight between the remote and the monitor's IR receiver.
System Stops Working After a Short Period
- Напојување: Verify the power supply to both the monitor and cameras is stable and within the specified voltage range (12V-24V DC). Fluctuations or insufficient power can cause intermittent operation.
- Прегревање: Ensure adequate ventilation around the monitor and cameras, especially in enclosed spaces.
- Лабави врски: Recheck all wiring connections for security.
Гаранција и поддршка
For warranty information, technical support, or assistance with installation and troubleshooting beyond this manual, please contact EVERSECU customer service. Refer to the product packaging or the official EVERSECU webстраница за најактуелните контакт информации.
Производител: ЕВЕРСЕКУ
За дополнителни ресурси, можете да ја посетите EVERSECU Store on Amazon.
Ask a question about this manual
Ask about setup, troubleshooting, compatibility, parts, safety, or missing instructions. Manuals+ will review the question and use this page’s manual context to help answer it.