1. Вовед
Thank you for choosing the nooa Cordless Hair Clippers. This professional haircut kit is designed for smooth and fast trimming, offering versatility and convenience for personal grooming. This manual provides essential information for the safe and effective use, maintenance, and care of your new hair clipper.
2. Содржина на пакетот
Ве молиме проверете дали сите артикли наведени подолу се вклучени во вашиот пакет:
- 1 x Машинка за коса
- 4 x Plastic Guide Combs (various lengths)
- 1 x Чешел за коса
- 1 x Hair Cutting Scissor
- 1 x четка за чистење
- 1 x сунѓер за чистење
- 1 x Заштитна капа
- 1 x USB кабел за полнење
- 1 x торба за складирање

Image 2.1: The nooa Cordless Hair Clipper shown with all its accompanying accessories, including guide combs, scissors, cleaning tools, charging cable, and storage bag.
3. Важни безбедносни инструкции
Ве молиме прочитајте ги и разберете ги сите безбедносни упатства пред да го користите овој производ. Непочитувањето на овие упатства може да резултира со електричен удар, пожар или сериозни повреди.
- Always turn off the hair clipper before attempting to remove or attach the cutter head.
- Do not wash the hair clipper with water while it is connected to the charging cable.
- Ensure the charging port is completely dry and free of water before connecting the USB charging cable.
- When the LED indicator displays a battery power level below 10%, it is recommended to charge the device promptly.
- Чувајте го овој производ подалеку од дофат на деца за да спречите несреќи.
4. Производот завршиview
The nooa Cordless Hair Clipper features a self-sharpening ceramic titanium alloy blade for precise cutting. It includes an adjustable trimming length setting directly on the clipper body and supports additional guide combs for extended length options. An LED display provides battery status and operational mode information.

Слика 4.1: Детален view of the clipper's precision blades, highlighting the ceramic cutter and titanium alloy components, along with the adjustable length dial.

Image 4.2: The hair clipper is depicted next to a sleeping infant, emphasizing its low noise operation (below 60 decibels) during use.
5. Полнење на уредот
The hair clipper is equipped with a rechargeable 2500mAh lithium battery. To charge the device:
- Осигурајте се дека машинката за стрижење е исклучена.
- Connect the provided USB charging cable to the charging port on the bottom of the clipper.
- Вклучете го другиот крај од USB кабелот во компатибилен USB адаптер за напојување (не е вклучен) или во USB порт.
- The LED indicator will display the charging status and current battery percentage.
A full charge typically takes approximately 3 hours and provides up to 200 minutes of cordless operation. It is recommended to use the provided USB charging cable for optimal performance.

Image 5.1: The hair clipper is shown connected to its USB charging cable, with the LED display indicating battery charge status and operational modes.
6. Setup and Length Adjustment
The clipper offers precise length adjustment through its integrated dial and additional guide combs.
6.1 Прилагодување на должината на сечење
The clipper itself has 5 accurate trimming length settings: 0.8mm, 1.2mm, 1.6mm, 2.0mm, and 2.5mm. Rotate the dial on the clipper body to select your desired length.
6.2 Прикачување на чешли-водичи
For longer cutting lengths, attach one of the four plastic guide combs. These combs provide additional trimming lengths, extending the range from 0.8mm up to 14.5mm when combined with the clipper's internal settings.
- Осигурајте се дека машинката за стрижење е исклучена.
- Изберете го посакуваниот водилски чешел.
- Align the comb with the clipper head and push it firmly until it clicks into place.
- To remove, gently pull the comb away from the clipper head.
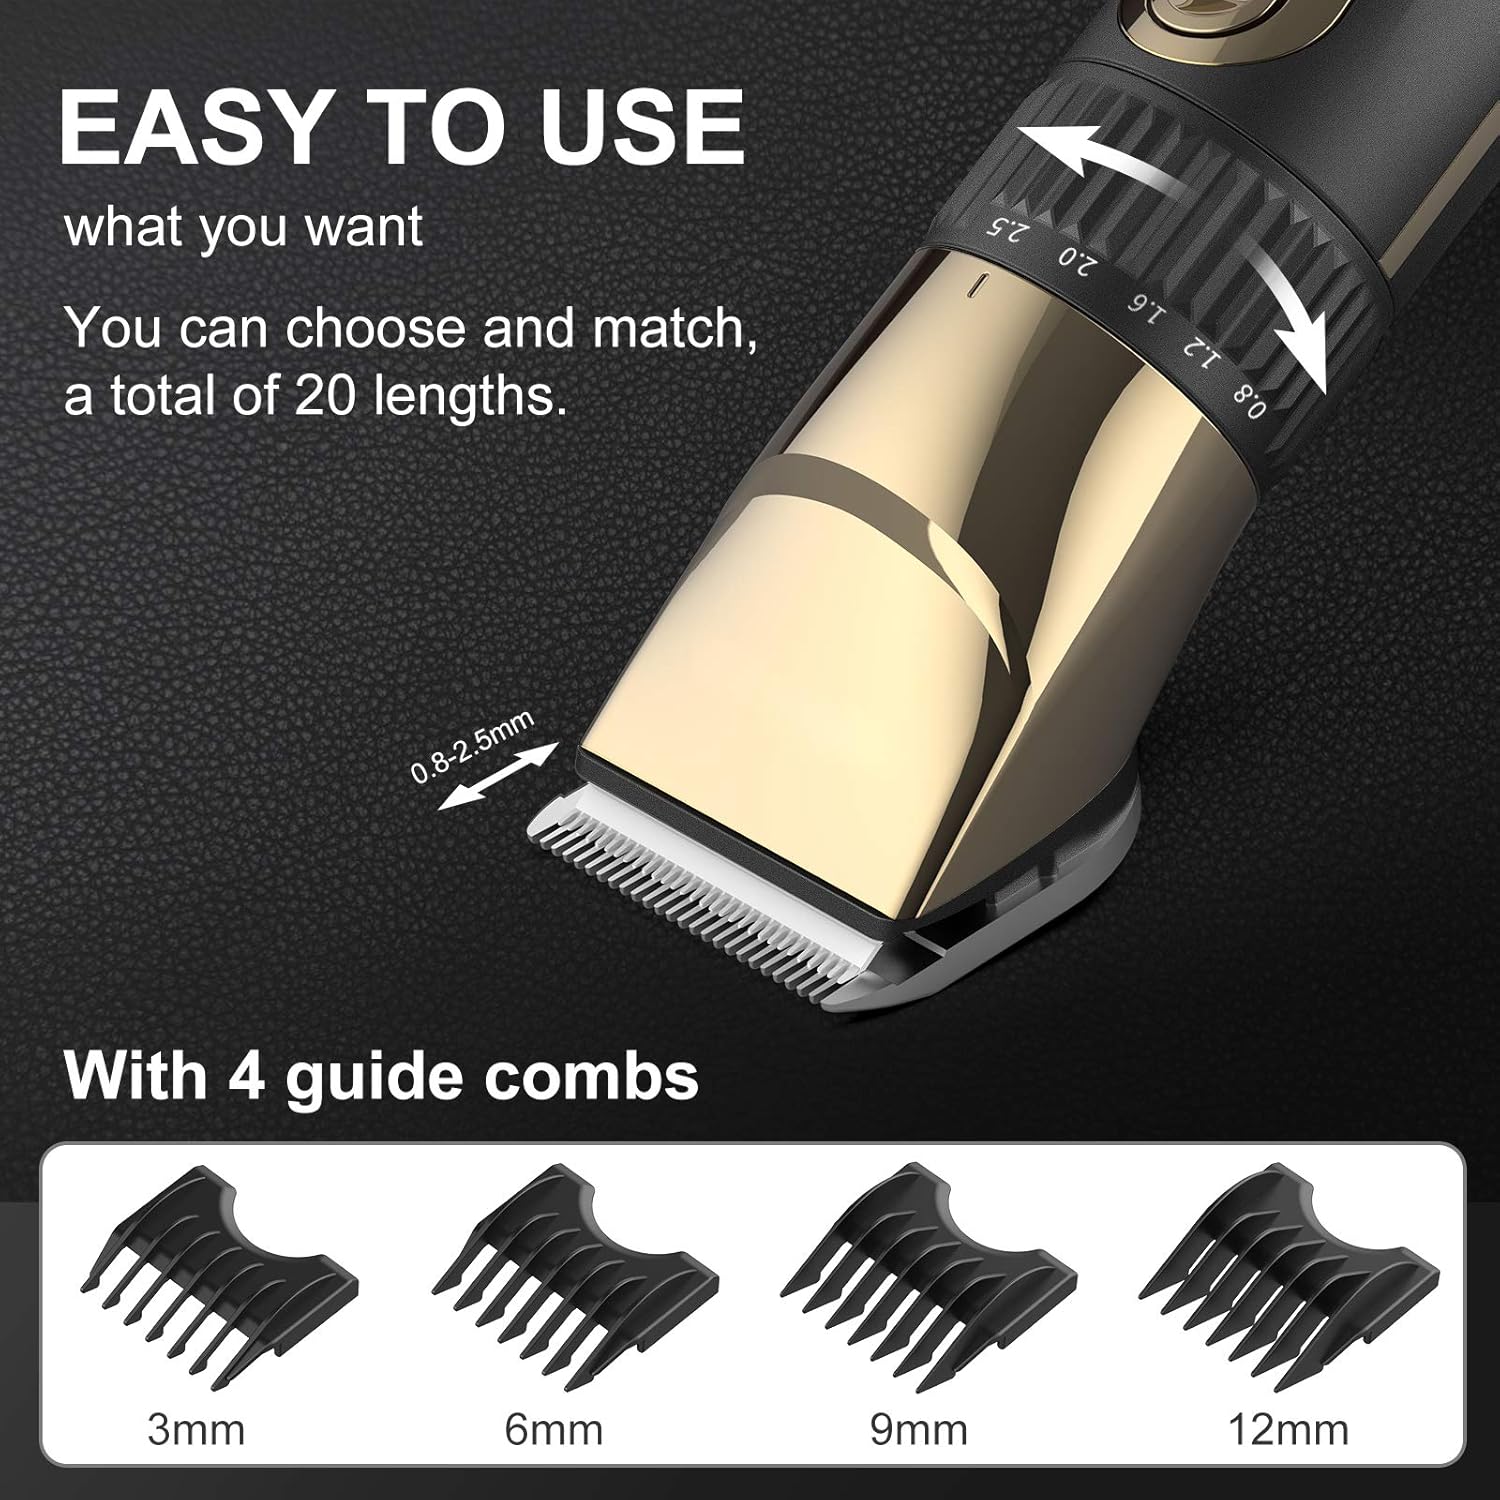
Image 6.1: The hair clipper's adjustable length dial is shown in detail, alongside the four interchangeable guide combs (3mm, 6mm, 9mm, 12mm) that offer a total of 20 length options.
7. Ракување со машинката за шишање
The nooa hair clipper is designed for ease of use, suitable for both beginners and experienced users.
- Вклучување/исклучување: Притиснете го копчето за вклучување за да ја вклучите или исклучите машинката за шишање.
- Поставки за брзина: The clipper offers two speed settings. The first speed setting operates at less than 60 decibels, suitable for general use or sensitive areas. The second speed setting provides more power for thicker or coarser hair, or for faster trimming.
- Сечење: Hold the clipper firmly and move it against the direction of hair growth for an even cut. Use the included hair comb to guide and lift hair as needed.

Image 7.1: A collage demonstrating the versatility of the nooa hair clipper, showing its use for beard trimming, children's haircuts, and professional-style fades.
8. Одржување и чистење
Regular cleaning and maintenance will ensure the longevity and optimal performance of your hair clipper.
8.1 Водоотпорен дизајн
The nooa hair clipper is waterproof, allowing for easy cleaning under running water. However, ensure the charging port is dry before charging.
8.2 Чистење на сечилата
- Исклучете го клиперот.
- Gently push the blade head to detach it from the clipper body.
- Rinse the detached blade head under running water to remove hair clippings.
- Use the provided cleaning brush to remove any stubborn hair or debris.
- Оставете главата на сечилото целосно да се исуши на воздух пред повторно да ја прикачите на машинката за шишање.
- Periodically apply a small amount of clipper oil (not included) to the blades for smooth operation and to prevent rust.

Image 8.1: A three-step visual guide demonstrating how to remove the blade head from the clipper and rinse it under running water for cleaning.
9 Смена на проблеми
If you encounter any issues with your nooa hair clipper, please refer to the following common solutions:
| Проблем | Можна причина | Решение |
|---|---|---|
| Clipper does not turn on or has low power. | Батеријата е испразнета. | Charge the clipper fully (approximately 3 hours). Check the LED display for battery level. |
| Clipper is not cutting effectively or pulls hair. | Blades are dull, dirty, or not properly aligned. | Clean the blades thoroughly. Ensure no hair is trapped. Apply clipper oil. If blades are dull, consider professional sharpening or replacement. |
| Машината за машинка испушта необичен шум. | Blades may be dry or misaligned. | Turn off the clipper, remove and clean the blades, then reattach them securely. Apply clipper oil. If the issue persists, contact customer support. |
10. Спецификации
| Карактеристика | Детал |
|---|---|
| Бренд | nooa |
| Број на модел | Г-9932 |
| Материјал за сечилото | Ceramic, Titanium Alloy |
| Извор на енергија | Напојување со батерии (безжична/со кабелска употреба) |
| Тип на батерија | 1 литиум полимерна батерија (вклучена) |
| Капацитет на батеријата | 2500 mAh |
| Време на полнење | Прибл. 3 часа |
| Време на извршување | Прибл. 200 минути |
| Водоотпорен | Да |
| Ниво на бучава | Less than 60 decibels (at first speed setting) |
| Димензии на производот | 22 x 10 x 5.5 cm |
| Тежина на производот | 442 гр |
| UPC | 791711043317 |
11. Гаранција и поддршка
The nooa Cordless Hair Clippers come with a 12-month quality warranty from the date of purchase. This warranty covers manufacturing defects under normal use. Please retain your proof of purchase for warranty claims.
For technical support, warranty service, or any questions regarding your product, please contact nooa customer service through the retailer where the product was purchased.