1. Вовед
This manual provides essential information for the safe and efficient operation of your BETOPPER LM0910N LED Spider Moving Head Light. Please read this manual thoroughly before installation, operation, or maintenance. Keep this manual for future reference.
2. Информации за безбедност
- Ensure the product is connected to a power supply within the specified voltage range (AC 100–240V; 50–60Hz).
- Always disconnect the power supply before cleaning, maintenance, or when the unit is not in use.
- This product is designed for indoor use only. Avoid exposure to rain, moisture, or extreme temperatures.
- Обезбедете соодветна вентилација околу уредот за да спречите прегревање. Не ги блокирајте отворите за вентилација.
- Избегнувајте директно изложување на очите на изворот на светлина.
- Installation should be performed by qualified personnel, ensuring secure mounting and proper electrical connections.
- Не обидувајте се сами да го поправите уредот. Сите сервиси обратете се кај квалификуван сервисер.
3. Содржина на пакетот
По распакувањето, проверете дали сите предмети наведени подолу се присутни и во добра состојба:
- 1 x LED Spider Moving Head Light (LM0910N)
- 1 x кабел за напојување
- 1 x држач за монтажа
- 2 x завртки
- 1 x Упатство за користење (англиски)
4. Производот завршиview
The BETOPPER LM0910N is a compact and lightweight LED Spider Moving Head Light designed for various entertainment venues. It features a unique triangular design with 9 individual 4-in-1 RGBW LEDs, offering a wide range of color mixing and dynamic beam effects. The unit supports infinite rotation on the X-axis and 90° movement on the Y-axis, allowing for versatile lighting patterns.

Слика 4.1: Различни views of the BETOPPER LM0910N LED Spider Moving Head Light, illustrating its compact design and dimensions.
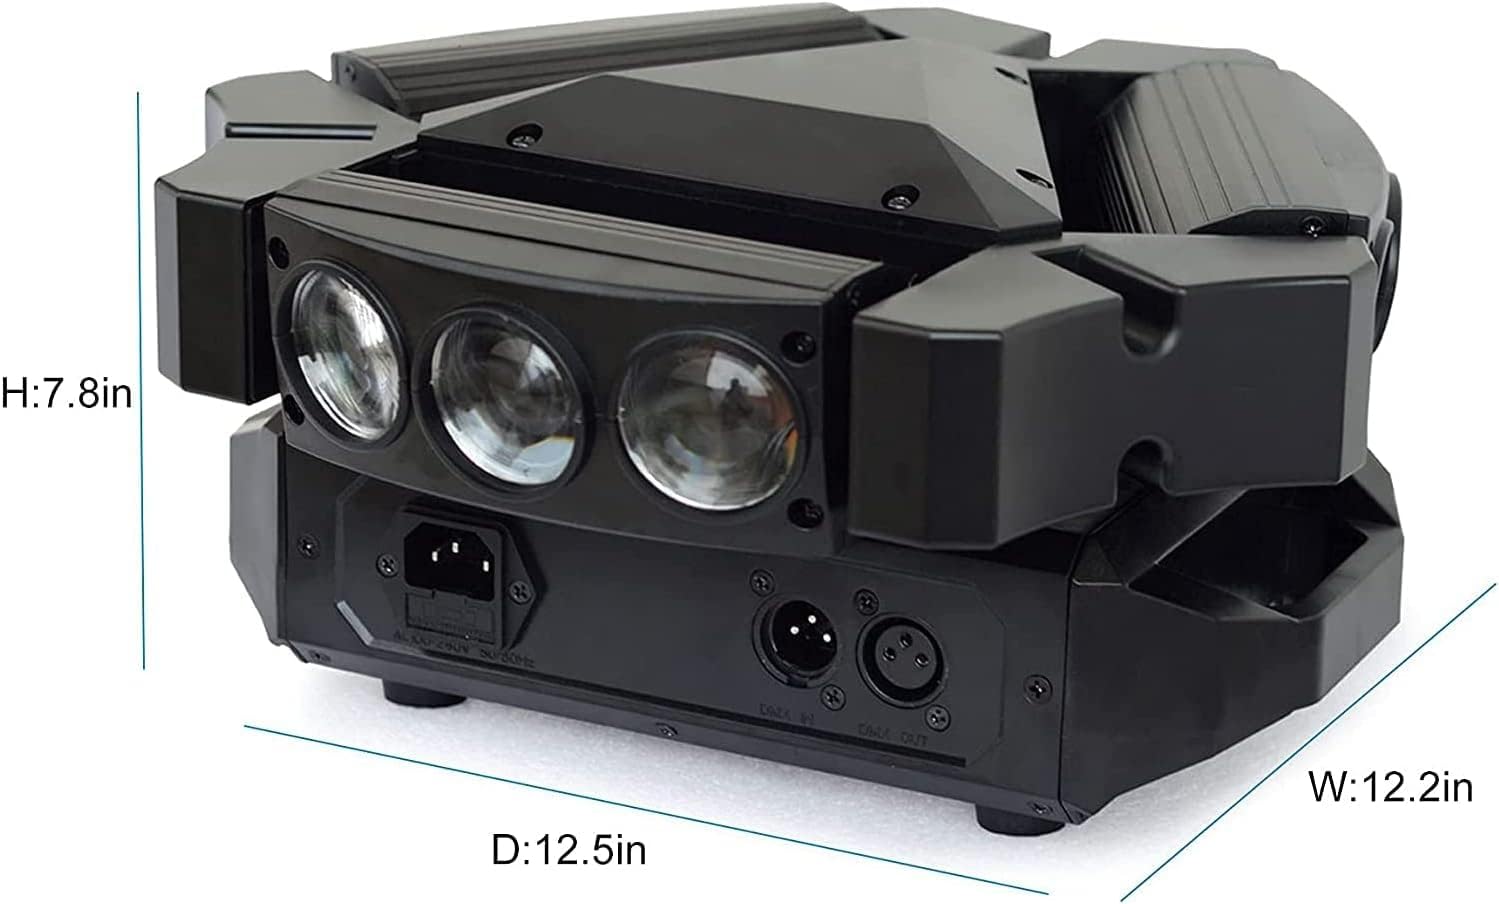
Figure 4.2: Detailed dimensions of the BETOPPER LM0910N LED Spider Moving Head Light.
5. Поставување
The LM0910N can be installed in various positions:
- Виси: Use the provided mounting bracket to securely attach the light to a truss or ceiling. Ensure all clamps and safety cables are properly secured.
- Монтирање на ѕид: The bracket can also be used to mount the light on a wall. Ensure the wall material can support the weight of the fixture.
- Поставување на подот: The unit can be placed directly on a flat, stable surface. Ensure it is not easily knocked over.
After mounting, connect the power cable to a suitable power outlet. For DMX control, connect DMX cables from your DMX controller to the DMX IN port, and from DMX OUT to the next fixture in the chain (if applicable).
6. Работни режими
The LM0910N offers four primary control modes:
- Автоматски режим: The light operates through integrated pre-programmed sequences, changing effects automatically.
- Режим на активиран звук: The light reacts to sound frequencies from music, creating dynamic effects synchronized with the audio.
- DMX512 режим: Allows professional control over all functions of the light using a DMX console. This mode offers precise control over color, movement, strobe, and dimming.
- Режим Master-Slave: Connect multiple LM0910N units. Designate one unit as the master, and the others will follow its programming, moving and changing effects synchronously.

Figure 6.1: The light projecting green beams, demonstrating its dynamic capabilities.
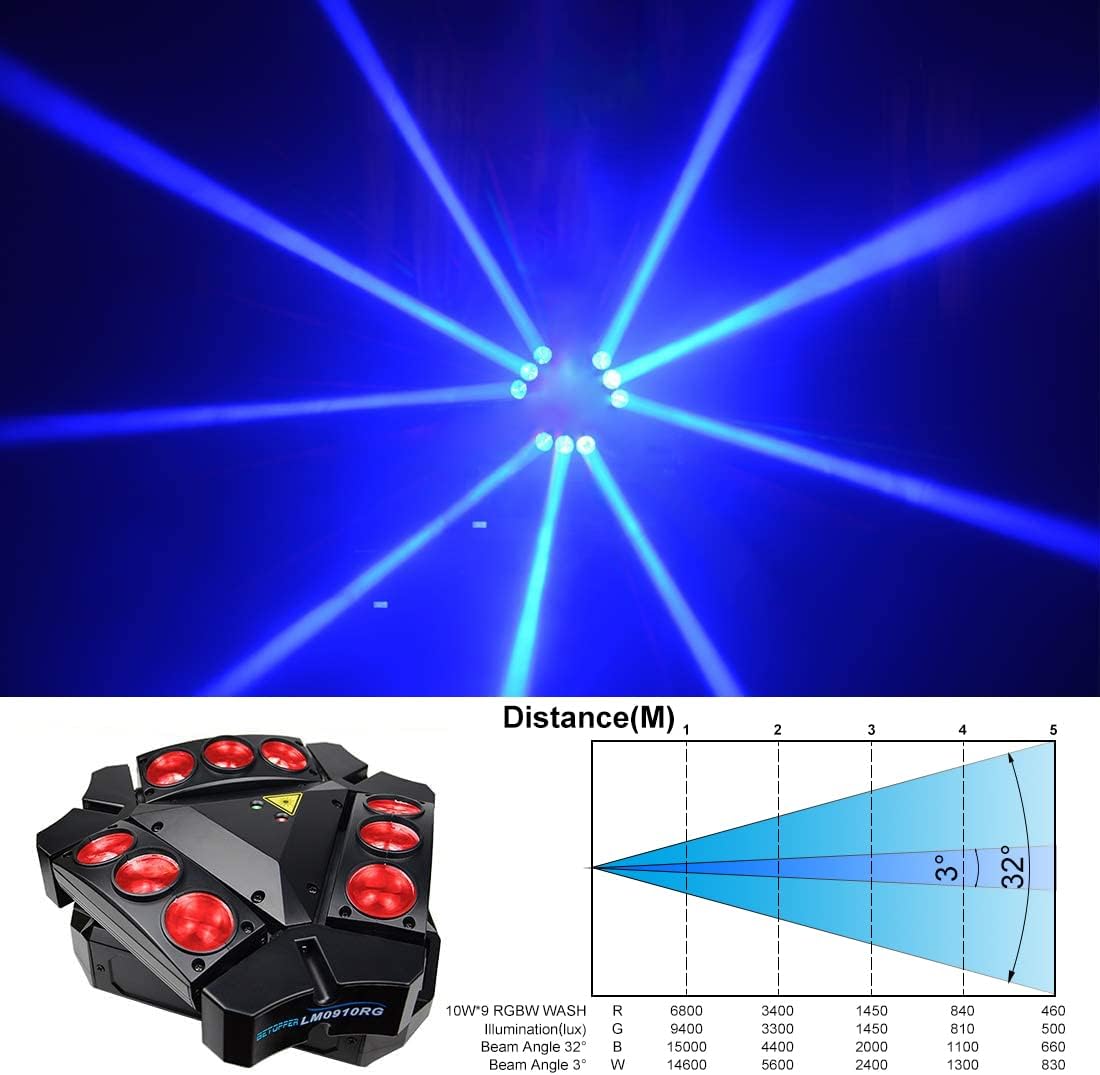
Figure 6.2: The light projecting blue beams, showcasing color options.

Figure 6.3: The light projecting various colored beams simultaneously.
7. DMX Channel Modes
The LM0910N supports two DMX channel modes for varying levels of control:
- 9-канален режим: Овозможува основна контрола врз основните функции.
- 11-канален режим: Offers extended control, allowing for more intricate programming and effects.
Refer to the DMX chart in the separate DMX protocol document (if provided) for detailed channel assignments and values.
8. Технички спецификации
| Карактеристика | Спецификација |
|---|---|
| Извор на светлина | 9 x 10W RGBW LED диоди |
| Номинална моќност | 35 W |
| Влез волуменtage | AC 100–240V; 50–60Hz |
| Режими на канали DMX | 9/11 канали |
| Контролни режими | Auto, Sound Activated, DMX512, Master-Slave |
| X-Axis Scan Angle | Бесконечна ротација |
| Y-Axis Scan Angle | 90° |
| Затемнување | 0-100% Линеарно затемнување |
| Животниот век | 5000 ~ 10000 часа |
| Димензии на производот | 17.5 x 14.6 x 28.6 cm (6.9 x 5.7 x 11.3 инчи) |
| Тежина на производот | 3.5 кг (7.7 фунти) |
| Работна средина | Indoor 10–40 °C (50–105 °F) |
| Материјал | Пластика |
| Сертификати | CE, RoHS, FCC |
9. Одржување
Regular maintenance ensures optimal performance and extends the lifespan of your light:
- Чистење: Periodically clean the lenses and exterior housing with a soft, lint-free cloth. Do not use abrasive cleaners or solvents.
- Инспекција: Regularly check power cables, DMX cables, and mounting hardware for any signs of wear, damage, or loose connections.
- Вентилација: Осигурајте се дека отворите за вентилација се чисти од прашина и остатоци за да се спречи прегревање.
10 Смена на проблеми
Доколку наидете на проблеми, погледнете ги следните вообичаени проблеми и решенија:
- Без моќност:
- Проверете дали кабелот за напојување е безбедно поврзан и со уредот и со штекерот.
- Проверете дали штекерот е функционален.
- Check the fuse (if accessible and replaceable).
- Нема излез на светлина:
- Осигурајте се дека уредот прима струја.
- In DMX mode, check DMX signal and channel settings. Ensure the dimmer channel is not set to 0.
- In Auto or Sound mode, ensure the mode is correctly selected.
- No Movement/Incorrect Movement:
- In DMX mode, verify DMX signal and pan/tilt channel settings.
- Ensure the unit is not physically obstructed.
- Recalibrate the unit by power cycling it.
- Проблеми со контролата на DMX:
- Check DMX cable connections and ensure they are 3-pin XLR (or 5-pin if applicable).
- Verify the DMX address of the fixture matches the address set on your controller.
- Ensure the DMX controller is sending a valid signal.
- Пробај со друг DMX кабел.
Доколку проблемите продолжат откако ќе се обидете со овие решенија, контактирајте ја корисничката поддршка.
11. Гаранција и поддршка
BETOPPER products are manufactured to high-quality standards. For warranty information, please refer to the warranty card included with your purchase or contact BETOPPER customer support directly. For technical assistance or service inquiries, please visit the official BETOPPER webсајт или контактирајте со нивниот оддел за услуги на клиентите.