1. Важни безбедносни информации
Please read all instructions carefully before using the EVTSCAN Projection Clock. Keep this manual for future reference.
- Не го изложувајте уредот на екстремни температури, директна сончева светлина или висока влажност.
- Избегнувајте испуштање или изложување на часовникот на силни удари.
- Не обидувајте се сами да го расклопите или поправите уредот. Контактирајте квалификуван сервисер.
- Use only the specified power adapter (DC 5.0V, 1.2A) or appropriate batteries (2xAAA, not included).
- Да се чува подалеку од дофат на деца.
2. Производот завршиview
The EVTSCAN Projection Clock is a versatile digital alarm clock featuring a 3-inch backlit LCD screen that displays time, date, day of the week, temperature, and humidity. It includes a projection function to display time and temperature on a wall or ceiling, dual alarms with snooze, and a USB port for charging mobile phones.
Клучни карактеристики:
- 12/24-hour time format display.
- Date and day of the week display (7 languages for week).
- Temperature detection (-9℃ to +50℃) and humidity detection (20% to 95%).
- Projection function with 180-degree rotation for time and temperature.
- Dual alarm clocks with slowly increasing волумен.
- 5-minute snooze function.
- USB порт за полнење за мобилни уреди.
- Adjustable backlight with 4 levels (high, medium, low, off).

Слика 2.1: Предна страна view of the EVTSCAN Projection Clock, showing the LCD display and projection lens.
3. Содржина на пакетот
По распакувањето, проверете дали сите предмети наведени подолу се присутни и во добра состојба:
- 1 x EVTSCAN Projection Clock
- 1 x USB кабел
- 1 x Англиски кориснички прирачник
Note: 2xAAA batteries are required for battery power and are not included in the package.
4. Поставување
4.1 Напојување на уредот
The EVTSCAN Projection Clock can be powered by either AAA batteries or via the included USB cable.
4.1.1 Инсталација на батерија
- Пронајдете го капакот на преградата за батерии на задната страна од часовникот.
- Отворете го капакот со лизгање.
- Вметнете две (2) AAA батерии, внимавајќи на правилниот поларитет (+/-).
- Добро затворете го капакот на преградата за батерии.
Note: When powered by batteries, the backlight will only light up for 8 seconds when activated to conserve power. The projection lamp will also light up for 8 seconds.
4.1.2 USB приклучок за напојување
- Connect the small end of the provided USB cable to the DC 5.0V 1.2A input port on the back of the clock.
- Connect the larger end of the USB cable to a compatible USB power adapter (not included) or a powered USB port.
Note: When powered by USB, the backlight and projection lamp can remain continuously on, with adjustable brightness for the backlight.
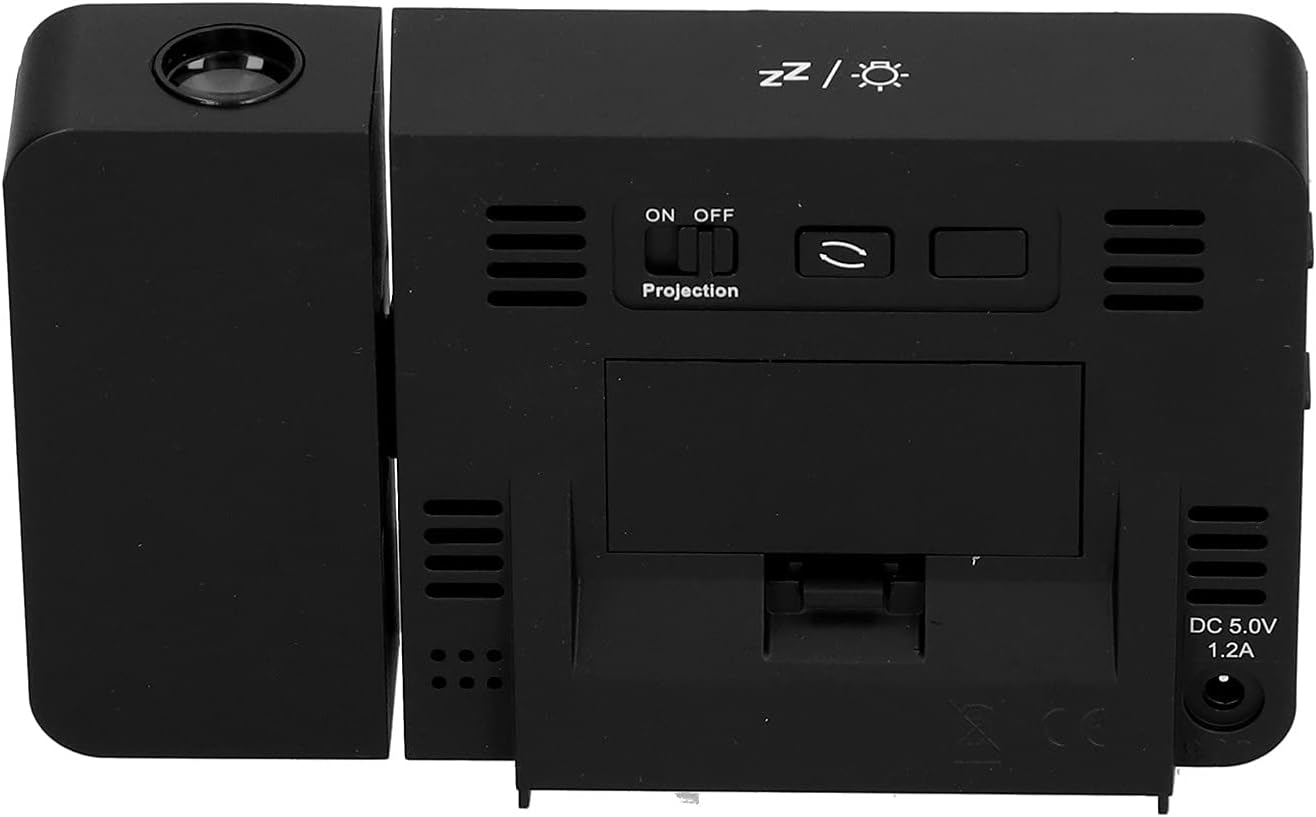
Слика 4.1: Заден дел view of the clock, indicating the battery compartment and DC 5.0V 1.2A power input.
5. Упатства за работа
5.1 Функции на копчињата
Familiarize yourself with the control buttons located on the front and sides of the clock:
- ВРЕМЕ: Влегува во режим на поставување време.
- АЛАРМ: Enters alarm setting mode.
- +: Increases values, switches 12/24HR format, adjusts backlight.
- -: Decreases values, switches temperature units (℃/℉).
- Projection ON/OFF Switch: Activates or deactivates the projection. (Located on the back/side)
- Alarm 1 ON/OFF Switch: Activates or deactivates Alarm 1. (Located on the side)
- Alarm 2 ON/OFF Switch: Activates or deactivates Alarm 2. (Located on the side)
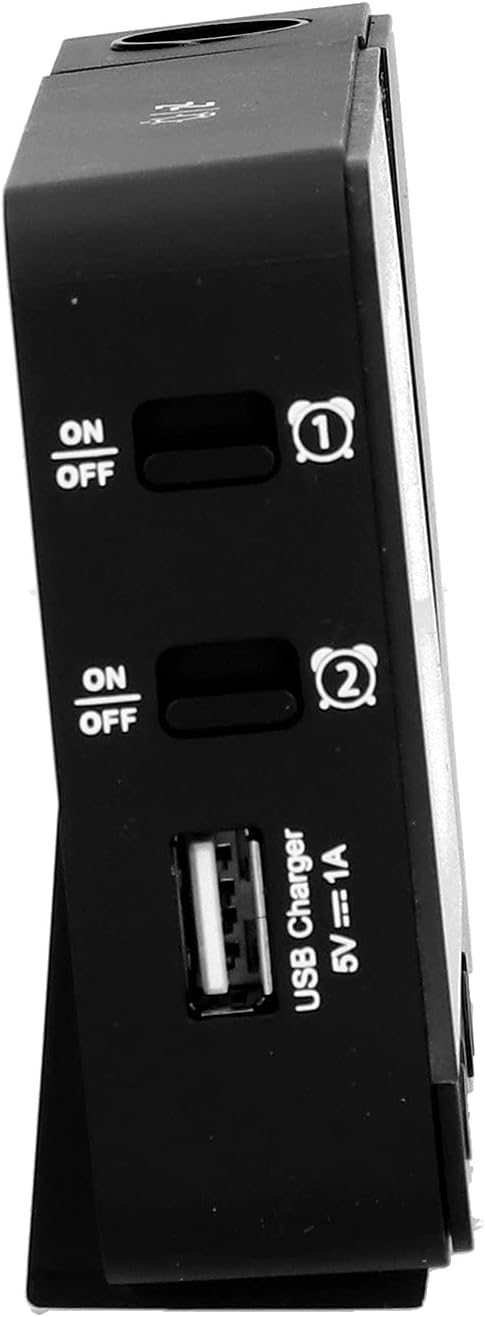
Слика 5.1: Страна view showing Alarm 1 and Alarm 2 ON/OFF switches, and the USB charging port.
5.2 Поставување време и датум
- Притиснете и задржете го ВРЕМЕ button to enter time setting mode. The hour display will flash.
- Користете го + or - копчиња за прилагодување на часот.
- Притиснете ВРЕМЕ повторно за да го потврдите часот и да преминете на поставката за минути. Прилагодете со + or -.
- Продолжете со притискање ВРЕМЕ to cycle through setting year, month, and day. Adjust each with + or -.
- Откако ќе го поставите денот, притиснете ВРЕМЕ уште еден последен пат за да излезете од режимот на поставување.
- За да префрлате помеѓу 12-часовен и 24-часовен формат, притиснете го копчето + button during normal time display.
- To switch between Celsius (℃) and Fahrenheit (℉) for temperature, press the - button during normal time display.
5.3 Поставување аларми
The clock features two independent alarms (Alarm 1 and Alarm 2).
- Притиснете и задржете го АЛАРМ button to enter Alarm 1 setting mode. The Alarm 1 hour display will flash.
- Користете го + or - копчиња за прилагодување на часот на алармот.
- Притиснете АЛАРМ again to confirm the hour and move to Alarm 1 minute setting. Adjust with + or -.
- Притиснете АЛАРМ again to move to Alarm 2 hour setting, and repeat the process for Alarm 2.
- After setting Alarm 2 minutes, press АЛАРМ уште еден последен пат за да излезете од режимот на поставување.
- To activate or deactivate an alarm, use the corresponding Аларм 1 ВКЛУЧЕНО/ИСКЛУЧЕНО or Аларм 2 ВКЛУЧЕНО/ИСКЛУЧЕНО switch on the side of the clock. An alarm icon will appear on the display when active.
5.3.1 Функција за одложување
When an alarm sounds, press any button (except the alarm ON/OFF switch) to activate the 5-minute snooze function. The alarm will sound again after 5 minutes. To turn off the alarm completely, slide the corresponding alarm ON/OFF switch to OFF.
5.4 Функција за проекција
The clock can project the time and temperature onto a wall or ceiling.
- Лоцирајте го Проекција Вклучено/Исклучено switch on the back of the clock. Slide it to ON to activate the projection.
- Adjust the angle of the projection arm (the part with the lens) to direct the projection as desired. The arm can rotate nearly 180 degrees.
- The projection will display the current time and temperature in a soft red color.

Слика 5.2: Страна view showing the projection arm extended and ready for use.

Слика 5.3: The clock projecting time and temperature onto a wall in a bedroom setting.
5.5 Прилагодување на задно осветлување
When the clock is powered by USB, the backlight can be adjusted to four levels: high, medium, low, or off. Repeatedly press the + button during normal time display to cycle through the brightness levels.
When powered by batteries, the backlight will illuminate for 8 seconds when any button is pressed, then turn off to conserve power.
5.6 USB порта за полнење
The clock features a USB charging port (5V=1A) on its side. You can use this port to charge your mobile phone or other small electronic devices while the clock is connected to USB power.
Note: The USB charging port only functions when the clock is powered via the USB cable. It does not work when the clock is running on battery power.
6. Одржување
6.1 Чистење
- Избришете ја површината на часовникот со мека, сува крпа.
- Do not use abrasive cleaners, solvents, or chemical sprays, as these may damage the finish or electronic components.
- Keep the projection lens clean for clear projection. Use a soft, lint-free cloth.
6.2 Замена на батеријата
When the display becomes dim or the clock functions erratically while on battery power, it's time to replace the AAA batteries. Refer to Section 4.1.1 for battery installation instructions. Always replace both batteries at the same time with new ones.
7 Смена на проблеми
| Проблем | Можна причина | Решение |
|---|---|---|
| Приказот на часовникот е празен или затемнет. | No power, low batteries, or USB cable not connected. | Check battery installation and replace if necessary. Ensure USB cable is securely connected to a power source. |
| Projection is unclear or not visible. | Projection switch is OFF, lens is dirty, or projection distance is too far/close. | Ensure Projection switch is ON. Clean the projection lens. Adjust the clock's distance from the projection surface. |
| Алармот не се огласува. | Алармот не е поставен или е деактивиран. | Verify alarm time is set correctly. Ensure the corresponding Alarm ON/OFF switch is in the ON position. |
| USB-портата за полнење не работи. | Clock is running on battery power, or USB cable is not connected to a power source. | Ensure the clock is powered via the USB cable and connected to a functional power adapter. |
| Неточно време/датум. | Time/date not set correctly. | Погледнете го делот 5.2 за ресетирање на времето и датумот. |
8. Спецификации
| Модел: | B0CLGDFCGX |
| Бренд: | EVTSCAN |
| Материјал: | ABS (акрилонитрил бутадиен стирен) |
| Димензии на производот: | Приближно 13.5 x 8 x 2.5 см (5.3 x 3.1 x 1.0 инчи) |
| Тежина: | Прибл. 242 g (8.5 oz) |
| Тип на приказ: | Дигитален LCD екран со позадинско осветлување |
| Извор на енергија: | 2xAAA batteries (not included) or DC 5.0V 1.2A via USB cable |
| Излез за полнење преку USB: | 5V=1А |
| Опсег на детекција на температура: | -9℃ to +50℃ (1℃ resolution) |
| Опсег на откривање на влажност: | 20% до 95% (резолуција од 1%) |
| Temperature/Humidity Calibration Time: | 30 секунди |
| Нивоа на задно осветлување: | 4 levels (High, Medium, Low, Off) when USB powered; 8s illumination when battery powered. |
| Проекција Лamp: | Always on when USB powered; 8s illumination when battery powered. |

Слика 8.1: Product dimensions: 5.3 inches wide by 3.1 inches high.
9. Гаранција и поддршка
EVTSCAN products are manufactured to high quality standards. For specific warranty information, please refer to the warranty card included with your purchase or contact your retailer.
If you encounter any issues or have questions regarding your EVTSCAN Projection Clock, please contact the seller or EVTSCAN customer support for assistance. Please have your model number (B0CLGDFCGX) ready when contacting support.
За дополнителна помош, можете да ја посетите EVTSCAN Store on Amazon.