1. Вовед
Thank you for choosing the JOOM JU011-12 Contactless Kitchen Faucet. This manual provides essential information for the safe installation, operation, and maintenance of your new kitchen faucet. Please read these instructions thoroughly before installation and keep them for future reference.
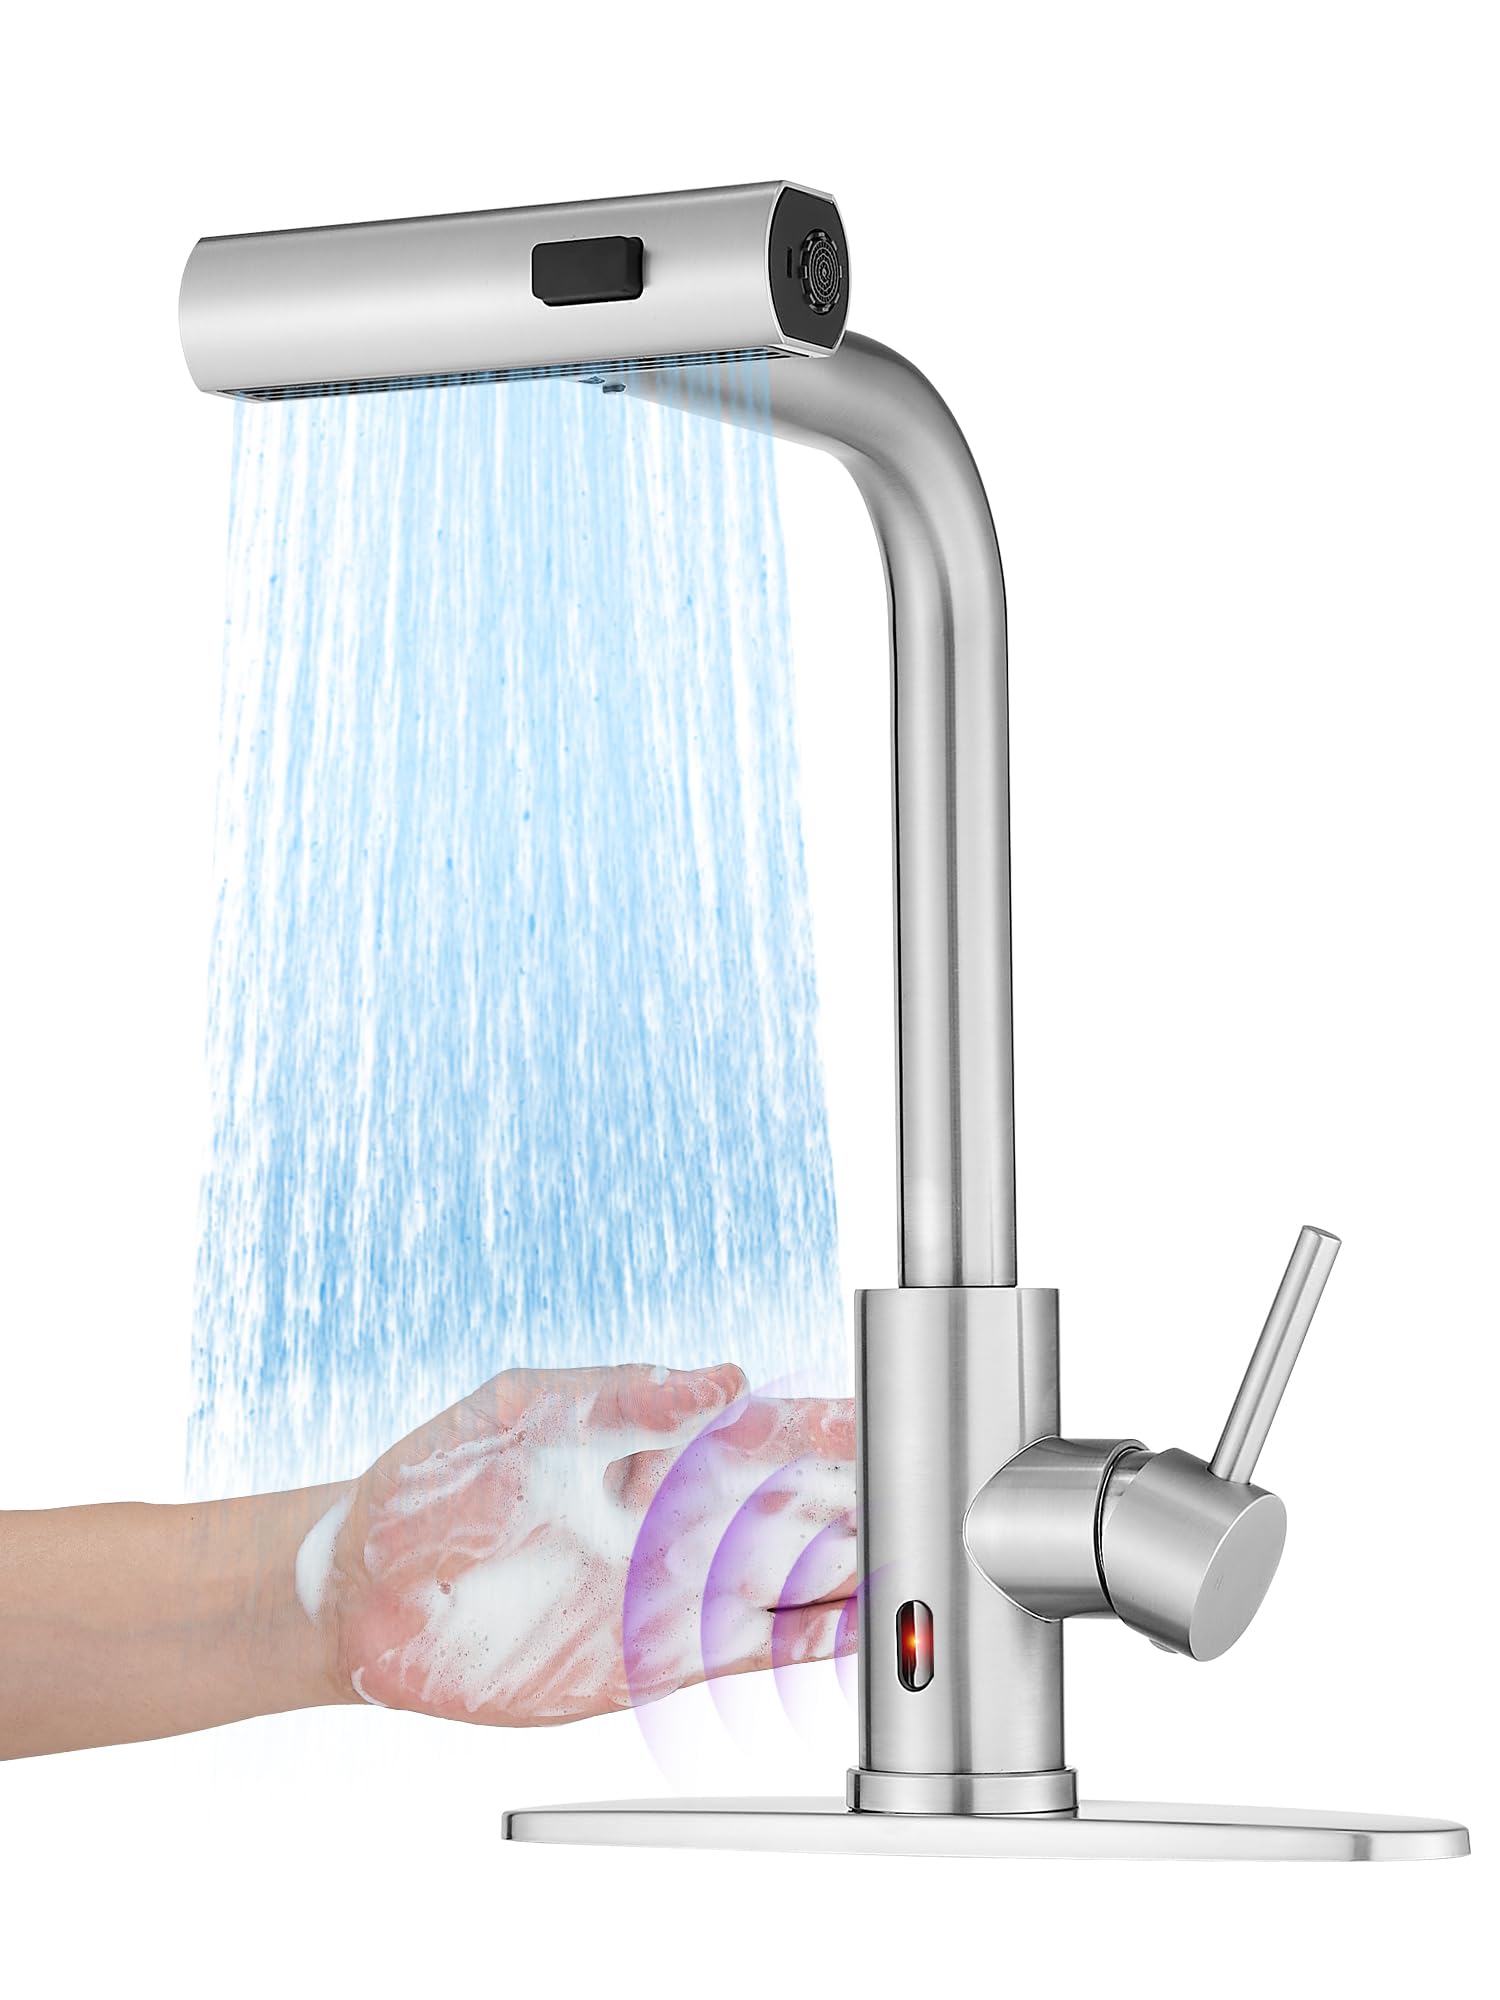
Image: The JOOM JU011-12 Contactless Kitchen Faucet, showcasing its modern design and brushed stainless steel finish.
2. Карактеристики на производот
- Бесконтактно работење: Equipped with intelligent chips and a responsive sensor for hands-free water activation.
- 3-in-1 Multi-mode Sprayer: Features Stream, Broom, and Rain spray modes for versatile cleaning tasks.
- Распрскувач со повлекување надолу: Includes a 24-inch braided hose with 360° rotation for extended reach and flexibility.
- Auto-Retraction Technology: Ensures the sprayer hose smoothly retracts back into place after use.
- Функција на водопад: Provides a unique cascade water flow option.
- Издржлива конструкција: Made from high-quality stainless steel with a brushed finish.
- Контрола со една рачка: Allows for easy adjustment of water temperature and flow.
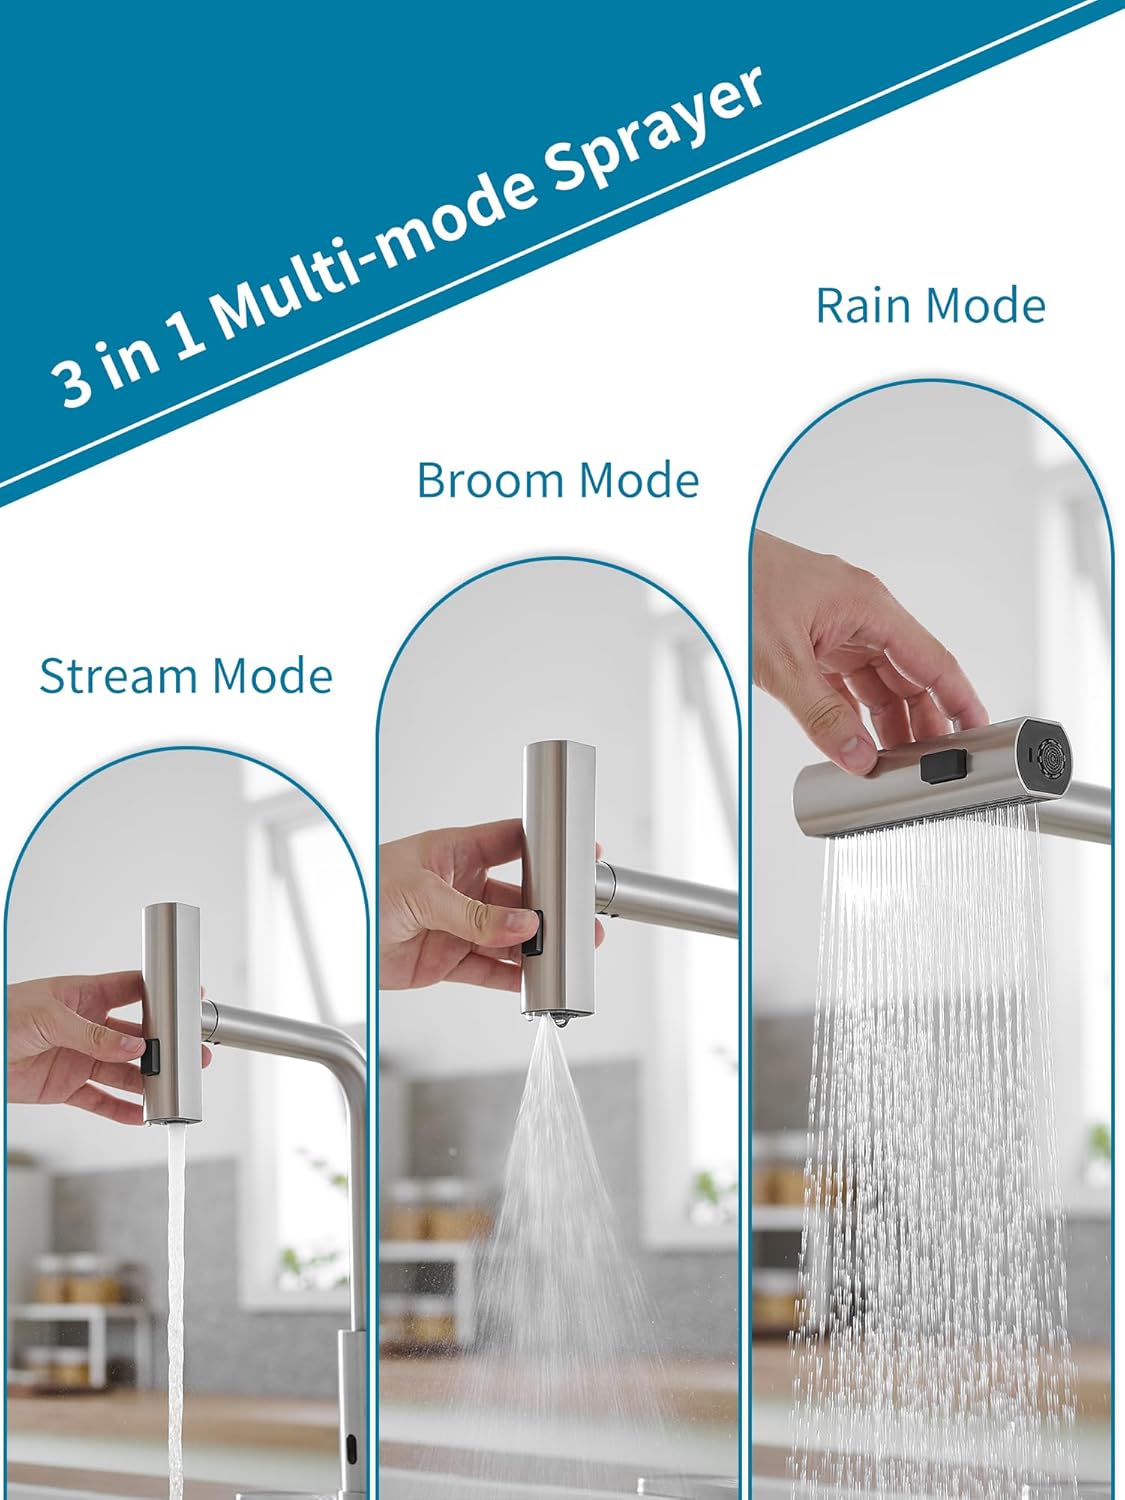
Image: The faucet's sprayer head demonstrating the three distinct water modes: Stream, Broom, and Rain.

Image: The pull-down sprayer extended from the faucet, highlighting the 24-inch braided hose and 360-degree swivel capability, along with the auto-retraction weight.

Слика: Крупен план view of the faucet's intelligent chip sensor, indicating fast response for contactless operation.

Image: A hand activating the contactless sensor on the faucet, showing water flowing in response to the gesture.
3. Спецификации
| Бренд | JOOM |
| Број на модел | JU011-12 |
| Препорачана употреба | Кујна |
| Тип на монтирање | Плажа планина |
| Тип на завршница | Брусен |
| Материјал | Нерѓосувачки челик |
| Број на рачки | 1 |
| Посебни карактеристики | Pull-down Sprayer, Contactless Sensor, Waterfall Function |
| Дијаметар на дупка за монтирање | 3.2-3.5 cm (1-3/10" ~ 1-3/8") |
| Max Countertop Thickness | 5 см (2 инчи) |
| Hose Sizes Supported | M 10x1, G3/8 |

Image: Detailed diagram showing the faucet's dimensions in centimeters and inches, along with mounting hole diameter and maximum countertop thickness requirements.
4. Информации за безбедност
- Секогаш исклучувајте го главниот довод на вода пред да започнете со каква било инсталација или одржување.
- Носете соодветна лична заштитна опрема, како што се заштитни очила и ракавици, за време на инсталацијата.
- Проверете дали сите врски се безбедни за да спречите протекување. Не затегнувајте премногу.
- Доколку не сте сигурни за кој било дел од процесот на инсталација, консултирајте се со квалификуван водоводџија.
- Чувајте ги малите делови подалеку од деца за да спречите опасност од гушење.
5. Водич за инсталација
Follow these steps for proper installation of your JOOM kitchen faucet:

Image: A four-panel diagram illustrating the initial installation steps: 1) Installing the nut kit from below, 2) Tightening the nut kit with a screwdriver, 3) Connecting hot and cold water pipes to the valve, and 4) Installing the hose load-bearing ball.
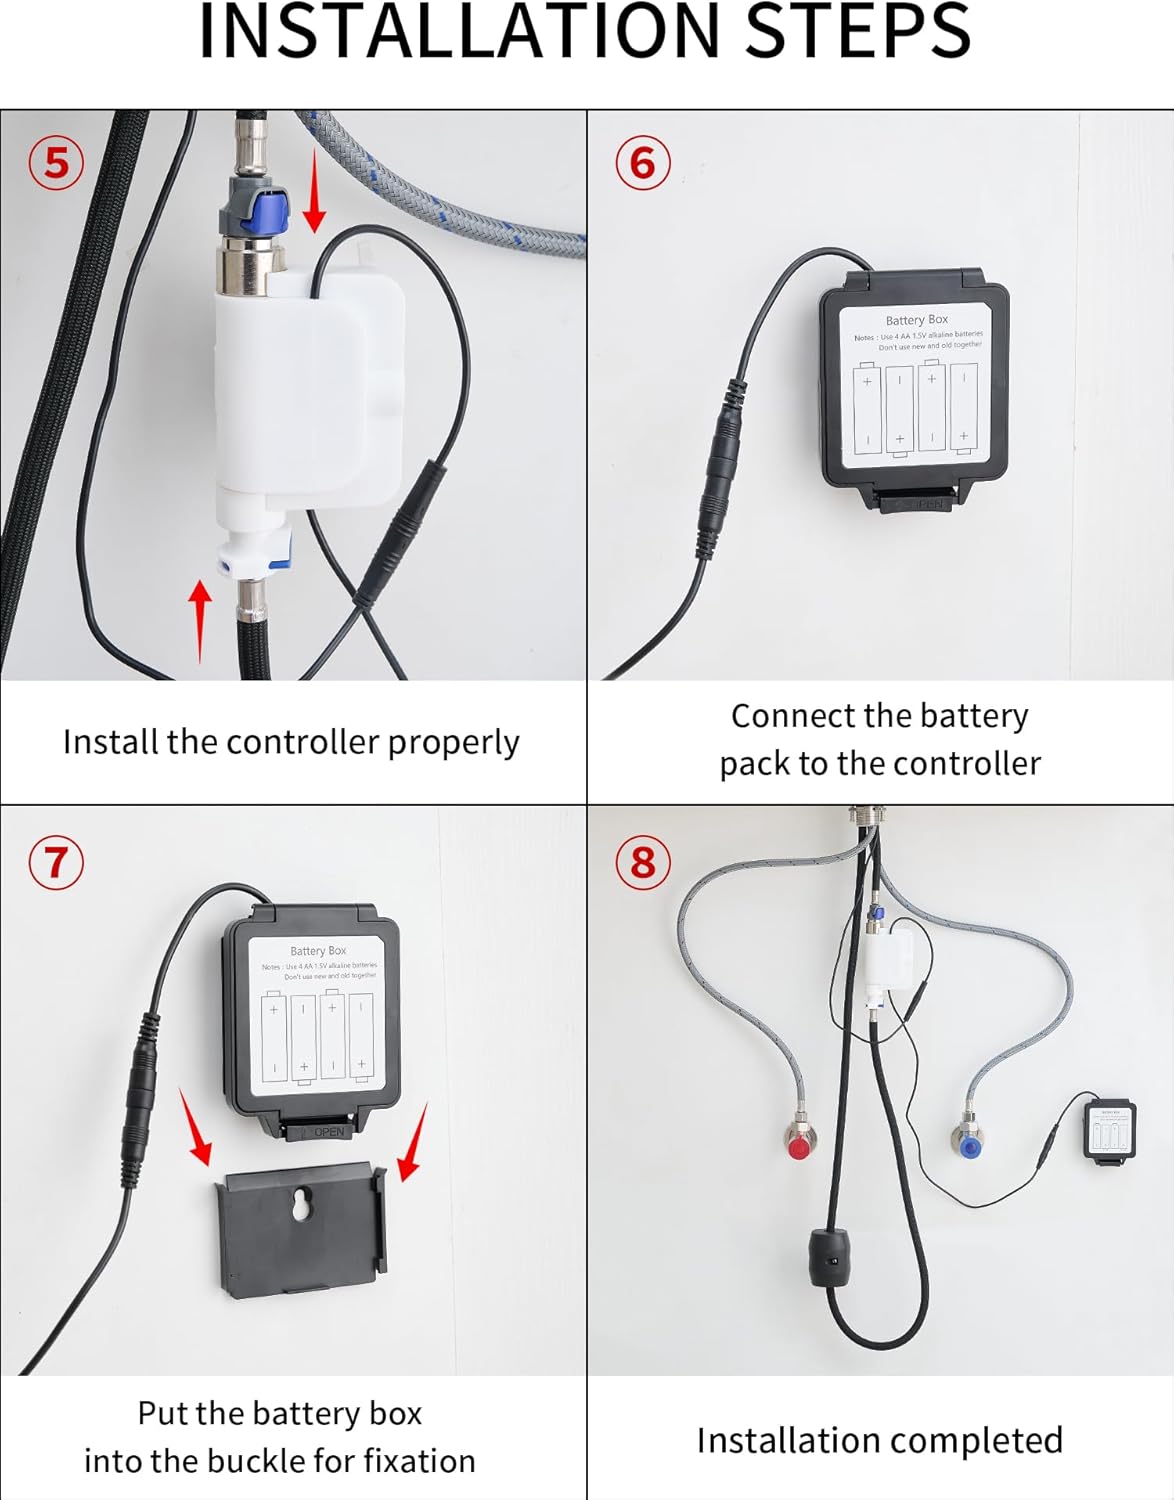
Image: A four-panel diagram illustrating the final installation steps: 5) Installing the controller, 6) Connecting the battery pack to the controller, 7) Securing the battery box into its buckle, and 8) A view of the completed installation under the sink.
- Подгответе ја дупката за монтирање: Ensure your countertop has a suitable mounting hole (3.2-3.5 cm diameter) and is not thicker than 5 cm.
- Инсталирајте ја чешмата: Вметнете го телото на чешмата во монтажната дупка.
- Secure the Faucet (Step 1 & 2): From underneath the sink, install the nut kit onto the faucet shank and tighten it securely using a screwdriver until the faucet is stable.
- Connect Water Lines (Step 3): Connect the hot and cold water supply lines to the corresponding inlets on the faucet's valve. Ensure a tight, leak-free connection.
- Install Hose Load-Bearing Ball (Step 4): Attach the load-bearing ball to the pull-down hose underneath the sink. This provides the necessary weight for hose retraction.
- Install the Controller (Step 5): Mount the electronic controller unit in an accessible location under the sink.
- Connect Battery Pack (Step 6 & 7): Connect the battery pack to the controller. Insert the battery box into its designated buckle for fixation. Ensure batteries are correctly inserted (typically 4 AA batteries, not included).
- Тест за протекување: Turn on the main water supply and check all connections for any leaks.
6. Операција
- Manual Handle Operation: Use the single handle to control water flow and temperature. Lift the handle to turn on/off water and move it left/right for hot/cold water.
- Contactless Sensor Operation: Wave your hand near the sensor located on the faucet body to activate or deactivate water flow. The intelligent chip ensures a fast response.
- Changing Sprayer Modes: Press the button on the sprayer head to cycle through the Stream, Broom, and Rain modes.
- Using the Pull-Down Sprayer: Gently pull the sprayer head from the spout for extended reach. The 24-inch braided hose and 360° rotation allow for flexible use. When finished, the auto-retraction technology will pull the hose back into place.
- Функција на водопад: The faucet also features a waterfall mode, providing a broad, gentle flow of water.

Image: A person using the pull-down sprayer to rinse fruits in a colander, demonstrating the practical application of the sprayer function.
7. Одржување и грижа
- Чистење: Clean the faucet regularly with a soft cloth and mild soap. Avoid abrasive cleaners, harsh chemicals, or scouring pads, as these can damage the brushed stainless steel finish.
- Одржување на сензорот: Keep the sensor area clean and free from obstructions to ensure proper contactless operation.
- Чистење на аератор: Periodically unscrew and clean the aerator (if applicable) to remove mineral deposits and maintain optimal water flow.
- Инспекција на цревото: Regularly check the pull-down hose for any signs of wear or damage.
- Замена на батерија: If the contactless function becomes unresponsive or intermittent, replace the batteries in the battery pack.
8 Смена на проблеми
| Проблем | Можна причина | Решение |
|---|---|---|
| Низок проток на вода | Partially closed water supply valves, clogged aerator, debris in water lines. | Ensure hot and cold water supply valves are fully open. Clean or replace the aerator. Flush water lines. |
| Contactless sensor not working | Dead batteries, obstructed sensor, sensor malfunction. | Replace batteries in the battery pack. Clean the sensor area. If problem persists, contact customer support. |
| Протекување од врски | Loose connections, damaged O-rings/washers. | Tighten connections carefully. Inspect and replace any damaged O-rings or washers. |
| Sprayer hose does not retract fully | Obstruction under the sink, incorrect weight placement. | Clear any obstructions around the hose under the sink. Ensure the load-bearing ball is correctly positioned. |
9. Гаранција и поддршка
This JOOM product is covered by a standard manufacturer's warranty. For specific warranty details, please refer to the documentation included with your purchase or contact JOOM customer service.
For technical support, replacement parts, or any questions regarding your JOOM JU011-12 faucet, please contact our customer support team through the retailer where you purchased the product or visit the official JOOM webсајт.