BORGUSI CTM5314
BORGUSI Auto Incline Treadmill User Manual
Model: CTM5314 | Brand: BORGUSI
1. Важни безбедносни информации
Please read this entire manual carefully before operating the treadmill. Keep this manual for future reference. Failure to follow these instructions could result in injury or damage to the product.
- Always place the treadmill on a solid, level surface.
- Држете ги децата и миленичињата подалеку од лентата за трчање за време на работата.
- Носете соодветна спортска облека и спортски обувки.
- Пред да започнете, проверете дали безбедносниот клуч е правилно прицврстен на вашата облека.
- Не ракувајте со лентата за трчање ако е оштетена или неисправна.
- The maximum user weight capacity for this treadmill is 320 lbs.
- Исклучете ја лентата за трчање од штекер кога не е во употреба или пред чистење/одржување.
2. Вклучени компоненти
Проверете дали сите компоненти се присутни пред да започнете со склопување:
- Treadmill Main Frame
- Упатство за употреба
- Безбедносен клуч
- Лубрикант
- Tool Kit (includes Allen wrenches and screwdriver)
3. Поставување и склопување
The BORGUSI CTM5314 treadmill is 90% pre-assembled. Follow these steps for quick setup:
- Step 1: Unpack and Position
Open the carton and carefully remove all parts. Place the main frame on a level ground surface. - Step 2: Lock the Upright Frame
Secure the upright frame to the base frame using the provided bolts (70, 51) and lock washers (64). Use the 5# Allen wrench (12) to tighten. - Step 3: Pre-lock the Computer Bracket
First, connect the computer bottom wire with the computer top wire. Then, align the metal plate of the computer bracket with the upright frame hole and pre-lock it using bolts (51) and lock washers (64). - Step 4: Lock the Computer Bracket
Hold the computer bracket with one hand and fold it in the direction of the arrow. Fully secure the computer bracket onto the upright frame using the remaining bolts and the 5# Allen wrench. - Step 5: Lock the Rollers
Attach the rollers (23) to the main frame using the bolts (51) and lock washers (55, 67). Use the 5# Allen wrench (12). - Step 6: Secure the Back End Caps
Attach the back end caps (21, 22) to the main frame using the bolts (60) and the wrench with screwdriver (76). - Step 7: Secure the Bottom Covers
Secure the bottom covers (30, 36) onto the upright frame using the bolts (77) and the wrench with screwdriver (76). - Step 8: Secure the Bottle Cage
Secure the bottle cage onto the right upright frame using the bolts (77) and the wrench with screwdriver (76).
Video: BORGUSI CTM5314 Treadmills Installation Guide. This video demonstrates the step-by-step assembly process for the treadmill.

Image: The treadmill's elevated console design and folding capability for space-saving storage.
4. Упатства за работа
Familiarize yourself with the treadmill's functions for an effective workout.
4.1 Основно работење
- Вклучување/исклучување: Connect the power cord to a grounded outlet. Press the power button on the console to turn the treadmill on or off.
- Безбедносен клуч: Always attach the safety key clip to your clothing before starting. The treadmill will not operate without the safety key in place. Pulling the safety key will immediately stop the treadmill in an emergency.
- Почеток/Стоп: Press the 'START' button to begin your workout. The belt will start moving at a low speed. Press the 'STOP' button to gradually slow down and stop the belt.
4.2 Speed and Incline Adjustment
- Контрола на брзина: Use the '+' and '-' buttons on the console or handrails to adjust the speed from 0.5 MPH to 10 MPH. Quick speed buttons (e.g., 3, 6, 9 MPH) are also available for instant changes.
- Auto Incline: Use the 'INCLINE +' and '-' buttons to adjust the incline from 0% to 15%. Quick incline buttons (e.g., 3%, 6%, 9%) are available for rapid changes.
4.3 Preset Programs and App Connectivity
- Претходно поставени програми: The treadmill features 36 built-in preset programs (P1-P36), as well as unique L and U programs with 8 levels of intensity. Select a program using the 'PROGRAM' button and press 'START' to begin.
- Bluetooth апликација: Connect your device via Bluetooth to the treadmill to use compatible fitness apps such as KINOMAP, Zwift, and Fitshow. These apps allow for customized workouts, virtual routes, and tracking of your progress.
4.4 Monitoring Your Workout
- LCD дисплеј: The upgraded backlit LCD panel displays key metrics including Time, Speed, Distance, Calories Burned, Incline, and Heart Rate.
- Монитор за отчукувањата на срцето: Grip the heart rate sensors on the handrails to monitor your pulse during your workout.
Video: BORGUSI CTM5314 Auto Treadmill Overview. This video highlights the key features and operational aspects of the treadmill, including speed, incline, and program functions.
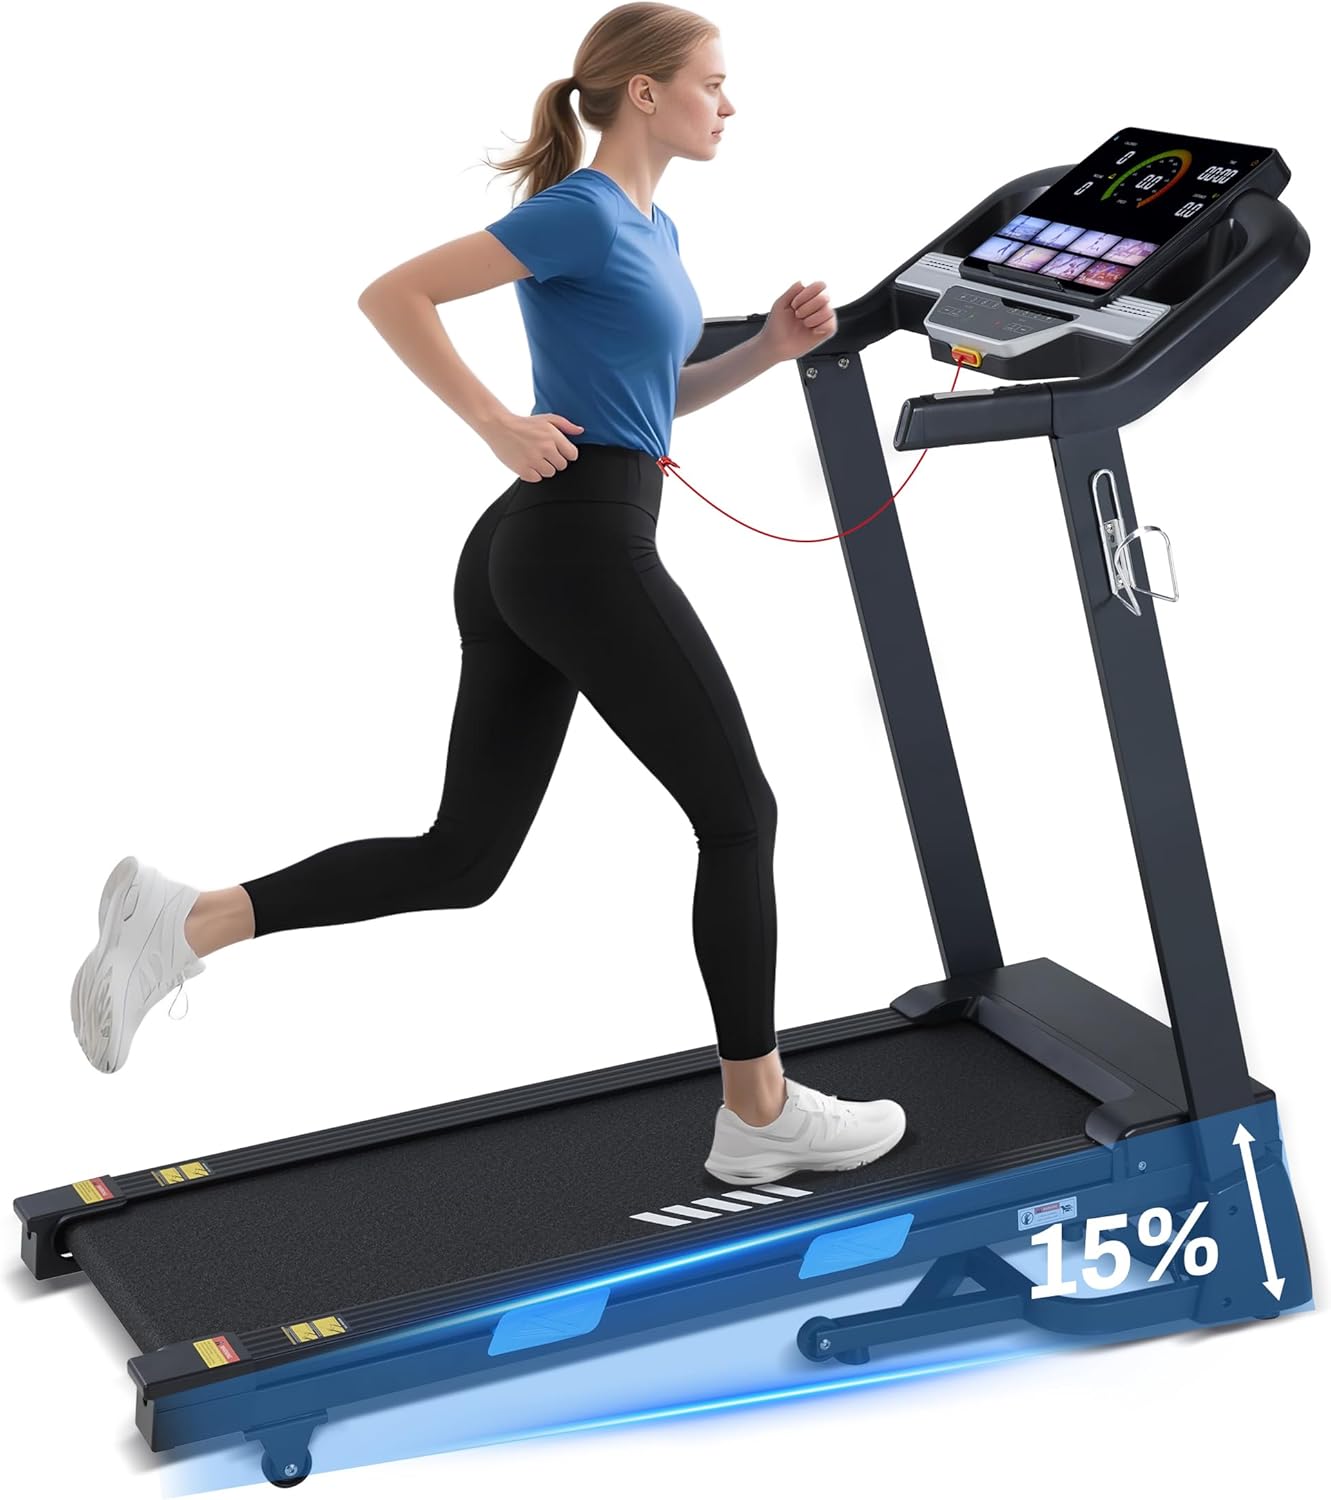
Image: The treadmill in use, showcasing its auto-incline capability.

Слика: Детална view of the upgraded LCD display, providing real-time workout data.
5. Одржување
Редовното одржување обезбедува долготрајност и оптимални перформанси на вашата лента за трчање.
- Чистење: Избришете ги површините на лентата за трчање со адamp крпа по секоја употреба. Избегнувајте употреба на абразивни средства за чистење.
- Подмачкување: The running belt requires periodic lubrication to reduce friction. Refer to the specific instructions in the included lubricant packaging for frequency and application method.
- Подесување на ременот: If the running belt becomes off-center or slips, refer to the detailed instructions in the full user manual for proper adjustment.
- Складирање: When not in use, the treadmill can be folded vertically to save space. Ensure it is securely locked in the folded position.
6 Смена на проблеми
Овој дел се однесува на вообичаени проблеми со кои може да се соочите со вашата лента за трчање.
| Проблем | Можна причина | Решение |
|---|---|---|
| Не започнува да работи | Кабелот за напојување не е вклучен; Безбедносниот клуч не е на место; Прекинувачот е исклучен. | Ensure power cord is securely plugged in; Insert safety key fully; Turn on the power switch. |
| Лизгалки за трчање на ременот | Ременот е премногу лабав; недоволно подмачкување. | Adjust belt tension (refer to full manual); Apply lubricant as per instructions. |
| Error Code E01 (Driver communication failure) | Loose connection between upper and lower control boards. | Unplug the treadmill, check and re-connect all system wires. If the issue persists, contact customer support. |
| Unusual noise or burning smell | Motor issue; Belt friction; Loose components. | Immediately stop the treadmill and unplug it. Check for any visible damage or loose parts. Do not operate and contact customer support. |
For issues not listed here or if solutions do not resolve the problem, please contact BORGUSI customer support.
7. Спецификации на производот
| Спецификација | Детал |
|---|---|
| Бренд | БОРГУСИ |
| Име на моделот | CTM5314 |
| Димензии на производот (Д x Ш x В) | 55.3" x 26.2" x 52.1" |
| Folded Size (D x W x H) | 33.1" x 26.2" x 52.2" |
| Тежина на ставката | 110 фунти |
| Материјал | Легуриран челик |
| Максимална брзина | 10 милји на час |
| Минимална брзина | 0.5 милји на час |
| Максимална коњска сила | 3.5 КС |
| Максимален процент на наклонtage | 15% |
| Препорака за максимална тежина | 320 фунти |
| Димензии на работната површина | 45.5" x 16.5" |
| Број на програми | 36 Preset Programs (plus L and U programs) |
| Технологија за поврзување | Bluetooth (KINOMAP, Zwift, Fitshow App compatible) |
| Тип на дисплеј | Upgraded LCD Panel |
| Апсорпција на шок | 10+4 Silicone Shock Absorbers |

Image: Visual representation of the treadmill's robust 320 lbs weight capacity and 15% auto incline.

Image: The spacious running platform, measuring 45.5 inches in length and 16.5 inches in width.

Image: Illustration of the 10+4 silicone shock absorption system designed to reduce impact.
8. Гаранција и поддршка
Your BORGUSI CTM5314 Treadmill comes with a 1 Year Parts Protection Plan. This warranty covers manufacturing defects in materials and workmanship under normal use and service.
For warranty claims, technical support, or any questions regarding your product, please refer to the contact information provided in your product packaging or visit the official BORGUSI webсајт.
Ask a question about this manual
Ask about setup, troubleshooting, compatibility, parts, safety, or missing instructions. Manuals+ will review the question and use this page’s manual context to help answer it.