1. Вовед
This manual provides essential information for the safe and effective operation of your ION Audio Retro Glow Boombox. This device combines classic audio playback with modern connectivity, featuring an AM/FM radio, cassette player/recorder, Bluetooth 5.3, USB, and SD card playback capabilities. Please read this manual thoroughly before use and retain it for future reference.
2. Информации за безбедност
- Не го изложувајте уредот на вода или влага.
- Избегнувајте поставување на уредот во близина на извори на топлина или на директна сончева светлина.
- Обезбедете соодветна вентилација; не блокирајте никакви отвори за вентилација.
- Користете само додатоци/додатоци наведени од производителот.
- Исклучете го уредот од струја за време на громови или кога не се користи долго време.
- Целото сервисирање упатете го на квалификуван сервисен персонал.
3. Што е вклучено
По распакувањето, проверете дали сите предмети наведени подолу се присутни и во добра состојба:
- ION Audio Retro Glow Boombox
- Кабел за напојување
- Водич за брза станица
4. Производот завршиview
The Retro Glow Boombox features a translucent housing with multi-colored LED lights that synchronize with music. It includes dual full-range speakers for robust audio output.
Преден панел

Слика 1: Предна страна view of the Retro Glow Boombox, showcasing the cassette deck, radio tuner, and illuminated dual speakers.
Топ контроли

Слика 2: Детално view of the top panel, including volume, bass, treble controls, cassette function buttons (Pause, Stop/Eject, F.FWD, REW, Play, REC), and mode selectors (Tape, Aux, Radio, Bluetooth/USB/SD).
Side Panel and Rear
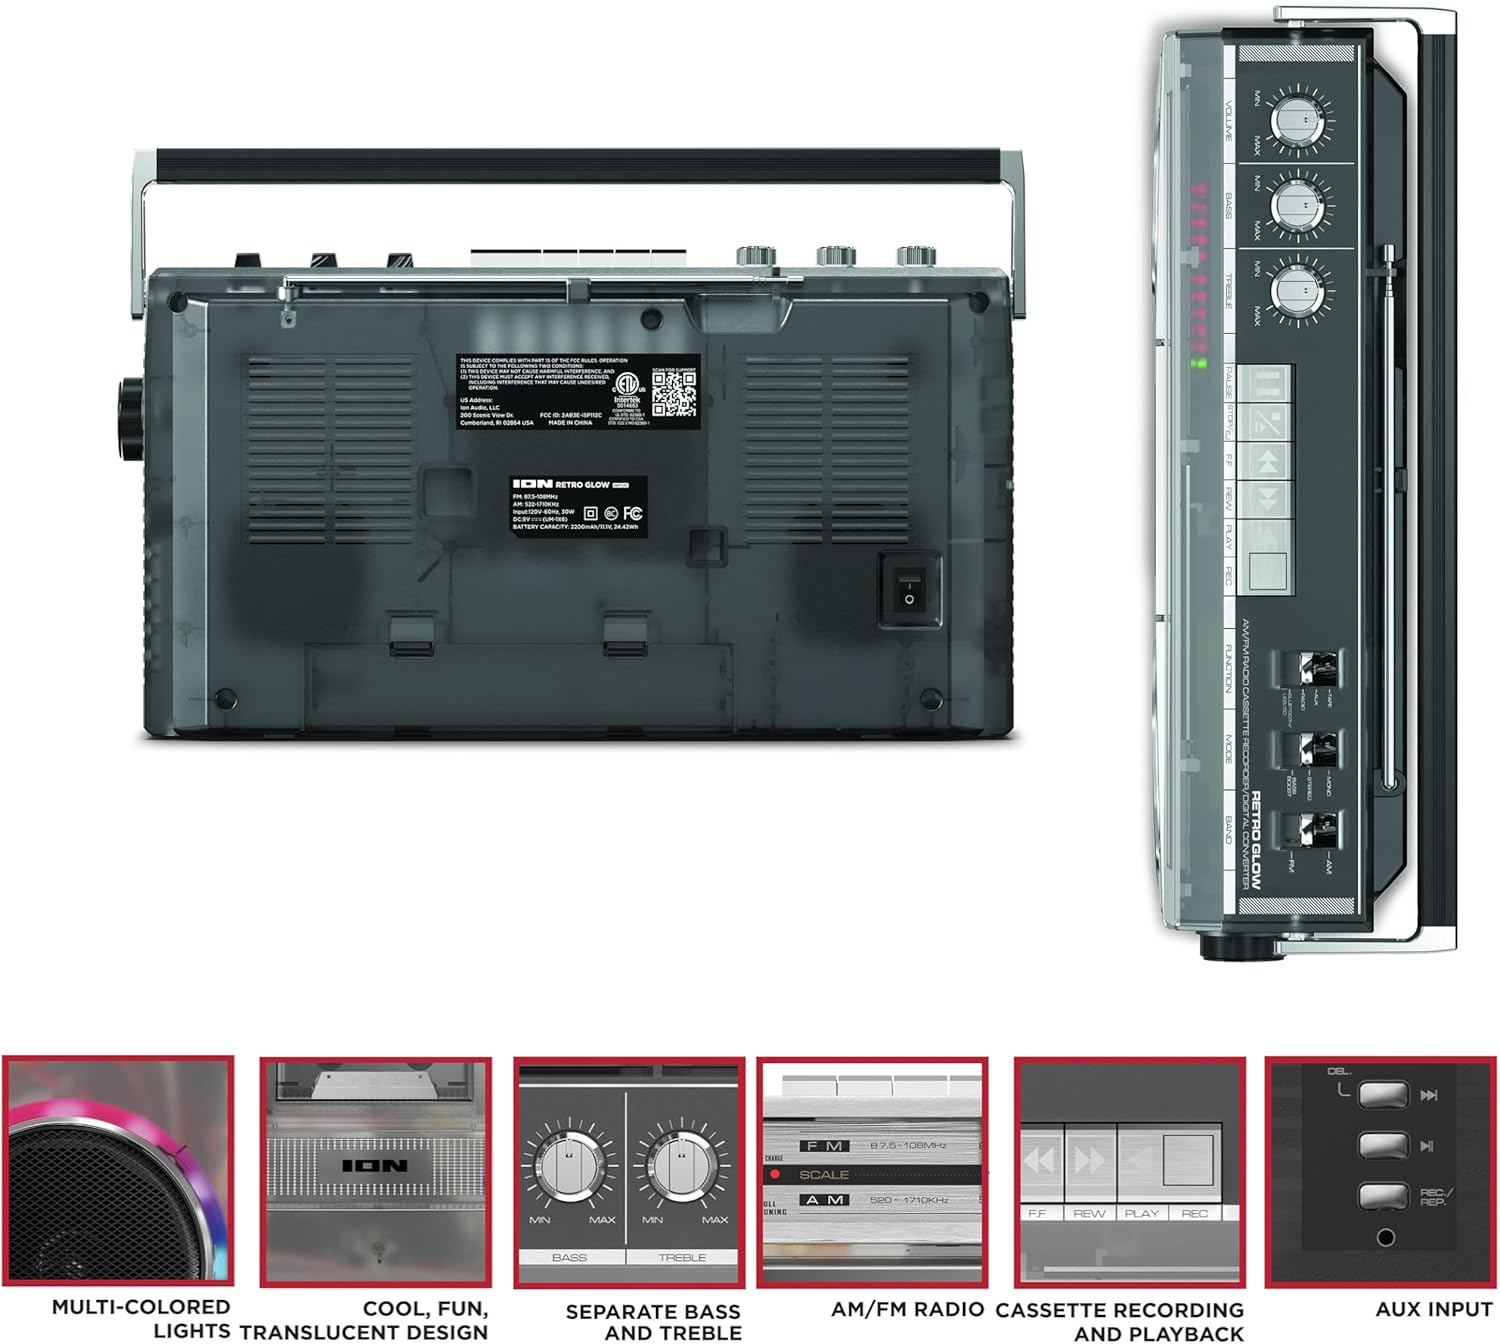
Figure 3: Side panel illustrating the USB port, SD card slot, and playback control buttons. The rear panel includes the power input and battery compartment.
5. Поставување
Напојување на Boombox-от
The Retro Glow Boombox can be powered via the included AC power cable or by batteries for portable use.
- AC напојување: Connect the power cable to the AC input on the rear of the unit and then to a wall outlet.
- Напојување на батеријата: Open the battery compartment on the rear and insert the required batteries (type and quantity specified in specifications).

Слика 4: Заден дел view of the boombox, highlighting the power input and the battery compartment for portable operation.
6. Упатства за работа
Општа операција
- Вклучување/исклучување: Use the power switch to turn the unit on or off.
- Контрола на јачината на звукот: Adjust the 'VOLUME' knob on the top panel to increase or decrease the sound level.
- Контрола на тон: Use the 'BASS' and 'TREBLE' knobs to customize the audio output to your preference.
- LED светла: The multi-colored LED lights around the speakers dance in sync with the music. Refer to the Quickstart Guide for specific controls to change light modes or turn them off.
Radio Functionality
- Switch the 'FUNCTION' selector to 'RADIO'.
- Select 'AM' or 'FM' using the 'BAND' switch.
- Продолжете ја телескопската антена за оптимален FM прием. За AM, ротирајте го уредот за најдобар прием.
- Use the 'TUNING' knob to scan for stations.
Касетофон/Фрибонатор
- Репродукција: Press the 'STOP/EJ' button to open the cassette door. Insert a cassette tape and close the door. Press 'PLAY' to begin playback.
- Снимање: To record from the radio, built-in microphone, or an external source (via Aux input), ensure a blank cassette is inserted. Select the desired source using the 'FUNCTION' switch. Press the 'REC' button (often simultaneously with 'PLAY') to start recording.
- Брзо напред/назад: Use the 'F.FWD' and 'REW' buttons for tape navigation.
Bluetooth поврзување
- Switch the 'FUNCTION' selector to 'BLUETOOTH/USB/SD'. The unit will enter pairing mode.
- On your Bluetooth-enabled device, search for 'Retro Glow Boombox' and select it to pair.
- Once paired, you can stream audio wirelessly to the boombox.
Репродукција преку USB и SD картичка
- Insert a USB drive or SD card into the respective slot on the side panel.
- Switch the 'FUNCTION' selector to 'BLUETOOTH/USB/SD'. The unit should automatically detect and begin playing audio files од вметнатиот медиум.
- Use the playback control buttons (play/pause, skip forward/backward) on the side panel to manage your audio.
Помошен влез
- Connect an external audio device (e.g., smartphone, MP3 player) to the 'AUX' input using a 3.5mm audio cable (not included).
- Switch the 'FUNCTION' selector to 'AUX'. Audio from your external device will play through the boombox speakers.
7. Одржување
- Чистење: Користете мека, сува крпа за чистење на надворешноста на уредот. Не користете абразивни средства за чистење или растворувачи.
- Грижа за касетофони: Редовно чистете ги главите на лентите и лесно стиснете ги ролерите со памукче.ampзбогатен со изопропил алкохол за да се обезбеди оптимален квалитет на звукот и да се спречи оштетување на лентата.
- Складирање: When not in use, store the boombox in a cool, dry place away from direct sunlight and extreme temperatures.
8 Смена на проблеми
Нема моќ
- Осигурајте се дека кабелот за напојување е безбедно поврзан и со уредот и со функционален штекер.
- If using batteries, check if they are inserted correctly and are not depleted.
Нема звук
- Check the volume level on the boombox and the connected audio source (if applicable).
- Ensure the correct function mode (Radio, Tape, Bluetooth, USB/SD, Aux) is selected.
- For cassette playback, verify the tape is inserted correctly and the heads are clean.
Проблеми со спарување Bluetooth
- Make sure the boombox is in Bluetooth pairing mode.
- Ensure your Bluetooth device is within range (typically 30 feet or 10 meters).
- Обидете се да го распарите и повторно да го спарите уредот.
9. Спецификации
| Димензии на производот | 9.25 x 16.25 x 5.25 инчи |
| Тежина на ставката | 8.93 фунти |
| Технологија за поврзување | Bluetooth 5.3, USB, SD Card, Aux Input |
| Тип на звучник | Stereo, Full-Range |
| Извор на енергија | AC Power Cable, Rechargeable Battery (approx. 10-hour life) |
| Посебни карактеристики | AM/FM Radio, Cassette Player/Recorder, Multi-colored LED Lights, Retro VU Meters, Separate Bass and Treble Controls |
10. Гаранција и поддршка
For warranty information or technical support, please refer to the Quickstart Guide included with your product or visit the official ION Audio website. Keep your purchase receipt as proof of purchase may be required for warranty claims.