1. Вовед
This manual provides detailed instructions for the installation, operation, and maintenance of your Bextgoo Smart Lock D10. Please read this manual thoroughly before installation and use to ensure proper function and safety. This smart lock offers multiple access methods for enhanced home security and convenience.
2. Што има во кутијата
Внимателно распакувајте ја кутијата и проверете дали сите компоненти се присутни:
- Rear Panel x1
- Smart Keypad x1
- Latch 60/70 x1
- Latch Strike Plate x1
- Strike Plate Box x1
- IC Cards x3
- АА батерии x4
- Physical Key x2
- Завртка M4x45mm x2
- Завртка M4x20mm x4
- Упатство за употреба x1
- Adjustable Deadbolt Latch x1
- Hardware Assembly x1

Image: All components included in the Bextgoo Smart Lock D10 package.
3. Потребни алатки
Следниве алатки се препорачуваат за инсталација:
- Шрафцигер Филипс
- Владетел
- Lineman's Pliers (for screw trimming, if necessary)
4. Important Notes Before Installation
- Keep the door open during installation.
- DO NOT close the door until the batteries are installed.
- Battery installation is the final step.
Проверка на компатибилност на вратите
Пред купувањеasing and installing, ensure your door dimensions are compatible:
- Дијаметар на попречен отвор: 2-1/8 инчи (54 мм)
- Cross Bore Backset: 2-3/8 inches or 2-3/4 inches (60 mm or 70 mm)
- Дебелина на вратата: 1-3/8 inches to 2-1/8 inches (35 mm to 55 mm)
- Latch Bolt Size (height): 1 инчи (25 мм)
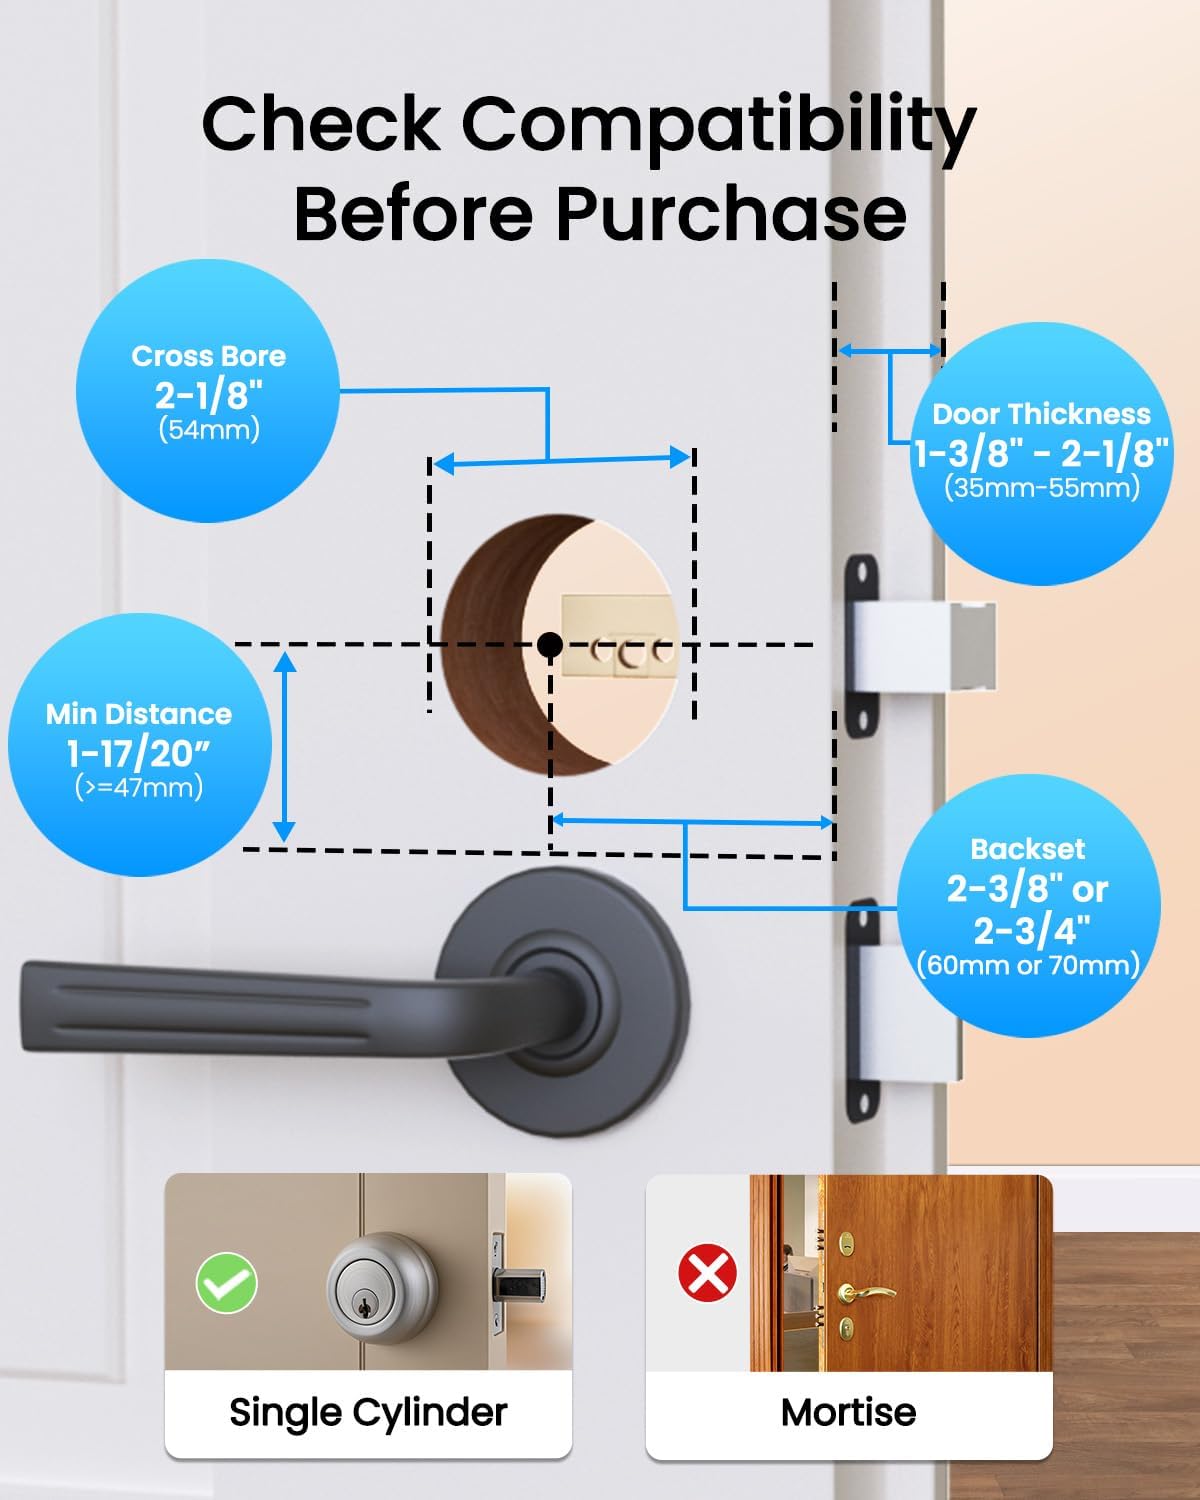
Image: Door measurement guide for Bextgoo Smart Lock D10 compatibility.
5. Водич за инсталација
Follow these steps carefully to install your Bextgoo Smart Lock D10. For a visual guide, please refer to the installation video below.
Видео за инсталација
Video: Official Bextgoo Smart Lock D10 installation guide. This video demonstrates the step-by-step process of installing the smart lock on a door, including bolt adjustment, keypad panel installation, and mounting plate setup.
Инсталација чекор-по-чекор
- Bolt Adjustment:
- Hold the bolt in front of the door hole to check if the latch square hole is centered.
- If centered (60mm backset), no adjustment is needed.
- If not centered (70mm backset), adjust the bolt by rotating it to the end.

Image: Bolt adjustment process, showing how to measure and rotate the bolt if needed.
- Инсталирајте го бравата:
- Ensure the 'UP' sign on the latch is facing upwards.
- Вметнете ја бравата во работ на вратата.
- Прицврстете ја резето со приложените завртки.
- Check latch function: Ensure the latch is retracted (unlocked) before proceeding.

Image: Installing the latch and securing it with screws.
- Install the Keypad Panel:
- Position the square spindle vertically to match the latch square hole.
- Route the power cable underneath the latch.
- Align the keypad panel with the latch square hole.
- Note: Ensure the keypad panel faces the outside of the door.

Image: Keypad panel installation, showing cable routing and spindle alignment.
- Take out the Mounting Plate:
- Open the battery compartment on the rear panel.
- Одвртете ги завртките за монтирање.
- Отстранете ја монтажната плоча.

Image: Removing the mounting plate from the rear panel.
- Инсталирајте ја монтажната плоча:
- Before installing, pass the power cable through the mounting plate.
- Insert the trimmed screws (if necessary, based on door thickness) suitable for your door thickness and tighten them.

Image: Installing the mounting plate and securing the power cable.
- Install the Rear Panel:
- Connect the power cable between the front and rear panels of the lock.
- Make sure to set the rear panel to the unlocked position first.
- Tidy up any excess power cable and tuck it into the door frame.
- Align the rear panel with the latch and secure it in place.
- Insert the two screws you previously removed from the holes and tighten them.
- Вметнете 4 AA батерии во преградата за батерии.
- Finally, close the battery cover.

Image: Completing the rear panel installation and battery insertion.
6. Карактеристики
- 10-in-1 Keyless Access: Unlock using fingerprint, Bluetooth app, IC card, passcode, physical key, or the indoor one-touch unlock button.
- Ultra-Fast Fingerprint Access: Unlock in just 0.1 seconds with high-accuracy fingerprint recognition. Supports up to 100 fingerprints.
- Контрола на апликацијата: Manage your lock via Bluetooth. With an optional gateway (sold separately), enjoy remote access, generate passcodes from anywhere, view unlock history, and enable voice control via Alexa or Google Assistant.
- Автоматско заклучување и заклучување со еден допир: Set auto-lock delays (5-60 seconds) for convenience.
- Flexible Passcode Options: Create permanent, temporary, recurring, or one-time passcodes for various users.
- Лозинка против ѕвонење: Add random digits before or after your actual passcode to prevent others from guessing it.
- Long Battery Life & Emergency Backup: Powered by 4 AA batteries (included) for up to 8+ months. Features low battery alerts, an emergency Type-C charging port, and a hidden keyhole for physical key access.
- Издржлив дизајн: Crafted from solid aluminum alloy for durability and a modern aesthetic.
- Отпорен на временски услови: Works in extreme temperatures (-13°F to 149°F) and is IP63 water-resistant.
- Left/Right-Handed Door Compatible: Fits both left and right-handed doors.
Image: Multiple unlocking methods for the smart lock.
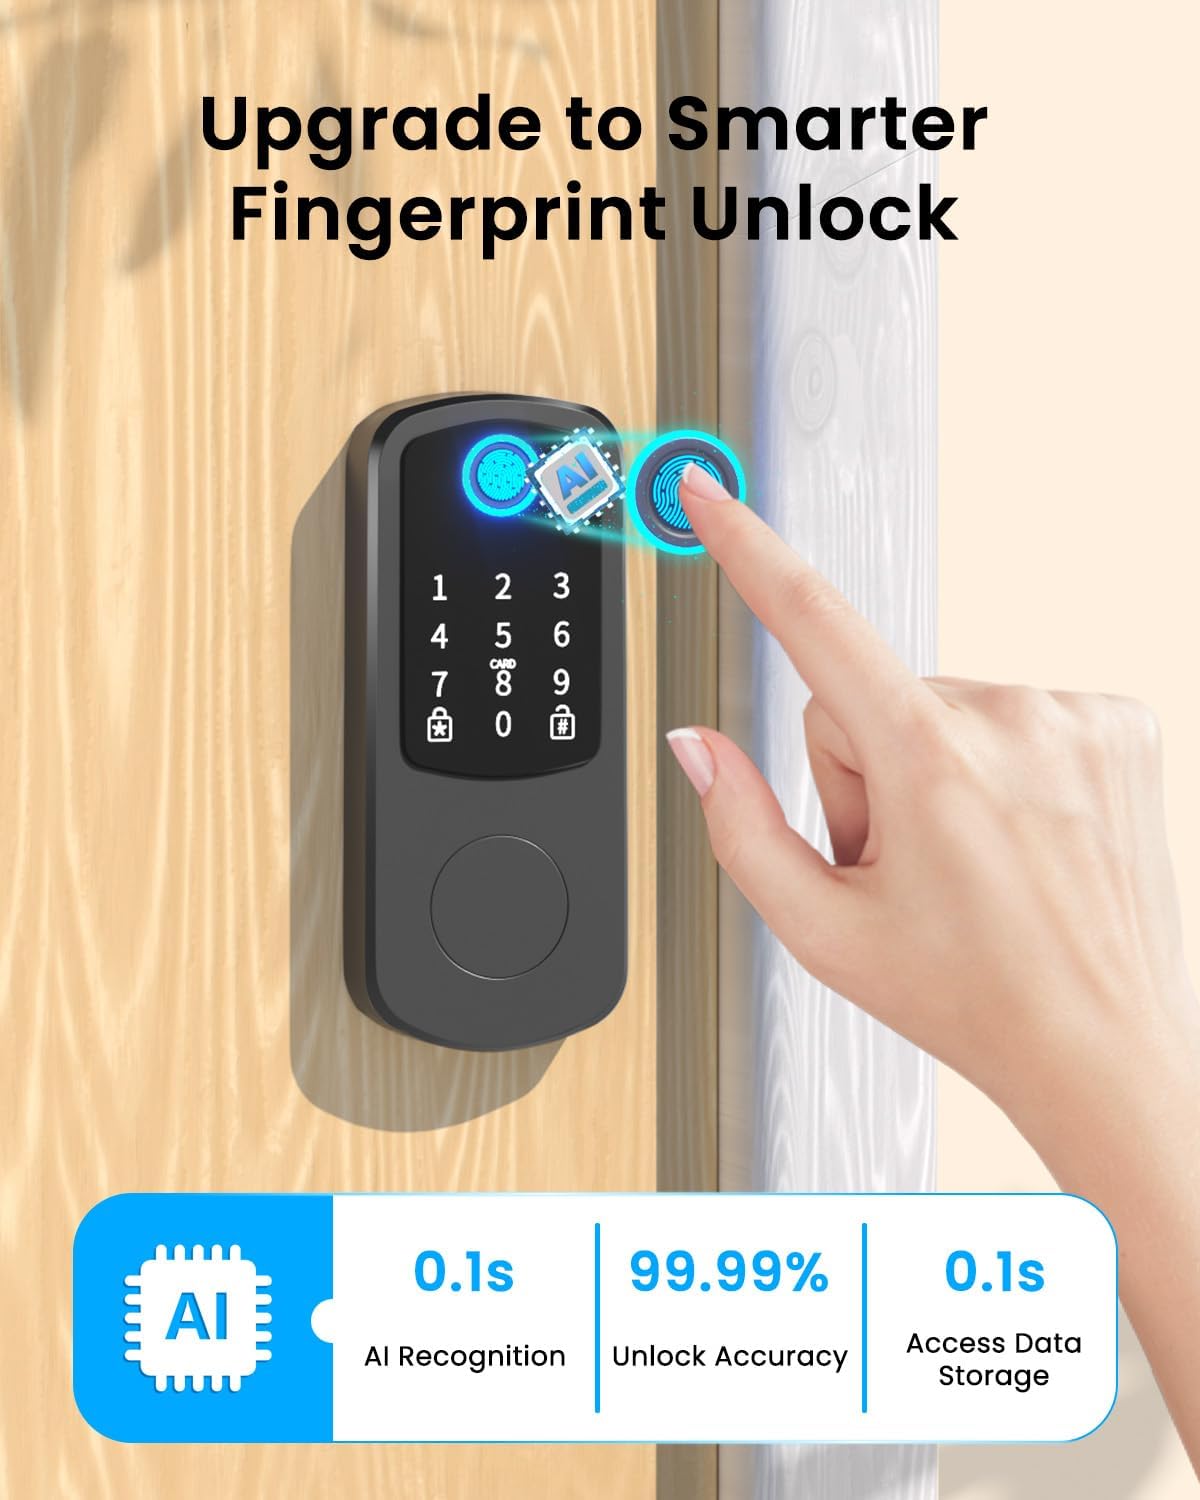
Image: Ultra-fast fingerprint access.

Image: Extended battery life and emergency backup.

Image: All-weather operation of the smart lock.
7. Упатства за работа
Методи за отклучување
- Отпечаток од прст: Place your registered finger on the fingerprint sensor. The lock will unlock instantly.
- Лозинка: Enter your registered passcode on the keypad. For anti-peep security, you can enter random digits before and after your actual code.
- IC картичка: Tap your registered IC card on the designated area of the keypad.
- Bluetooth апликација: Open the Bextgoo app on your smartphone and use the unlock function via Bluetooth within range (up to 15 meters).
- Физички клуч: In case of emergency or battery depletion, use the physical key in the hidden keyhole.
- Indoor One-Touch Unlock: Use the internal knob or button for quick exit.

Image: Fingerprint unlock in action.

Image: Anti-peep passcode entry.

Image: IC card unlocking.

Image: Bluetooth app unlocking.

Image: Physical key backup access.
Функции за контрола на апликацијата
The Bextgoo app provides comprehensive control over your smart lock:
- Enable Auto-Lock: Set the lock to automatically lock after a specified delay (5-60 seconds).
- Check Access Logs: View историја за тоа кој влегол и кога.
- Проверете го статусот на батеријата: Следете го моменталното ниво на батеријата на вашата брава.
- Set up IC Card: Register and manage IC cards for access.
- Set up Fingerprint: Register and manage fingerprints for access.
- Управување со корисници: Add, modify, or remove users and their access credentials.
- Temporary Passcodes: Generate time-limited or one-time passcodes for guests or service providers.
- Режим на премин: Disable auto-lock for a period, keeping the door unlocked for convenience during gatherings.
- Тивок режим: Adjust or mute the lock's voice prompts for quiet operation.

Слика: Надview of smart lock app control features.

Image: Auto-lock and one-touch locking via app.

Слика: Viewing access history in the app.

Image: Passage Mode for temporary open access.

Image: Silent Mode for adjusting lock sounds.

Image: Access Management for user control.
8. Одржување
- Замена на батерија: Replace all four AA batteries when the low battery alert is received. Use high-quality alkaline batteries for optimal performance.
- Чистење: Wipe the keypad and lock body with a soft, dry cloth. Avoid using abrasive cleaners or solvents that could damage the finish or electronic components.
- Редовни проверки: Периодично проверувајте дали сите завртки се затегнати и дали бравата работи непречено.
9 Смена на проблеми
- Заклучувањето не реагира: Check battery levels. If batteries are low, replace them or use the emergency Type-C charging port. If still unresponsive, use the physical key.
- Отпечатокот од прст не е препознаен: Проверете дали прстот ви е чист и сув. Регистрирајте го повторно отпечатокот од прст ако проблемите продолжат.
- Лозинката не работи: Double-check the entered passcode. Ensure anti-peep digits are correctly used if enabled. The lock will automatically lockout after 5 failed attempts.
- Проблеми со поврзувањето на апликациите: Ensure Bluetooth is enabled on your phone and you are within range of the lock. Restart the app or your phone if necessary.
- Latch Not Retracting/Extending: Check for any obstructions in the door frame or latch mechanism. Ensure the latch square hole is correctly aligned during installation.
10. Спецификации
| Бренд | Бекстгу |
| Име на моделот | D10 |
| Тип на заклучување | Мртобол |
| Материјал | Алуминиум |
| Боја | Црното |
| Димензии на ставката L x Ш x В | 4 x 2.8 x 6.1 инчи |
| Тежина на ставката | 2.16 фунти (0.98 килограми) |
| Контролен метод | Апликација, допрете |
| Посебни карактеристики | Anti-Peeping Password, Auto-Lock, Fingerprint, Fob Unlock, Passcode Unlock |
| Извор на енергија | 4 алкални батерии АА (вклучено) |
| Компатибилност со паметен дом | Smart Home Compatible (with optional gateway) |
11. Гаранција и поддршка
For any questions, concerns, or warranty information regarding your Bextgoo Smart Lock D10, please contact customer support.
Е-пошта: support@bextgoo.com