Аргон Аудио ТТ МК2
Argon Audio TT MK2 Turntable User Manual
Model: TT MK2
Вовед
Ви благодарам за купувањетоasing the Argon Audio TT MK2 Turntable. This manual provides essential information for the safe and optimal operation, setup, and maintenance of your new turntable. Please read this manual thoroughly before using the product and retain it for future reference.
The Argon Audio TT MK2 is designed to deliver high-fidelity audio playback from your vinyl records, featuring a built-in phono pre-amplifier, an Audio Technica AT3600 cartridge, and dual-speed control for 33 and 45 RPM records.
Важни безбедносни инструкции
За да го намалите ризикот од електричен удар, пожар или оштетување на уредот, ве молиме почитувајте ги следниве безбедносни мерки на претпазливост:
- Не го изложувајте овој апарат на дожд или влага.
- Не ставајте предмети полни со течности, како што се вазни, врз апаратот.
- Не ги блокирајте отворите за вентилација. Инсталирајте во согласност со упатствата на производителот.
- Не инсталирајте во близина на извори на топлина како што се радијатори, топлински регистри, шпорети или други апарати (вклучувајќи ampлајфикатори) кои произведуваат топлина.
- Заштитете го кабелот за напојување од закопчување или стегање, особено во приклучоците, садовите за погодност и точката каде што излегуваат од апаратот.
- Користете само додатоци/додатоци наведени од производителот.
- Исклучете го овој апарат од струја за време на громови или кога не го користите подолг временски период.
- Целото сервисирање упатете го на квалификуван сервисен персонал. Сервисирањето е потребно кога апаратот е оштетен на кој било начин, како што е оштетен кабелот за напојување или приклучокот, течноста е истурена или предмети паднале во апаратот, апаратот бил изложен на дожд или влага, не работи нормално , или е исфрлен.
Што има во кутијата
Carefully unpack all components and ensure all items are present before discarding packaging materials:
- Argon Audio TT MK2 Turntable Unit
- Audio Technica AT3600 Cartridge (pre-mounted)
- Dust Lid
- RCA кабел
- Адаптер за напојување
- Противтежа
- Тежина против лизгање
- Platter and Drive Belt
- Фелт мат

Image: The Argon Audio TT MK2 Turntable with its clear dust cover in place, showcasing its sleek black finish.
Водич за поставување
1 Поставување
Place the turntable on a stable, level surface away from direct sunlight, heat sources, and strong vibrations. Ensure there is enough space around the unit for ventilation and operation.
2. Инсталација на плато и ремен
- Carefully place the metal platter onto the spindle.
- Locate the drive belt. Gently stretch the belt around the inner rim of the platter and hook it onto the motor pulley. Ensure the belt is not twisted.
- Ставете го филцот на врвот на чинијата.

Image: The Argon Audio TT MK2 Turntable with its dust cover removed, showing the platter and tonearm assembly.
3. Cartridge and Tonearm Setup
The Audio Technica AT3600 cartridge comes pre-mounted on the tonearm. Follow these steps to balance the tonearm and set the tracking force:
- Отстранете го заштитникот на пенкалото од кертриџот.
- Gently release the tonearm from its rest.
- Rotate the counterweight at the rear of the tonearm until the tonearm floats freely and is perfectly balanced horizontally.
- Once balanced, hold the counterweight steady and rotate the numbered ring on the front of the counterweight to "0".
- Rotate the entire counterweight (including the numbered ring) counter-clockwise until the desired tracking force is set. For the AT3600 cartridge, the recommended tracking force is typically 3.5 grams.

Слика: Крупен план view of the tonearm's counterweight and anti-skate mechanism, showing the numerical scale for adjustment.
4. Anti-Skate Adjustment
Attach the anti-skate weight to the small loop on the tonearm and hang it over the second groove of the anti-skate support rod. This helps prevent the stylus from skipping inwards.
5. Поврзување со аудио систем
The TT MK2 features a built-in phono pre-amplifier, allowing direct connection to powered speakers or an amplifier's line-level input. If your amplifier has a dedicated "Phono" input, you can bypass the internal pre-amp.
- Connect the supplied RCA cable from the "RCA OUT" jacks on the rear of the turntable to the corresponding input on your amplifier or powered speakers (e.g., "AUX", "LINE IN").
- Locate the "RIAA" switch on the rear of the turntable.
- Set the switch to "ON" if connecting to a line-level input (e.g., AUX, CD) on your amplifier or directly to powered speakers. This activates the internal phono pre-ampживописен.
- Set the switch to "OFF" if connecting to a dedicated "Phono" input on your amplifier. This bypasses the internal phono pre-amplifier, as your amplifier will provide the necessary RIAA equalization.

Image: The rear panel of the Argon Audio TT MK2 Turntable, showing the RCA output jacks, the RIAA (Phono/Line) switch, and the DC 12V power input.
6. Поврзување за напојување
Connect the supplied power adapter to the "DC IN 12V" port on the rear of the turntable, then plug the adapter into a wall outlet.
Упатства за работа
1. Вклучување/исклучување
Use the power switch located on the rear panel to turn the turntable ON or OFF.
2. Избор на брзина на репродукција
The TT MK2 supports two playback speeds: 33 1/3 RPM for LPs and 45 RPM for singles. Use the speed selection knob on the top right of the turntable to switch between "33" and "45".
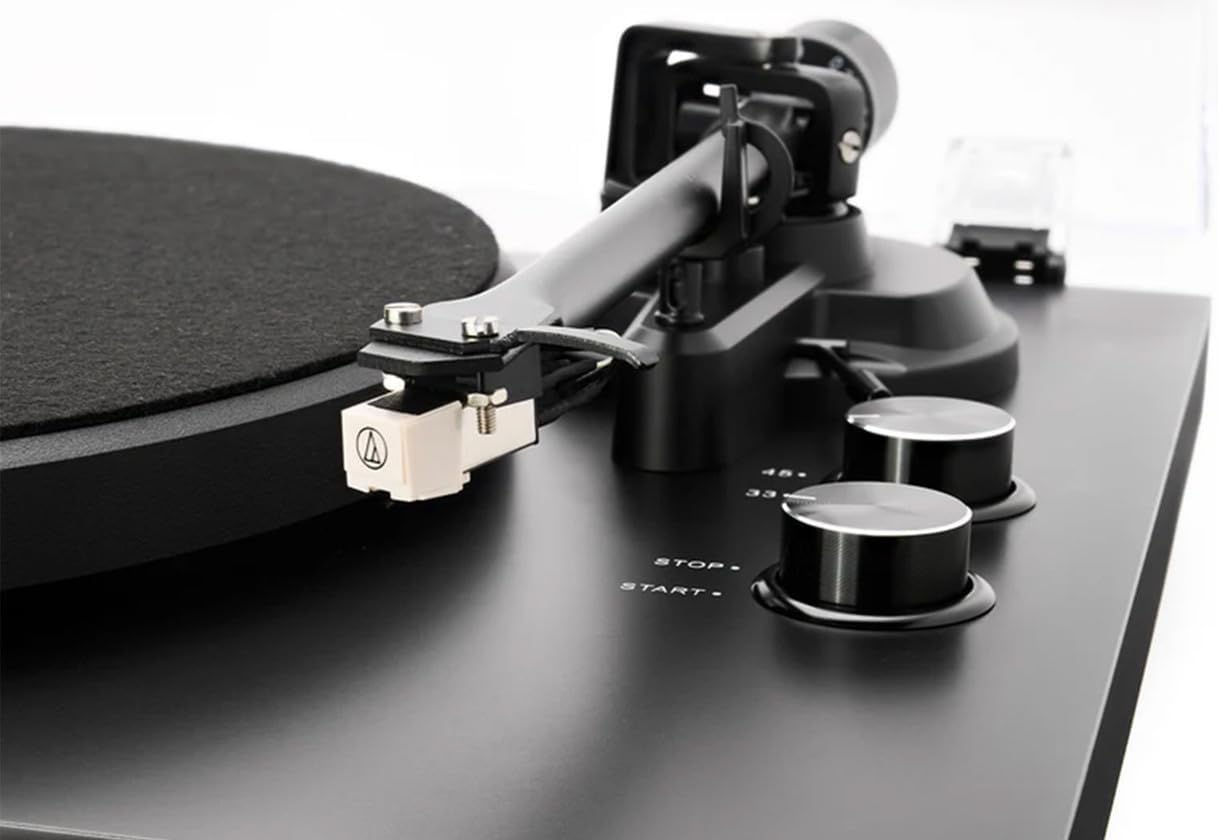
Image: A close-up of the Audio Technica AT3600 cartridge mounted on the tonearm, alongside the "STOP" and "START" buttons and the 33/45 RPM speed selection knob.
3. Репродукција на плоча
- Ставете плоча на послужавникот, осигурувајќи се дека е центрирана.
- Select the correct speed (33 or 45 RPM) using the speed knob.
- Press the "START" button. The platter will begin to rotate.
- Нежно подигнете ја тонераната рака користејќи ја рачката за покажување.
- Поставете го тонот над посакуваниот почетен жлеб на плочата.
- Полека спуштете ја рачката за сигнализирање за нежно да го спуштите пенкалото врз плочата.
4. Запирање на репродукцијата
- At the end of a record, the tonearm will not automatically return. Gently lift the tonearm using the cueing lever.
- Return the tonearm to its rest and secure it with the tonearm clip.
- Press the "STOP" button to halt platter rotation.
- Carefully remove the record.
Одржување
1. Чистење на пенкалото
The stylus (needle) should be cleaned regularly to ensure optimal sound quality and prevent damage to your records. Use a soft brush designed for stylus cleaning, brushing gently from back to front (away from the cantilever).
2. Евиденција за чистење
Always handle records by their edges. Use a carbon fiber brush or a dedicated record cleaning solution and cloth to remove dust and debris before each play.
3. Чистење на грамофонот
Wipe the turntable chassis and dust cover with a soft, dry, lint-free cloth. For stubborn marks, a slightly damp може да се користи крпа, а потоа сува крпа. Избегнувајте употреба на јаки хемикалии или абразивни средства за чистење.
4. Dust Cover Care
The dust cover protects your turntable from dust. When not in use, keep the dust cover closed. Clean it gently with a soft, damp cloth to avoid scratching the acrylic surface.
Решавање проблеми
If you experience issues with your Argon Audio TT MK2 Turntable, please consult the following table before contacting support:
| Проблем | Можна причина | Решение |
|---|---|---|
| Нема звук или звукот е многу слаб |
|
|
| Искривен или пригушен звук |
|
|
| Тавата не се врти |
|
|
| Speed issues (too fast/slow) |
|
|
Спецификации
| Карактеристика | Детал |
|---|---|
| Име на моделот | ТТ МК2 |
| Бренд | Аргон Аудио |
| Димензии (Ш x Д x В) | 42 x 35 x 12 cm |
| Тежина на ставката | 4.5 кг |
| Материјал | Engineered Wood, Aluminium |
| Боја | Црното |
| Картриџ | Audio Technica AT3600 (pre-fitted) |
| фоно пред-amp | Built-in, switchable (RIAA ON/OFF) |
| Ротациони брзини | 33 1/3 RPM, 45 RPM (electronic speed selection) |
| Поврзување | Излез на RCA |
| Вклучени компоненти | Turntable, Audio Technica AT3600 Cartridge, Dust Lid, RCA Cable, Power Adapter |
| Производител | Аргон Аудио |
| Земја на потекло | Данска |
Гаранција и поддршка
Argon Audio products are designed and manufactured to the highest quality standards. This product is covered by a manufacturer's warranty. Please refer to the warranty card included with your product or visit the official Argon Audio webстраница за детални услови за гаранција.
For technical support, troubleshooting assistance beyond this manual, or warranty claims, please contact your authorized Argon Audio dealer or Argon Audio customer service directly. Contact information can typically be found on the Argon Audio webсајт.
Ask a question about this manual
Ask about setup, troubleshooting, compatibility, parts, safety, or missing instructions. Manuals+ will review the question and use this page’s manual context to help answer it.