
1. Вовед
Thank you for choosing the VEVOR Computerized Sewing Machine. This manual provides essential information for the safe and efficient operation, maintenance, and troubleshooting of your new sewing machine. Please read it thoroughly before first use and keep it for future reference.
This versatile machine is designed for a wide range of sewing projects, from basic repairs to intricate decorative work, featuring 60 built-in stitch applications and user-friendly controls.

Слика 1.1: Предна страна view of the VEVOR Computerized Sewing Machine.
2. Инструкции за безбедност
За безбедно работење, секогаш следете ги овие основни безбедносни мерки:
- Секогаш исклучувајте ја машината од штекер кога не ја користите, кога ја чистите или кога правите какви било прилагодувања.
- Keep fingers away from all moving parts, especially the needle, while the machine is operating.
- Користете само додатоци препорачани од производителот.
- Никогаш не ракувајте со машината ако има оштетен кабел или приклучок, ако не работи правилно или ако е испадната или оштетена.
- Не користете на отворено и не работете каде што се користат аеросоли (спреј) производи или каде што се дава кислород.
- Чувајте ги децата и миленичињата подалеку од машината за време на работата.
3. Содржина на пакетот
Проверете дали сите артикли се присутни во пакувањето:

Figure 3.1: Included accessories and tools.
- VEVOR Computerized Sewing Machine (Model 2200)
- Foot Pedal + Power Cord (1 set)
- Упатство за употреба (1)
- Test Fabric (1)
- Покривка за прав (1)
- Buttonhole Foot (1)
- Bobbins (4 total - 1 in machine)
- Needles (Size 14#, 1 installed) (4)
- Twin Needle (1)
- Ripper / Brush (1)
- Guide Presser Foot (1)
- Zipper Foot (1)
- Multi-Use Cutter (1)
- Universal Presser Foot (Pre-Installed) (1)
4. Поставување
4.1 Поврзување за напојување
- Поставете ја машината на стабилна, рамна површина.
- Insert the power cord into the machine's power input jack.
- Вклучете го другиот крај од кабелот за напојување во соодветен штекер.
4.2 приклучок за педала за нозе
Connect the foot pedal cable to the designated port on the sewing machine. The foot pedal controls the sewing speed.
4.3 Намотување на макарата
Proper bobbin winding ensures smooth stitching. Follow the winding path indicated on the machine, ensuring the thread is taut and evenly distributed on the bobbin.
4.4 Навојување на горниот конец
Carefully follow the numbered threading path on the machine, ensuring the thread passes through all guides and tension discs correctly. The machine features an automatic needle threader for convenience.
4.5 Вметнување на макарата
This machine uses a vertical bobbin style. Insert the wound bobbin into the bobbin case, ensuring the thread feeds in the correct direction as per the machine's markings. Close the bobbin cover securely.
4.6 Changing the Needle
To change the needle, loosen the needle clamp screw, remove the old needle, insert the new needle with the flat side facing the back, and tighten the screw firmly. Always use the correct needle type for your fabric.
4.7 Changing the Presser Foot
To change the presser foot, lift the presser foot lever, press the release button on the back of the presser foot holder, and the foot will detach. Align the new presser foot with the pin on the holder and lower the lever to snap it into place.
5. Операција
5.1 Избор на бод
The VEVOR Computerized Sewing Machine offers 60 unique built-in stitches. Use the buttons next to the LED display to scroll through and select your desired stitch. The selected stitch number will be shown on the LED screen.

Слика 5.1: Прamples of various stitch patterns.
5.2 Прилагодување на должината и ширината на бодот
The machine allows for adjustable stitch length and width. These settings are often preset for each stitch but can be fine-tuned using the control buttons to achieve your desired result. Refer to the LED display for current settings.
5.3 Автоматска машина за навојување игли
To use the automatic needle threader, raise the needle to its highest position. Lower the threader mechanism, hook the thread, and release. The thread will pass through the needle eye, simplifying the threading process.
5.4 Sewing with Foot Pedal
Press the foot pedal to start sewing. The pressure applied to the pedal controls the sewing speed. Release the pedal to stop.

Figure 5.2: Operating the sewing machine.
5.5 Бесплатно шиење раце
To sew cylindrical items like cuffs, sleeves, or pant hems, remove the accessory box to convert the machine into free arm mode. This provides a narrow sewing surface for easier manipulation of fabric.
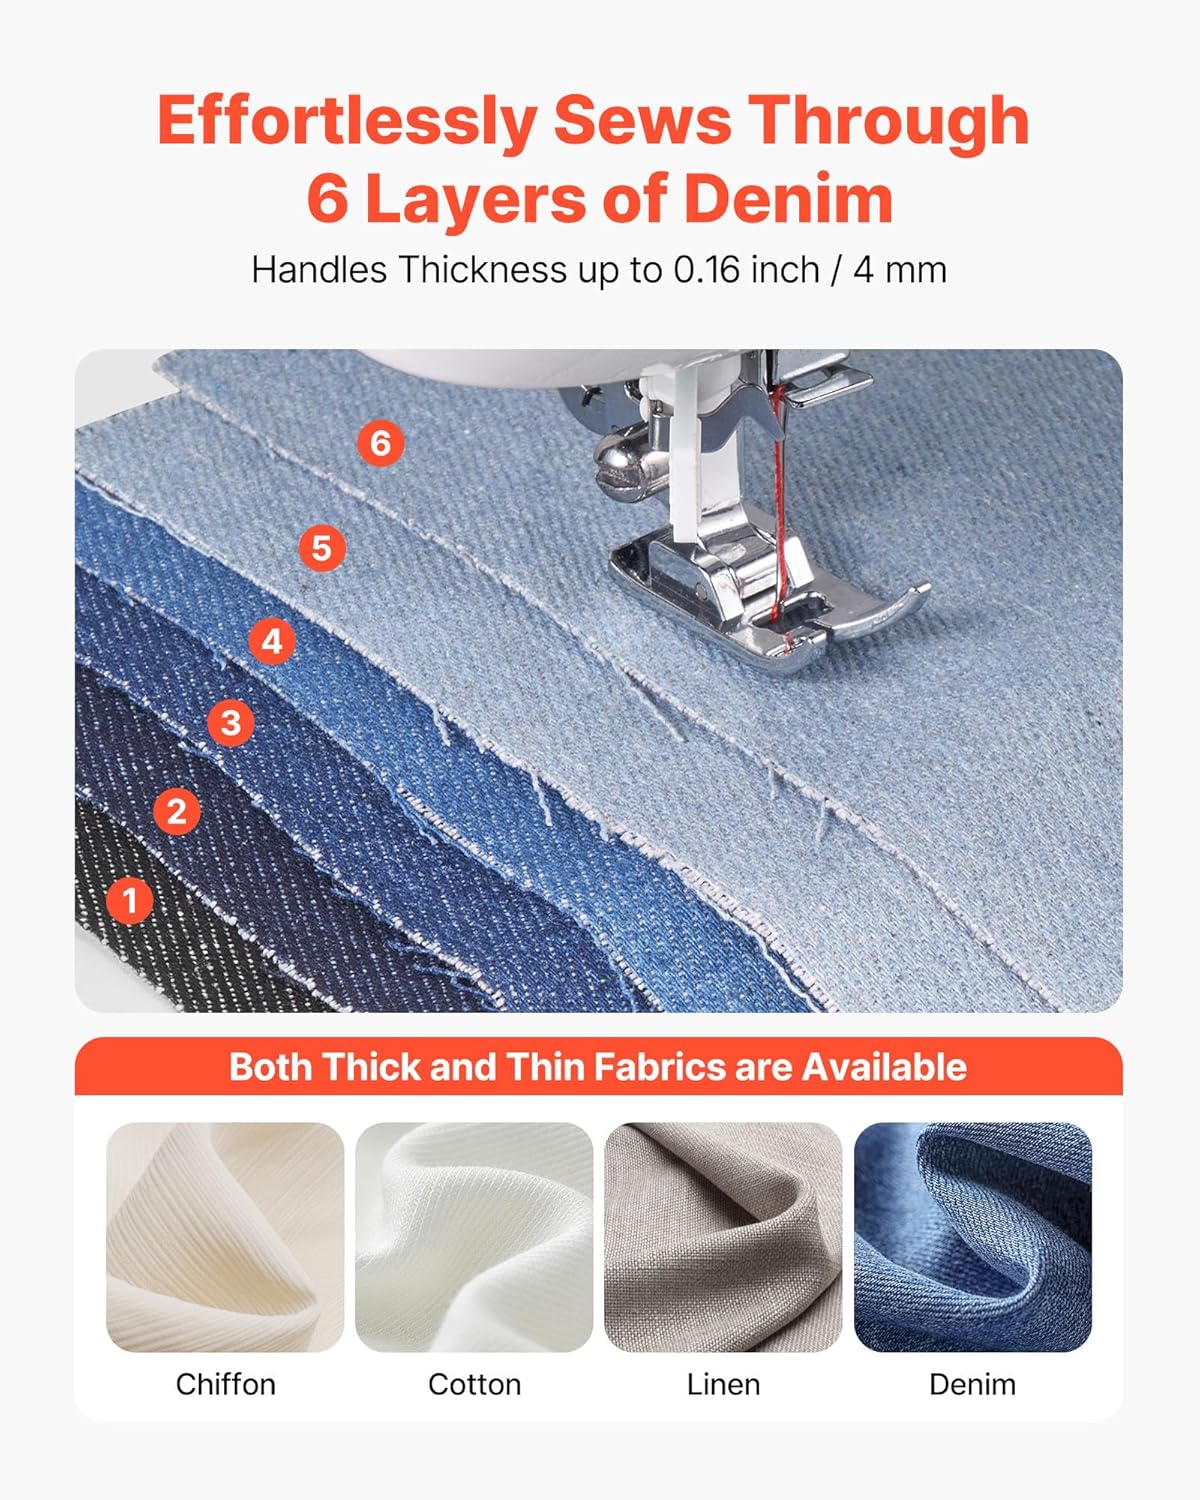
Figure 5.3: Sewing in free arm mode.
5.6 Twin Needle Sewing
For stronger seams or decorative stitching, the machine supports twin-needle sewing. Install the twin needle and thread both needles separately, following the machine's threading path for twin needles.

Figure 5.4: Twin needle setup for stronger seams.
5.7 Користење на LED светлото
The built-in LED light illuminates the sewing area, reducing shadows and eye strain, especially when working on dark fabrics or in low light conditions.
5.8 Sewing Different Fabrics
This machine is designed to handle a variety of fabric thicknesses, from thin chiffon to up to 6 layers of denim (0.16 inches / 4 mm thick). Adjust needle type, thread, and tension according to the fabric being sewn.
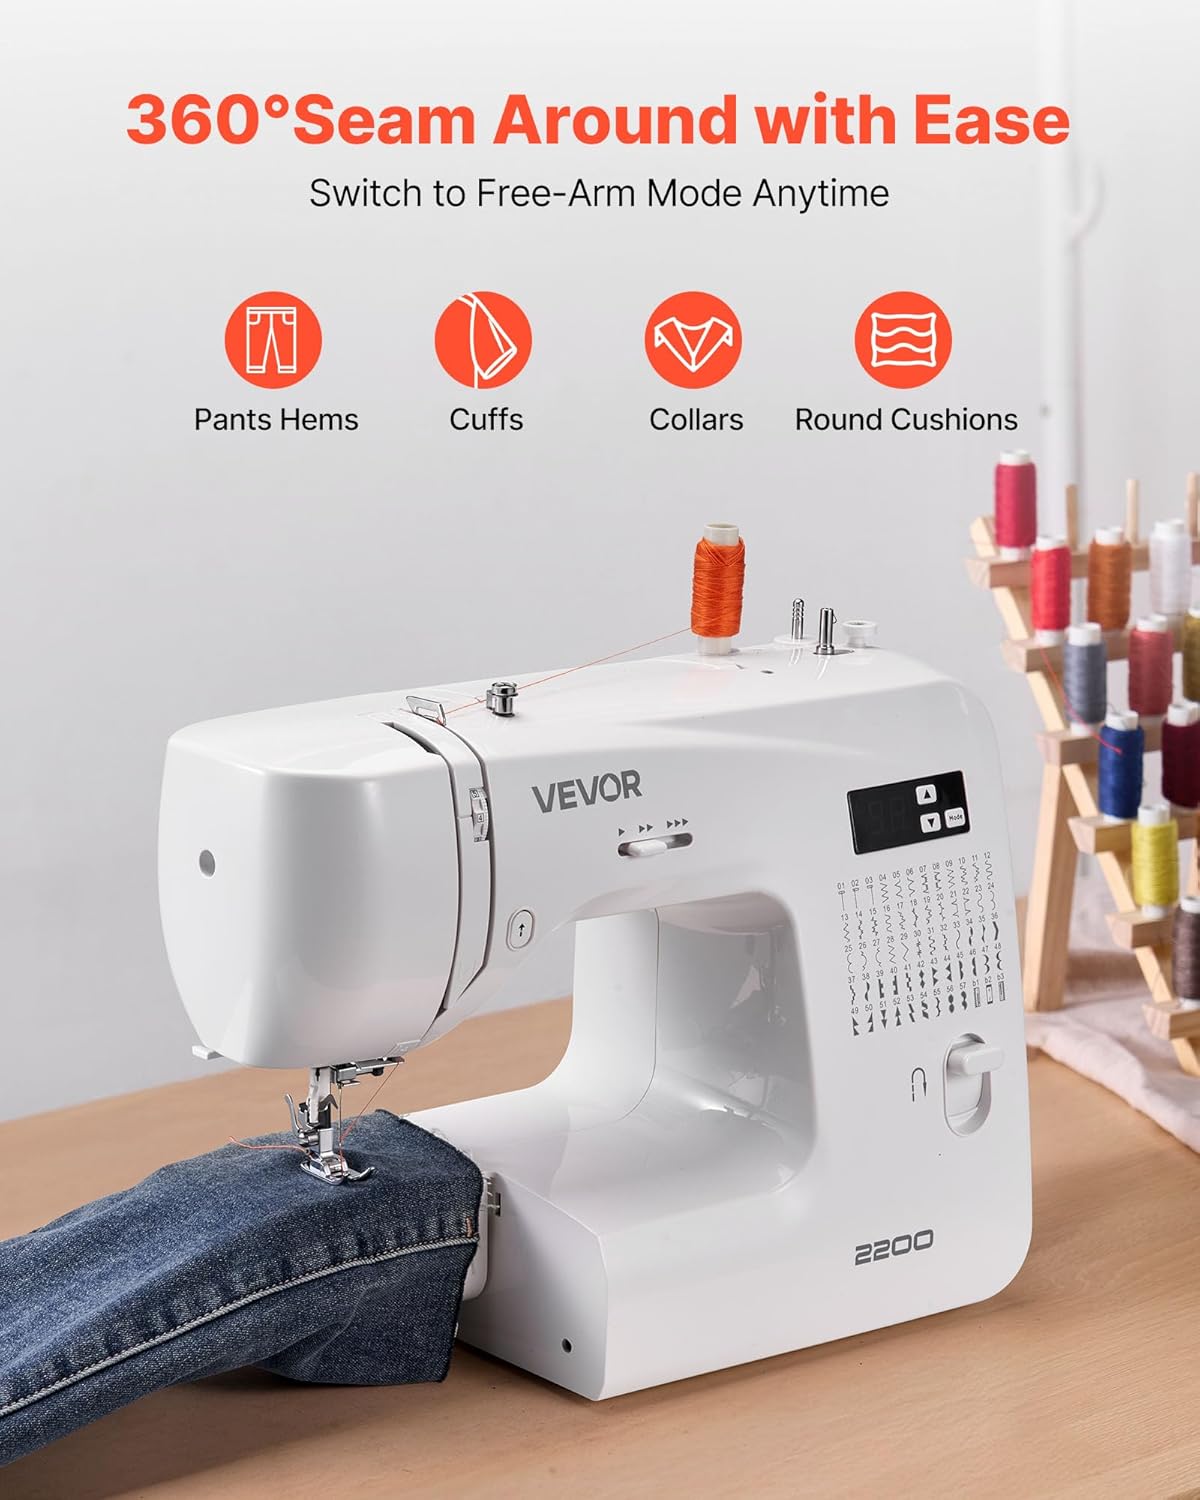
Figure 5.5: Machine demonstrating ability to sew through thick fabrics like denim.
6. Одржување
6.1 Чистење на машината
Regular cleaning is crucial for optimal performance. Use the provided brush to remove lint and dust from the feed dogs, bobbin area, and tension discs. Always unplug the machine before cleaning.
6.2 Replacing the Needle
Replace the needle regularly (after 8-10 hours of sewing) or if it becomes bent, dull, or damaged. A damaged needle can cause skipped stitches or fabric damage.
6.3 Општа нега
Keep the machine covered with the dust cover when not in use. Avoid pulling on the thread or fabric forcefully, as this can damage the needle or machine mechanisms. Store in a dry, cool place.
7 Смена на проблеми
Овој дел се однесува на вообичаени проблеми со кои може да се соочите. За проблеми што не се наведени овде, контактирајте ја службата за корисници.
| Проблем | Можна причина | Решение |
|---|---|---|
| Прекинување на конецот | Incorrect threading, tension too high, damaged needle, poor quality thread. | Re-thread the machine correctly, adjust tension, replace needle, use good quality thread. |
| Прескокнати шевови | Incorrect needle insertion, bent needle, wrong needle type for fabric, improper threading. | Re-insert needle correctly, replace bent needle, use appropriate needle, re-thread machine. |
| Machine jamming | Конец заплеткан во пределот на макарата, насобрани влакненца, неправилно вметнување на макарата. | Remove bobbin case and clear tangled thread/lint, re-insert bobbin correctly. |
| Poor stitch quality | Incorrect tension, wrong needle/thread combination, lint in tension discs. | Adjust tension, ensure correct needle/thread for fabric, clean tension discs. |
8. Спецификации
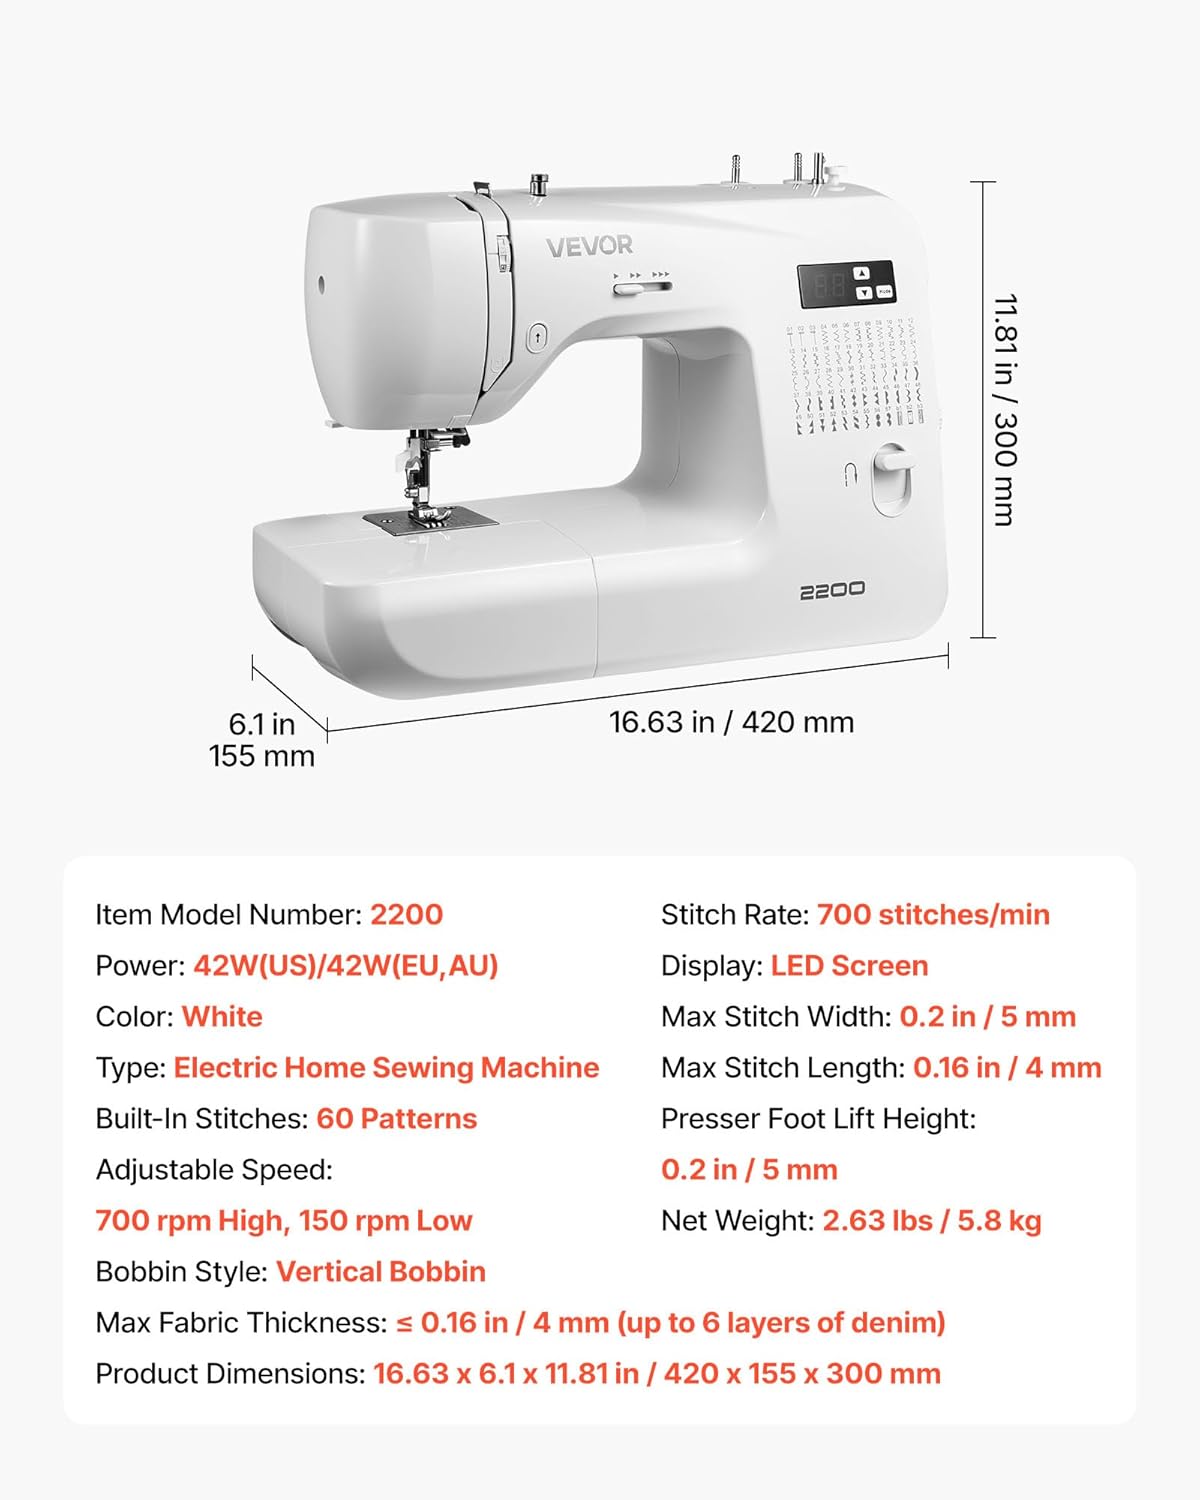
Слика 8.1: Димензии на производот и клучни спецификации.
| Карактеристика | Спецификација |
|---|---|
| Број на модел на ставка | 2200 |
| Моќ | 42W (US/EU/AU) |
| Боја | Бело |
| Тип | Електрична машина за шиење за дома |
| Вградени шевови | 60 Шаблони |
| Прилагодлива брзина | 700 вртежи во минута високо, 150 вртежи во минута ниско |
| Bobbin Style | Vertical Bobbin |
| Максимална дебелина на ткаенината | ≤ 0.16 инчи / 4 мм (до 6 слоеви тексас) |
| Димензии на производот (Д x Ш x В) | 16.63 во x 6.1 во x 11.81 инчи (420 mm x 155 mm x 300 mm) |
| Stitch Rate | 700 бодови/мин |
| Приказ | LED екран |
| Максимална ширина на бодот | 0.2 ин / 5 мм |
| Максимална должина на бод | 0.16 ин / 4 мм |
| Presser Foot Lift Height | 0.2 ин / 5 мм |
| Нето Тежина | 2.63 фунти / 5.8 кг |
| UPC | 197988696230 |
9. Гаранција и поддршка
За информации за гаранцијата, техничка поддршка или барања за услуги, ве молиме погледнете го официјалниот VEVOR. webстраницата или директно контактирајте ја нивната служба за корисници. Зачувајте ја сметката за купување како доказ за купување.
Електронска верзија од ова упатство за употреба е достапна за преземање: Преземи го упатството за користење (PDF)