WORKPRO W082191AE
WORKPRO 96x24" Heavy-Duty Adjustable Workbench Instruction Manual
Модел: W082191AE
Вовед
This manual provides detailed instructions for the assembly, operation, maintenance, and troubleshooting of your WORKPRO 96x24" Heavy-Duty Adjustable Workbench. Please read this manual thoroughly before use to ensure safe and efficient operation and to maximize the lifespan of your workbench.
The WORKPRO workbench is designed for demanding tasks in garages and workshops, featuring a robust construction and versatile functionalities.
Информации за безбедност
Always follow basic safety precautions when using this workbench to reduce the risk of injury or damage. Keep the work area clean and well-lit. Ensure the workbench is placed on a stable, level surface before use. Do not exceed the maximum load capacity of 4000 lbs.
- Пред употреба, проверете дали сите сврзувачки елементи се цврсто затегнати.
- Do not stand or climb on the workbench.
- Distribute weight evenly across the workbench surface.
- Keep children and unauthorized persons away from the workbench during use.
- Disconnect power from the integrated power outlet when not in use or during maintenance.
Список на компоненти
Before assembly, verify that all components are present and undamaged. If any parts are missing or damaged, contact customer service.
| Компонента | Количина | Опис |
|---|---|---|
| Rubber Wood Top | 1 | 96"x24" work surface, 1.2 inches thick. |
| Склопови на нозете | 4 | Industrial-grade Q195 square tubes with SPCC panels. |
| Нозе за израмнување | 4 | Adjustable feet for stability on uneven floors. |
| Појас за струја | 1 | ETL/FCC-certified with 4 AC outlets, 1 USB, 1 Type-C port, 5FT cord. |
| Штитница | 1 | Side-mounted for tool organization. |
| Куки за штипки | 20 | 10 long (3.9 in) and 10 short (2.2 in) hooks. |
| Хардвер за склопување | 1 комплет | Screws, bolts, and any necessary tools for assembly. |
Поставување и склопување
Assembly typically takes 15 minutes with clear instructions. It is recommended to have a Phillips screwdriver or electric drill with a screwdriver attachment, and a small drill for pilot holes, as some users have noted that pilot holes may not be pre-drilled for all screws.
Чекори на склопување:
- Прикачете ги нозете: Secure the leg assemblies to the workbench top using the provided hardware. Ensure the dual-screw fastening points are aligned.
- Secure the Bezel: Attach any bezels or support beams as indicated in the instructions to reinforce the structure.
- Прилагодете ја висината: The workbench offers 6 adjustable heights from 28-3/4" to 38-1/2". Adjust each leg to your desired height setting (indicated by pre-drilled holes) and secure with the provided fasteners.
- Connect the Leveling Feet: Screw the height-adjustable leveling feet into the bottom of each leg. Adjust them to compensate for uneven floors and ensure the workbench is perfectly level and stable.
- Install Pegboard and Hooks: Attach the side-mounted pegboard. Insert the 10 long (3.9 in) and 10 short (2.2 in) hooks into the pegboard holes to organize your tools.
- Connect Power Outlet: Ensure the ETL-certified power strip is securely integrated into the workbench. Plug the 5FT power cord into a suitable wall outlet.
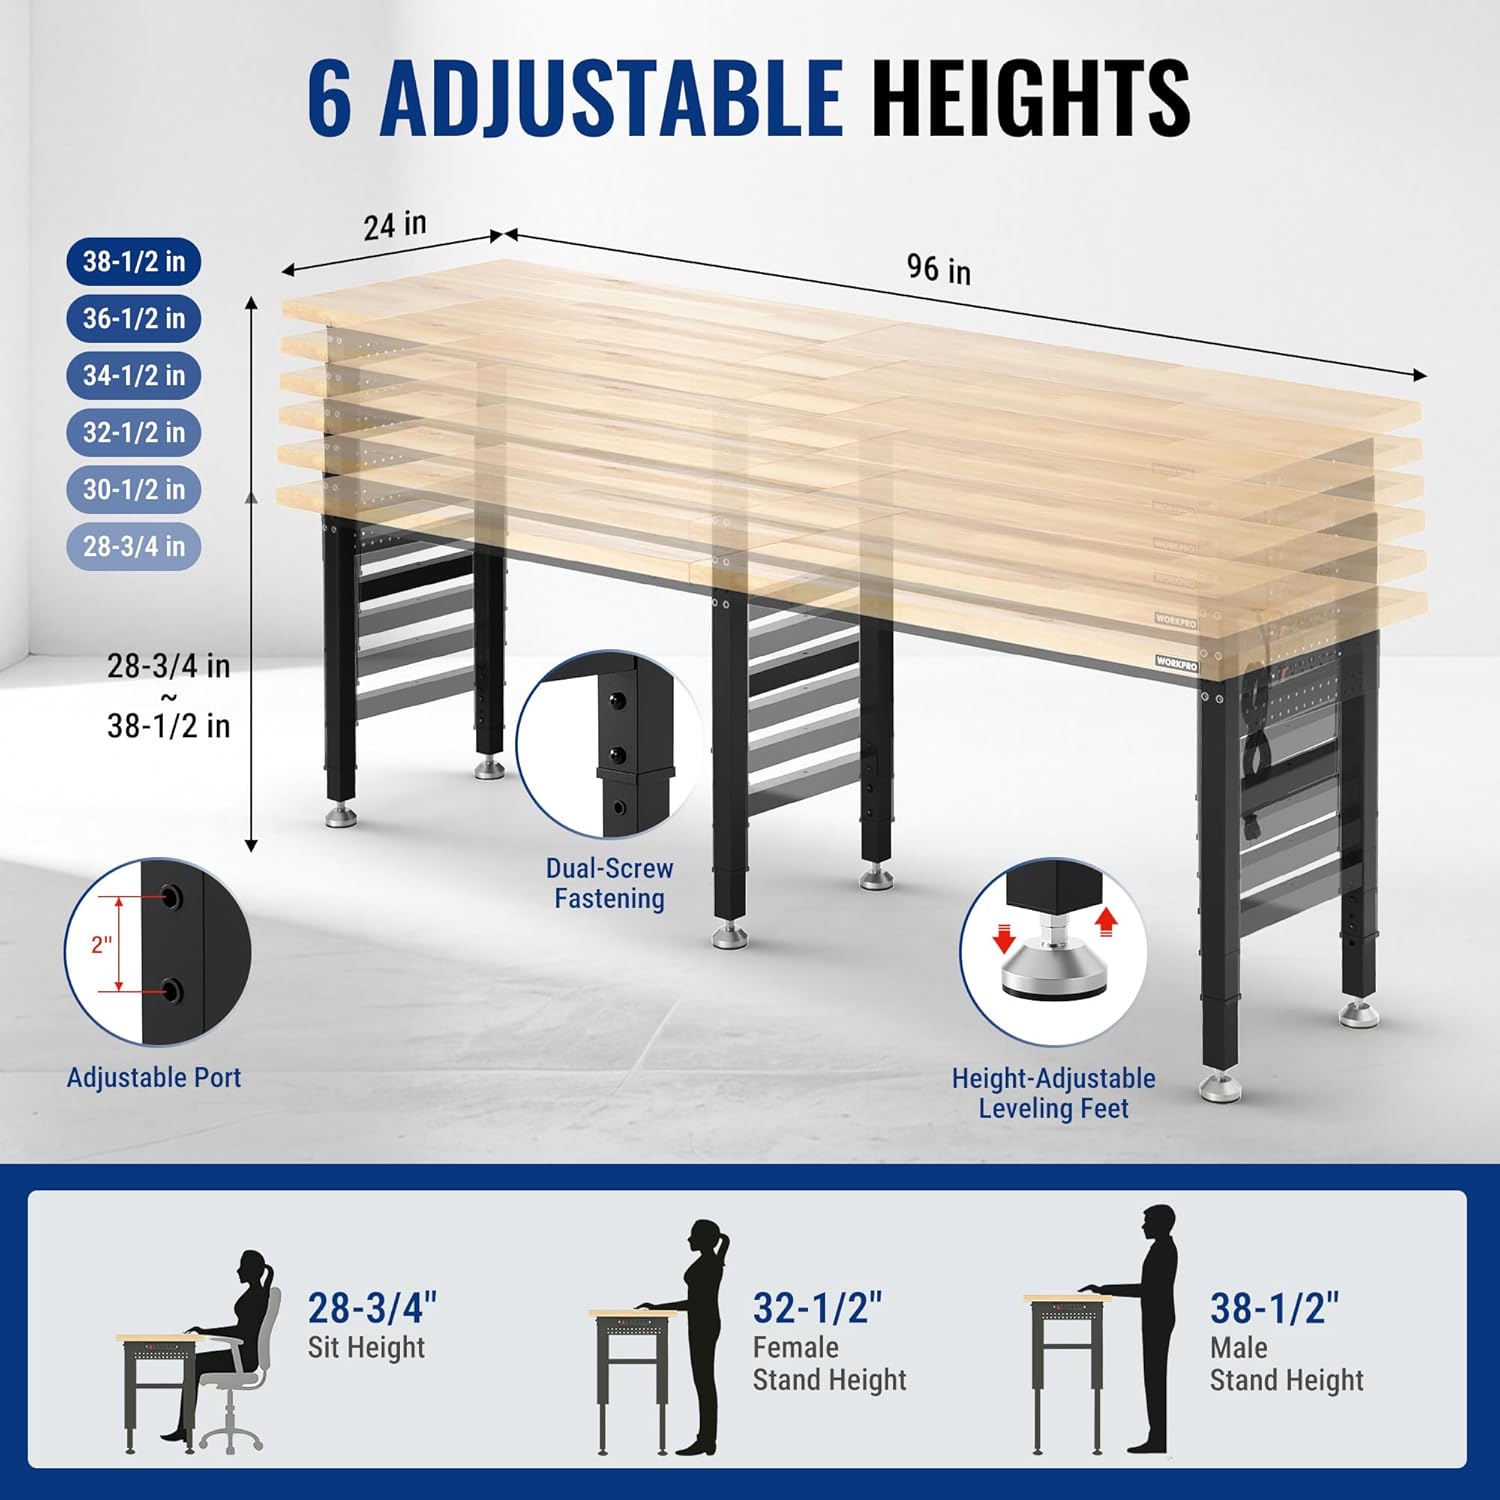
Figure 1: Attaching the workbench legs to the tabletop. Note the dual-screw fastening for stability.

Figure 2: Securing the bezel to the workbench frame for added structural integrity.

Figure 3: Diagram showing the six adjustable height options for the workbench, ranging from 28-3/4 inches to 38-1/2 inches.

Figure 4: Installation and adjustment of the height-adjustable leveling feet to ensure workbench stability.

Figure 5: The double-sided pegboard with various tools hung on the included hooks, demonstrating organized storage.

Figure 6: Close-up of the multi-functional power outlet, featuring 4 AC outlets, 1 USB port, and 1 Type-C port.
Video 1: Official WORKPRO video demonstrating the assembly process of the adjustable workbench.
Упатства за работа
Прилагодување на висината на работната маса:
To adjust the height, loosen the fasteners on each leg, slide the inner leg section to the desired height setting (indicated by pre-drilled holes), and re-tighten the fasteners securely. Ensure all legs are set to the same height for a level work surface. The workbench can be adjusted for sitting (28-3/4") or standing (up to 38-1/2") use.

Figure 7: The workbench demonstrating its adjustable height feature, suitable for both seated and standing work positions.
Користење на штекерот:
The integrated power strip provides convenient access to power for your tools and devices. It includes 4 AC outlets, 1 USB port, and 1 Type-C port. Plug the workbench's main power cord into a grounded wall outlet. Use the power strip's on/off switch to control power to the outlets. Always ensure tools and devices are within the power strip's electrical limits.
Utilizing the Pegboard:
The side-mounted pegboard and included hooks allow for organized storage of frequently used tools and accessories, keeping your workspace tidy and efficient.
Одржување
- Чистење: Wipe the rubber wood top with a damp cloth and mild detergent. Avoid harsh chemicals that may damage the wood finish. Clean the metal frame with a damp крпа.
- Проверка на прицврстувачите: Periodically check all screws and bolts for tightness. Re-tighten as necessary to maintain stability and safety.
- Грижа за дрвениот врв: The 1.2-inch thick solid rubber wood top is durable. To prolong its life and appearance, consider applying a wood conditioner or sealant periodically, especially if exposed to moisture or heavy use.
- Електрична безбедност: Inspect the power cord and power strip for any signs of damage. Do not use if damaged.
Решавање проблеми
| Проблем | Можна причина | Решение |
|---|---|---|
| Workbench is unstable or wobbles. | Uneven floor; loose fasteners; legs not adjusted to the same height. | Adjust the leveling feet until stable. Ensure all fasteners are tight. Verify all legs are set to the same height. |
| Приклучоците за струја не работат. | Power strip switch is off; not plugged into wall outlet; circuit breaker tripped. | Ensure the power strip switch is ON. Check if the workbench is plugged into a live wall outlet. Reset the circuit breaker if necessary. |
| Тешкотија при прилагодување на висината. | Fasteners are too tight; debris in adjustment holes. | Loosen fasteners completely before attempting to adjust. Clear any obstructions from the adjustment holes. |
Спецификации
- Модел: W082191AE
- Димензии (Д x Ш): 96 инчи x 24 инчи
- Прилагодлив опсег на висина: 28-3/4 inches to 38-1/2 inches
- Капацитет на носивост: 4000 фунти
- Материјал за маса: 1.2-inch thick Solid Rubber Wood
- Материјал на рамката: Industrial-grade Q195 Square Tubes, SPCC Panels (Metal)
- Штекер: ETL/FCC-certified, 4 AC outlets, 1 USB port, 1 Type-C port, 5FT power cord
- Пегтабла: Side-mounted, includes 20 hooks (10 long, 10 short)
- Израмнување: Height-adjustable leveling feet
- Потребно собрание: Да
- Бренд: WORKPRO
- Производител: ХАНГЖОУ ГРЕЈТСТАР ИНДУСТРИСКА КО., ДОО
- GTIN/UPC: 820909628316
Гаранција и поддршка
For warranty information or technical support, please refer to the documentation included with your purchase or contact WORKPRO customer service directly. Our expert customer service team is available to assist with any issues related to your workbench.
Контакт информациите обично може да се најдат на веб-страницата на производителот. webна локацијата или на пакувањето на производот.
Ask a question about this manual
Ask about setup, troubleshooting, compatibility, parts, safety, or missing instructions. Manuals+ will review the question and use this page’s manual context to help answer it.