1. Вовед
The Velleman DVM810 is a compact and economical 3 1/2 digit digital multimeter designed for measuring DC and AC voltages, DC currents, resistance, and for performing diode and transistor (hFE) tests. It features overload protection and automatic polarity indication, making it suitable for hobbyists, field use, and workshops. This manual provides essential information for the safe and effective operation of your DVM810 multimeter.
2. Карактеристики на производот
- Automatic polarity indication
- Voltage measurements: AC 500V and DC 500V maximum
- Current measurements: DC 10A maximum (0.2A fused, 10A unfused)
- Resistance measurements: Up to 2MΩ
- Diode and transistor (hFE) test functions
- Заштита од преоптоварување
- Compact design with 3 1/2 digit LCD display
3. Содржина на пакетот
Проверете ја содржината на пакувањето за да се осигурате дека сите артикли се присутни:
- Velleman DVM810 Дигитален мултиметар
- Тест сонди (една црвена, една црна)
- Упатство за употреба
4. Важни безбедносни информации
Read all safety warnings and instructions carefully before using this product. Failure to follow these instructions may result in electric shock, fire, or serious injury.
- Always ensure the multimeter is set to the correct function and range before making any measurements.
- Never exceed the maximum input limits for any range. The maximum voltage for AC/DC is 500V.
- Do not attempt to measure current on circuits with voltagе над 250 V.
- Inspect test leads for damaged insulation or exposed metal before each use. Replace damaged leads immediately.
- Не го користете мултиметарот ако изгледа оштетен или ако куќиштето е отворено.
- Exercise extreme caution when working with live circuits. Use appropriate personal protective equipment.
- Always disconnect power to the circuit and discharge high-voltage capacitors before measuring resistance or performing diode/transistor tests.
- Replace the battery when the low battery indicator appears on the display to ensure accurate readings.
5. Производот завршиview
Familiarize yourself with the components of your Velleman DVM810 multimeter:
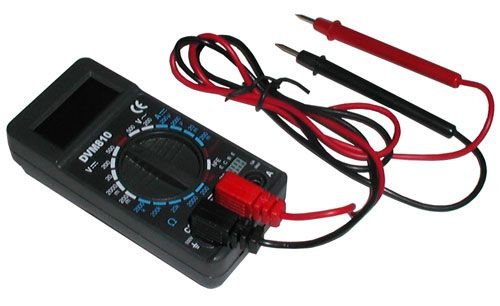
Figure 1: Velleman DVM810 Digital Multimeter. This image displays the front view of the compact multimeter, highlighting its liquid crystal display (LCD), the central rotary function switch, and the input jacks for test leads at the bottom.
- LCD дисплеј: Shows measurement readings, units, and polarity.
- Ротирачки прекинувач: Се користи за избор на саканата функција и опсег на мерење.
- Влезни дигалки:
- COM Џек: Common (negative) input for all measurements. Connect the black test lead here.
- VΩmA Џек: Позитивен влез за волуменtage, resistance, and current measurements up to 200mA. Connect the red test lead here.
- 10A Џек: Positive input for high current measurements (up to 10A). Connect the red test lead here for 10A measurements.
- Тест води: Red and black leads used to connect the multimeter to the circuit under test.
6. Поставување
6.1 Инсталација на батерија
The DVM810 multimeter requires a 9V battery (not always included). To install or replace the battery:
- Ensure the multimeter is turned OFF (rotary switch set to OFF).
- Пронајдете го капакот на преградата за батерии на задната страна од уредот.
- Remove the screw(s) securing the cover and carefully lift it off.
- Поврзете нова 9V батерија на спојката за батеријата, почитувајќи го правилниот поларитет.
- Ставете ја батеријата во преградата и вратете го капакот, прицврстувајќи го со завртката/шрафовите.
6.2 Поврзување на тест кабли
Секогаш правилно поврзувајте ги мерните сонди за точни и безбедни мерења:
- Вметнете го црниот тест одвод во COM (обичен) џек.
- За повеќето мерења (волуменtage, resistance, diode, hFE, and current up to 200mA), insert the red test lead into the VΩmA џек.
- За мерења на висока струја (до 10A), вметнете ја црвената мерна сонда во 10 А џек.
7. Упатства за работа
Before making any measurement, ensure the test leads are correctly connected and the rotary switch is set to the appropriate function and range.
7.1 Мерење DC Voltage (V=)
- Вметнете го црвениот олово во VΩmA jack and the black lead into the COM џек.
- Поставете го ротациониот прекинувач на саканата DC јачина на звукtage (V=) range. Start with the highest range if the voltagе непознато.
- Connect the test leads across the component or circuit to be measured (in parallel).
- Прочитајте го томtage value on the LCD display. The display will show the correct polarity.
7.2 Мерење AC Voltage (V~)
- Вметнете го црвениот олово во VΩmA jack and the black lead into the COM џек.
- Поставете го ротациониот прекинувач на саканата јачина на ACtage (V~) range. Start with the highest range if the voltagе непознато.
- Connect the test leads across the component or circuit to be measured (in parallel).
- Прочитајте го томtagе вредност на LCD екранот.
7.3 Мерење на еднонасочна струја (A=)
Caution: Never connect the multimeter in parallel with a voltagизворот при мерење на струја, бидејќи тоа може да го прегори осигурувачот или да го оштети мерачот.
- Determine the expected current. For currents up to 200mA, insert the red lead into the VΩmA jack. For currents up to 10A, insert the red lead into the 10 А jack. Always insert the black lead into the COM џек.
- Set the rotary switch to the appropriate DC Current (A=) range. Start with the highest range if the current is unknown.
- Turn off power to the circuit. Open the circuit where the current is to be measured.
- Поврзете го мултиметарот сериски со колото.
- Restore power to the circuit and read the current value on the LCD display.
7.4 Мерење на отпор (Ω)
Caution: Ensure the circuit is completely de-energized and all capacitors are discharged before measuring resistance.
- Вметнете го црвениот олово во VΩmA jack and the black lead into the COM џек.
- Set the rotary switch to the desired Resistance (Ω) range. Start with a higher range if the resistance is unknown.
- Поврзете ги мерните сонди преку компонентата што треба да се мери.
- Прочитајте ја вредноста на отпорот на LCD екранот.
7.5 Тест за диоди
Caution: Ensure the diode is disconnected from the circuit or the circuit is de-energized before testing.
- Вметнете го црвениот олово во VΩmA jack and the black lead into the COM џек.
- Поставете го ротациониот прекинувач на симболот за диода (→|).
- Поврзете го црвениот кабел со анодата, а црниот кабел со катодата на диодата. На екранот ќе се прикаже директниот волумен.tage drop (typically 0.5V to 0.8V for silicon diodes).
- Reverse the leads. The display should show 'OL' (Overload) for a good diode. If it shows a reading in both directions or 'OL' in both directions, the diode may be faulty.
7.6 Transistor (hFE) Test
Caution: Ensure the transistor is disconnected from the circuit before testing.
- Вметнете го црвениот олово во VΩmA jack and the black lead into the COM џек.
- Поставете го вртливиот прекинувач на положбата hFE.
- Identify if the transistor is NPN or PNP. Insert the transistor's emitter, base, and collector leads into the corresponding holes in the hFE socket on the multimeter.
- Прочитајте ја вредноста на hFE (засилување на еднонасочна струја) на LCD екранот.
8. Спецификации
| Параметар | Вредност |
|---|---|
| Бренд | Велеман |
| Број на модел | DVM810 |
| Тип на мерење | Мултиметар |
| DC Voltagе опсег | До 500 V |
| AC Voltagе опсег | До 500 V |
| Опсег на струја DC | Up to 10A (0.2A fused, 10A unfused) |
| Опсег на отпор | До 2MΩ |
| Тест за диоди | Да |
| Тест на транзистор (hFE) | Да |
| Приказ | 3 1/2 Digit LCD |
| Извор на енергија | Батерија од 9V (не е вклучена) |
| Димензии | Приближно 3.70" x 1.81" x 1.03" |
| Тежина на ставката | Приближно 3.2 унци (0.2 фунти) |
| UPC | 836479002272 |
9. Одржување
9.1 Замена на батеријата
When the low battery indicator appears on the LCD, replace the 9V battery as described in Section 6.1. A weak battery can lead to inaccurate readings.
9.2 Чистење
За чистење на мултиметарот, избришете го куќиштето со адхезија.amp cloth and a mild detergent. Do not use abrasives or solvents. Ensure the unit is completely dry before use.
9.3 Инспекција на тест-води
Regularly inspect the test leads for any signs of damage, such as cracked insulation, exposed wires, or loose connections. Replace damaged leads immediately to prevent electric shock hazards.
10 Смена на проблеми
- Нема екран или екранот е слаб: Проверете ја батеријата. Заменете ја доколку е потребно.
- Неточни читања:
- Проверете дали ротациониот прекинувач е поставен на точната функција и опсег.
- Проверете ја јачината на батеријатаtage; replace if low.
- Осигурајте се дека тест каблите се правилно поврзани и не се оштетени.
- За мерења на отпор, осигурајте се дека колото е исклучено од напон.
- Прикажан е „OL“ (Преоптоварување): Измерената вредност го надминува избраниот опсег. Изберете повисок опсег или осигурајте се дека струјното коло е во рамките на можностите на мерачот.
- Fuse blown (during current measurement): If the meter stops measuring current, the internal fuse may have blown. Refer to a qualified technician for fuse replacement.
11. Гаранција и поддршка
Warranty information for the Velleman DVM810 Digital Multimeter is typically provided with your purchase documentation or can be found on the official Velleman website. For technical support, service, or further inquiries, please refer to the contact information provided by your retailer or the manufacturer's official support channels.