1. Вовед
Thank you for choosing the Voltcraft VC-11 Digital Multimeter. This portable, Category III, 250V multimeter with a 2000-count display is designed for accurate electrical measurements in various applications. This manual provides essential information for safe operation, proper use, and maintenance of your device. Please read it thoroughly before use and keep it for future reference.
2. Информации за безбедност
WARNING: Electrical shock hazard. Improper use of this meter can cause damage, shock, injury, or death. Read and understand this manual before operating the meter.
- Always ensure the meter is in good working condition and the test leads are not damaged.
- Не применувајте повеќе од оценетиот томtage, како што е означено на мерачот, помеѓу терминалите или помеѓу кој било терминал и заземјување.
- Бидете внимателни кога работите со волtages above 25V AC RMS or 35V DC. These voltagтие претставуваат опасност од шок.
- Секогаш исклучувајте ги тест каблите од колото пред да ги промените функциите или опсезите.
- Do not operate the meter with the battery cover removed or loosened.
- Adhere to local and national safety codes. Use personal protective equipment (PPE) such as approved safety glasses and electrically insulated gloves.
3. Производот завршиview
The Voltcraft VC-11 is a compact digital multimeter featuring a clear LCD display, a rotary function switch, and input jacks for test leads. It is designed for measuring DC/AC voltage, DC current, resistance, and includes diode and continuity test functions.
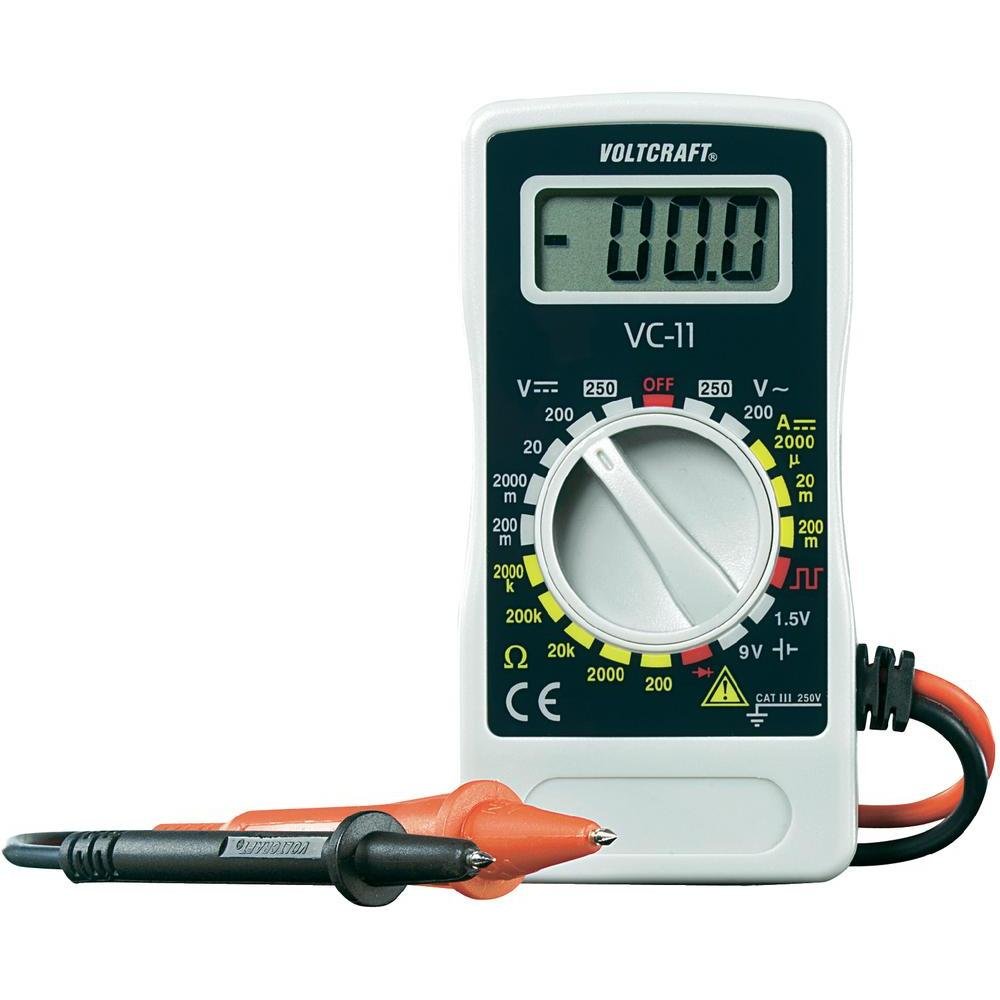
Слика 1: Предна страна view of the Voltcraft VC-11 Digital Multimeter with test leads connected. This image shows the LCD display, rotary switch, and input terminals.

Слика 2: Аголна view of the Voltcraft VC-11 Digital Multimeter, highlighting the compact design and the CE marking.

Figure 3: The Voltcraft VC-11 Digital Multimeter shown with its test leads detached, illustrating the input ports.
3.1 Компоненти
- LCD дисплеј: Ги прикажува отчитувањата на мерењата, единиците и индикаторите за функции.
- Ротирачки прекинувач: Used to select measurement functions and ranges.
- Влезни дигалки: Ports for connecting the test leads (COM, VΩmA).
- Тест води: Red and black leads for connecting to the circuit under test.
4. Поставување
4.1 Инсталација на батерија
The Voltcraft VC-11 requires a 9V battery for operation (not included). To install or replace the battery:
- Осигурајте се дека мултиметарот е исклучен и исклучете ги сите тест кабли.
- Пронајдете го капакот на преградата за батерии на задната страна од мерачот.
- Користете шрафцигер за да го отстраните завртката што го прицврстува капакот на батеријата.
- Внимателно отстранете го капакот.
- Поврзете нова 9V батерија на спојката за батеријата, почитувајќи го правилниот поларитет.
- Ставете ја батеријата во преградата и вратете го капакот, прицврстувајќи го со завртката.
4.2 Поврзување на тест кабли
Always connect the black test lead to the 'COM' (common) jack. Connect the red test lead to the appropriate input jack based on the desired measurement:
- За Voltage (V), Resistance (Ω), Diode, and Continuity measurements, connect the red lead to the 'VΩmA' jack.
- For Current (A) measurements, connect the red lead to the 'VΩmA' jack (for mA range).
5. Упатства за работа
Пред да извршите какво било мерење, проверете дали мерните сонди се правилно поврзани и дали ротациониот прекинувач е поставен на саканата функција и опсег.
5.1 Мерење DC Voltage (V=)
- Поставете го ротациониот прекинувач на саканата DC јачина на звукtage (V=) range (e.g., 200mV, 2V, 20V, 200V, 250V). If the voltage е непознато, почнете со највисокиот опсег и намалувајте по потреба.
- Connect the black test lead to the 'COM' jack and the red test lead to the 'VΩmA' jack.
- Поврзете ги тест сондите паралелно преку компонентата или колото што треба да се мери.
- Прочитајте го томtagе вредност на LCD екранот.
5.2 Мерење AC Voltage (V~)
- Поставете го ротациониот прекинувач на саканата јачина на ACtage (V~) опсег (на пр., 200V, 250V).
- Connect the black test lead to the 'COM' jack and the red test lead to the 'VΩmA' jack.
- Connect the test probes in parallel across the AC source or component.
- Прочитајте го томtagе вредност на LCD екранот.
5.3 Мерење на еднонасочна струја (A=)
- Set the rotary switch to the desired DC Current (A=) range (e.g., 2000µA, 20mA, 200mA).
- Connect the black test lead to the 'COM' jack and the red test lead to the 'VΩmA' jack.
- ПРЕДУПРЕДУВАЊЕ: To measure current, the meter must be connected in series with the circuit. Break the circuit and insert the meter.
- Поврзете ги тест сондите сериски со струјното коло.
- Прочитајте ја моменталната вредност на LCD дисплејот.
5.4 Мерење на отпор (Ω)
- Пред мерење на отпорот, проверете дали колото е исклучено од напон.
- Set the rotary switch to the desired Resistance (Ω) range (e.g., 200Ω, 2kΩ, 20kΩ, 200kΩ, 2000kΩ).
- Connect the black test lead to the 'COM' jack and the red test lead to the 'VΩmA' jack.
- Поврзете ги тест сондите преку компонентата што треба да се мери.
- Прочитајте ја вредноста на отпорот на LCD екранот.
5.5 Тест за диоди
- Осигурајте се дека колото е исклучено од напон.
- Set the rotary switch to the Diode symbol (usually next to resistance).
- Connect the black test lead to the 'COM' jack and the red test lead to the 'VΩmA' jack.
- Поврзете ја црвената сонда на анодата, а црната сонда на катодата на диодата. На екранот ќе се прикаже напонот напред.tagд капка.
- Reverse the probes. The display should show 'OL' (Overload) for a good diode.
5.6 Тест за континуитет
- Осигурајте се дека колото е исклучено од напон.
- Set the rotary switch to the Continuity symbol (usually next to diode/resistance).
- Connect the black test lead to the 'COM' jack and the red test lead to the 'VΩmA' jack.
- Поврзете ги тест сондите преку колото или компонентата.
- If the resistance is below a certain threshold (typically 30-50Ω), the meter will emit an audible beep, indicating continuity.
6. Одржување
6.1 Чистење
Избришете го мерачот со рекламаamp крпа и благ детергент. Не користете абразивни средства или растворувачи. Пред употреба, проверете дали мерачот е целосно сув.
6.2 Замена на батеријата
When the battery symbol appears on the LCD display, the 9V battery needs to be replaced. Refer to section 4.1 for battery installation instructions.
7 Смена на проблеми
| Проблем | Можна причина | Решение |
|---|---|---|
| Нема екран или екранот е затемнет | Потрошена или ниска батерија | Заменете ја батеријата од 9V. |
| Неточни читања | Incorrect function/range selected Poor test lead connection Damaged test leads | Select the correct function and range. Ensure test leads are firmly connected. Inspect and replace damaged test leads. |
| Прикажан е „OL“ (Преоптоварување) | Measurement exceeds selected range Open circuit (for resistance/current) | Select a higher range. Check for breaks in the circuit. |
8. Спецификации
- Бренд: ВОЛТЦРАФТ
- Број на модел: VC11
- Производител: ВОЛТЦРАФТ
- Тежина на производот: Approximately 9.07 g (without packaging)
- Димензии на пакетот: 14.8 x 8 x 3.6 cm
- Оценка на категоријата: CAT III 250V
- Прикажи: 2000 брои
- Извор на енергија: Батерија од 9V (не е вклучена)
9. Информации за гаранцијата
This product is covered by a standard manufacturer's warranty. Please refer to the warranty card included with your purchase or contact your retailer for specific terms and conditions. The warranty typically covers defects in materials and workmanship under normal use.
10. Поддршка за корисници
For technical assistance, troubleshooting, or service inquiries, please contact Voltcraft customer support or your local distributor. Contact information can usually be found on the manufacturer's webна локацијата или на пакувањето на производот.


