1. Вовед
This manual provides essential information for the safe and efficient use of your Hitachi CP-EX251N XGA 3LCD Projector. Please read this manual thoroughly before operating the projector and keep it for future reference. The CP-EX251N is designed for clear, bright projections with 2700 lumens brightness and XGA (1024x768) native resolution, featuring 3LCD technology and a long-life lamp.
2. Информации за безбедност
Следете ги следниве безбедносни мерки за да спречите пожар, електричен удар или повреда.
- Извор на енергија: Use only the power supply specified for this unit. Ensure the power cord is securely plugged into an outlet.
- Вентилација: Не ги блокирајте отворите за вентилација. Обезбедете доволен простор околу проекторот за правилен проток на воздух за да спречите прегревање.
- Топлина: Проекторот лamp станува многу жешко за време на работата. Оставете проекторот да се олади пред да ракувате или да вршите одржување.
- Lamp: Не гледајте директно во објективот на проекторот кога lamp е вклучено, бидејќи силната светлина може да ви ги оштети очите.
- Влага: Не изложувајте го проекторот на дожд или влага за да спречите пожар или електричен удар.
- Сервисирање: За сите сервиси обратете се кај квалификуван сервисер. Не обидувајте се сами да го отворите или поправите проекторот.
3. Содржина на пакетот
Проверете дали сите артикли се присутни во пакувањето:
- Hitachi CP-EX251N Projector
- Кабел за напојување
- Далечински управувач со батерии
- VGA кабел
- Упатство за употреба (овој документ)
4. Производот завршиview

Слика 4.1: Аголна view of the Hitachi CP-EX251N Projector, showing the lens, control panel, and ventilation.
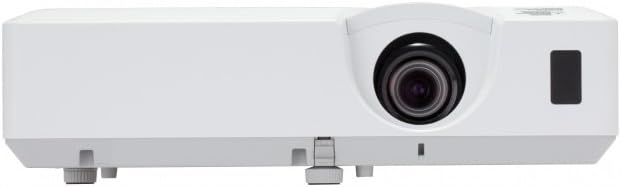
Слика 4.2: Предна страна view of the Hitachi CP-EX251N Projector, highlighting the projection lens and front IR receiver.
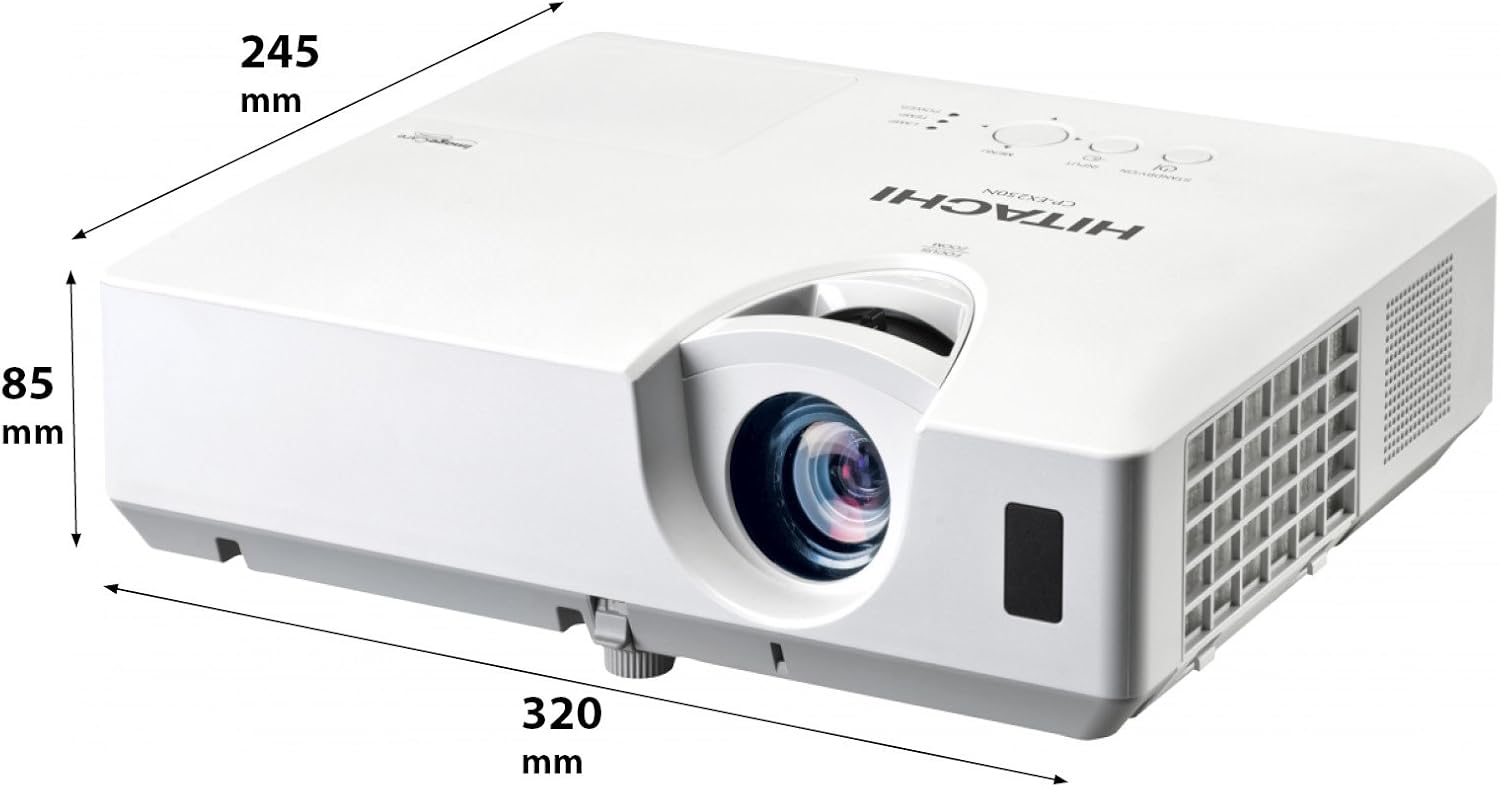
Слика 4.3: Аголна view of the projector illustrating its approximate dimensions (320mm length, 245mm width, 85mm height).
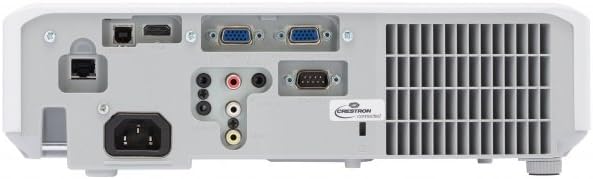
Figure 4.4: Rear panel of the projector, showing various input and output ports including HDMI, VGA, Composite, RS232C, and RJ45.
5. Поставување
5.1 Поставување
Position the projector on a stable, flat surface or mount it securely. Ensure the projector is at an appropriate distance from the screen to achieve the desired image size. Maintain clear space around the projector for ventilation.
5.2 Поврзување напојување
- Поврзете го кабелот за напојување со приклучокот за наизменична струја на проекторот.
- Приклучете го другиот крај на кабелот за напојување во заземјен електричен штекер.
5.3 Поврзување на влезни извори
The CP-EX251N offers multiple connectivity options:
- HDMI: Connect an HDMI cable from your source device (e.g., laptop, Blu-ray player) to the projector's HDMI port.
- VGA: Connect a VGA cable from your computer to one of the projector's VGA ports (VGA1 or VGA2).
- Композитно видео: Use an RCA composite video cable to connect devices like DVD players to the composite video input.
- Аудио: Connect audio cables to the corresponding audio input jacks if using analog video sources.
- Контрола: For remote control and monitoring, connect an RS232C serial cable or an RJ45 Ethernet cable to a control system.
5.4 Initial Power On and Image Adjustment
- Press the Power button on the projector or remote control. The power indicator will light up.
- Прилагодете го Фокус прстен on the lens until the image is sharp.
- Прилагодете го Прстен за зумирање on the lens to achieve the desired image size.
- Ако сликата изгледа трапезоидно, користете го Корекција на клучеви function (usually found in the projector menu or via dedicated buttons on the remote) to square the image.
6. Работење
6.1 Вклучување/исклучување
- За вклучување: Притиснете го копчето за вклучување еднаш.
- За исклучување: Press the Power button twice. The projector will enter a cooling cycle before shutting down completely. Do not unplug the projector during the cooling cycle.
6.2 Избор на влез
Press the 'Input' or 'Source' button on the remote control or projector control panel to cycle through available input sources (HDMI, VGA1, VGA2, Composite).
6.3 Навигација на мени
Use the 'Menu' button to access the on-screen display (OSD) menu. Navigate using the arrow buttons and confirm selections with the 'Enter' button. The menu allows adjustment of picture settings, audio, display options, and system settings.
6.4 Прилагодувања на сликата
Within the OSD menu, you can adjust:
- Осветленост: Прилагодете ја вкупната осветленост или темнина на сликата.
- Контраст: Adjust the difference between the light and dark areas of the image.
- Режим на боја: Select from various preset modes (e.g., Standard, Dynamic, Cinema, sRGB) or customize settings.
- Сооднос: Променете го соодносот на екранот (на пр., 4:3, 16:9).
6.5 еко режим
Activate Eco Mode to reduce lamp brightness, conserve energy, and extend lamp life up to 10,000 hours. This setting can be found in the projector's OSD menu.
7. Одржување
7.1 Чистење на објективот
Нежно избришете го објективот на проекторот со мека крпа без влакненца, специјално дизајнирана за оптички површини. Не користете абразивни средства за чистење или прекумерна сила.
7.2 Чистење на филтерот за воздух
Regularly clean the air filter to maintain optimal performance and prevent overheating. Refer to the projector's OSD menu for filter usage time. Remove the filter cover and gently clean the filter with a soft brush or vacuum cleaner. Replace the filter if it is damaged or excessively dirty.
7.3 лamp Замена
Проекторот лamp has a long lifespan, but will eventually require replacement. When the lamp indicator lights up or the image becomes dim, replace the lamp. Always use a genuine Hitachi replacement lamp. Allow the projector to cool completely before attempting lamp replacement. Consult the full service manual for detailed lamp инструкции за замена.
7.4 Складирање
When storing the projector for an extended period, ensure it is powered off and cooled down. Store it in a cool, dry place, away from direct sunlight and extreme temperatures.
8 Смена на проблеми
| Проблем | Можна причина | Решение |
|---|---|---|
| Нема моќ | Power cord disconnected; Power outlet faulty; Projector in standby mode. | Check power cord connection; Try a different outlet; Press the Power button. |
| Нема прикажана слика | Input source not selected; Cable not connected properly; Source device not outputting signal. | Select correct input source; Reconnect video cable; Check source device settings. |
| Сликата е искривена или заматена | Focus/Zoom not adjusted; Keystone not corrected; Projector not perpendicular to screen. | Adjust Focus and Zoom rings; Use Keystone correction; Reposition projector. |
| Нема звук | Audio cable not connected; Volume too low; Mute function active. | Connect audio cable (if applicable); Increase volume; Deactivate mute. |
| Далечинскиот управувач не работи | Batteries depleted; Obstruction between remote and projector; Remote sensor blocked. | Replace batteries; Remove obstructions; Ensure clear line of sight to IR sensor. |
9. Спецификации
| Карактеристика | Спецификација |
|---|---|
| Број на модел | CP-EX251N |
| Технологија на прикажување | 3 LCD |
| Осветленост | 2700 лумени |
| Мајчин резолуција | XGA (1024 x 768) |
| Lamp Животот | Up to 10,000 hours (in Eco Mode) |
| Поврзување | HDMI x 1, VGA x 2, Component (Shared) x 2, Composite x 1, RS232C, RJ45 |
| Аудио излез | 16W звучник |
| Тежина на ставката | 6.83 фунти (приближно 3.1 кг) |
| Димензии на производот | 6 x 12 x 14 инчи (приближно 15.2 x 30.5 x 35.6 см) |
| Препорачана употреба | Бизнис, Образование, Игри, Домашно кино |
| Специјална карактеристика | Пренослив |
10. Гаранција и поддршка
За информации за гаранцијата, ве молиме погледнете ја гарантната картичка вклучена во вашиот производ или посетете ја официјалната страница на Hitachi. website. For technical support, service, or inquiries about replacement parts, please contact Hitachi customer service through their official channels.
Поддршка преку Интернет: www.hitachi.com/support (Прampлинкот, ве молиме погледнете ја документацијата за вистинскиот производ за точни информации. URL)


