1. Вовед
This manual provides detailed instructions for the installation, operation, and maintenance of your Alpine MRV-M500 Class D Mono Car Amplifier. Please read this manual thoroughly before attempting installation or operation to ensure proper use and to prevent damage to the unit or your vehicle's electrical system. The Alpine MRV-M500 is designed to deliver powerful and clear audio performance for your car's subwoofer system.
2. Информации за безбедност
- Исклучете ја батеријата: Always disconnect the negative terminal of your vehicle's battery before beginning any installation work to prevent electrical shorts and potential injury.
- Професионална инсталација: If you are unsure about any part of the installation process, it is highly recommended to seek assistance from a qualified professional installer.
- Правилно поврзување: Use appropriate gauge wiring for power, ground, and speaker connections as specified in this manual to prevent overheating and ensure optimal performance. Incorrect wiring can lead to fire or equipment failure.
- Вентилација: Обезбедете го amplifier is mounted in a location with adequate ventilation to prevent overheating. Do not cover the amplifier with carpets or other materials that could obstruct airflow.
- Нивоа на гласност: Продолженото изложување на високи нивоа на јачина на звук може да предизвика оштетување на слухот. Прилагодете ја јачината на звукот на безбедно и удобно ниво.
3. Содржина на пакетот
Проверете дали сите артикли се присутни во вашиот пакет:
- Alpine MRV-M500 Mono Car Ampживописен
- Wiring Kit (Power cable, Ground cable, Remote turn-on wire, RCA interconnects, Speaker wire, Fuse holder, Fuse, Terminals, Cable ties)
- Хардвер за монтирање (завртки)
- Упатство за сопственикот (овој документ)

Image 1: Alpine MRV-M500 amplifier and various components of the included wiring kit, including power cables, RCA cables, speaker wire, and mounting hardware.

Image 2: The Alpine MRV-M500 amplifier shown with its mounting brackets and a wiring harness, indicating components for installation.
4. Поставување и инсталација
4.1 Локација за монтирање
Изберете место за монтирање кое обезбедува соодветна вентилација за amplifier. Avoid mounting in enclosed spaces or directly on carpet. Secure the amplifier firmly to a solid surface using the provided mounting hardware to prevent movement during vehicle operation.
4.2 Приклучоци за жици
Refer to the diagram below and the following instructions for proper wiring. Ensure all connections are secure and insulated.
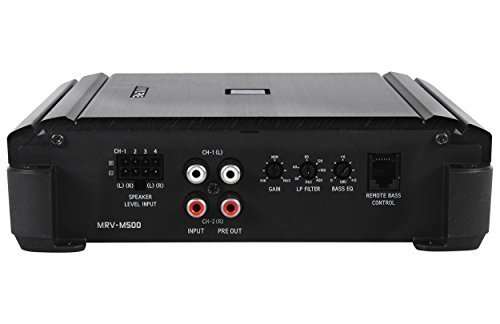
Image 3: Rear panel of the Alpine MRV-M500 amplifier, displaying the various input and control connections including speaker level input, RCA input/pre-out, gain, LP filter, bass EQ, and remote bass control port.
4.2.1 Поврзување за напојување
- Connect the power cable (typically red) from the amplifier's +12V terminal to the positive terminal of the vehicle's battery.
- Install the fuse holder within 18 inches (45 cm) of the battery and insert the appropriate fuse (refer to specifications for fuse rating).
4.2.2 Приклучување на земјата
- Connect the ground cable (typically black) from the ampGND терминалот на ладилникот на чиста, необоена метална површина на шасијата на возилото.
- Ensure the ground point is free of paint, rust, or dirt for a good electrical connection. The ground cable should be as short as possible, ideally less than 3 feet (1 meter).
4.2.3 Remote Turn-On Connection
- Connect the remote turn-on wire (typically blue) from the amplifier's REM terminal to the remote output of your head unit. This wire turns the ampВклучување и исклучување на ладилникот со аудио системот на вашиот автомобил.
4.2.4 Input Connection (RCA or Speaker Level)
- Влез RCA: Ако вашата главна единица има RCA предизлези, поврзете ги со amplifier's RCA INPUT terminals (CH-1(L) and CH-2(R)).
- Влез за ниво на звучник: If your head unit does not have RCA pre-outs, use the speaker level input harness. Connect the speaker wires from your head unit's speaker outputs to the corresponding wires on the amplifier's speaker level input harness.
4.2.5 Поврзување на звучникот
- Поврзете го/ги вашиот/те сабвуфер/и со amplifier's SPEAKER OUTPUT terminals.
- Ensure correct polarity (+ to + and - to -) for optimal sound performance.
4.2.6 Remote Bass Control (Optional)
- If using an optional remote bass control, connect it to the REMOTE BASS CONTROL port on the ampживописен.
5. Упатства за работа
Откако ќе се инсталира, прилагодете го ampпоставки на лифирачот за оптимални звучни перформанси.
5.1 Контроли и прилагодувања
- ДОБИВКА: This control matches the output level of your head unit to the input sensitivity of the amplifier. Start with the gain set to minimum, then slowly increase it until you achieve a clear, undistorted sound at your desired maximum volume from the head unit. Avoid setting the gain too high, as this can introduce distortion.
- LP FILTER (Low Pass Filter): Оваа контрола ја поставува горната граница на фреквенцијата за amplifier's output. For subwoofers, set this to a frequency typically between 50Hz and 120Hz. This ensures that only low-frequency sounds are sent to the subwoofer, improving overall sound clarity.
- BASS EQ: This control provides a bass boost at a specific frequency. Use sparingly and adjust carefully to avoid distortion or damage to your subwoofer.
- REMOTE BASS CONTROL: If connected, this allows for convenient adjustment of the bass level from the driver's seat.
6. Одржување
- Чистење: Периодично бришете го ampИзбришете ја надворешноста на ладилникот со мека, сува крпа. Не користете јаки хемикалии или абразивни средства за чистење.
- Проверки за поврзување: Regularly inspect all wiring connections to ensure they are secure and free from corrosion. Loose connections can lead to poor performance or damage.
- Замена на осигурувачи: Ако на amplifier stops working, check the fuse in the external fuse holder. Replace it only with a fuse of the exact same type and rating. Never use a higher-rated fuse.
7 Смена на проблеми
Ако имате проблеми со вашите ampлифирач, консултирајте се со следната табела пред да контактирате со поддршката.
| Проблем | Можна причина | Решение |
|---|---|---|
| Без струја / Ampлафијачот не се вклучува | Запален осигурувач Лабава врска за напојување или заземјување Нема сигнал за далечинско вклучување | Проверете и заменете го осигурувачот Проверете дали сите приклучоци за напојување и заземјување се безбедни Check remote wire connection to head unit |
| Нема звук | Loose RCA or speaker wires Неправилен избор на влез Засилувањето е поставено премногу ниско | Check all input and output connections Ensure correct input (RCA or speaker level) is used Прилагодете ја контролата на засилувањето |
| Искривен звук | Засилувањето е поставено превисоко Incorrect LP Filter setting Оштетен звучник | Намалете ја поставката за засилување Adjust LP Filter to appropriate frequency Inspect speaker for damage |
| Ampлафијач Прегрее | Несоодветна вентилација Несоодветна импеданса на звучникот Одржлив висок волумен | Обезбедете соодветен проток на воздух наоколу ampживописен Проверете ги совпаѓањата на импедансата на звучникот ampможностите на лифирачот Намалете ја јачината на звукот или дозволете ampладилник за ладење |
8. Спецификации
- Модел: MRV-M500
- Производител: Алпски
- Ampпоживо Тип: Класа D Моно
- RMS моќност: 500 вати
- Број на канали: 1 (моно)
- Voltage: 14.4 Volts (nominal)
- Тип на монтирање: Површинска монтажа
- Број на модел на ставка: MRV-M500+RWK81
9. Гаранција и поддршка
This Alpine product is covered by a manufacturer's warranty. Please refer to the warranty card included with your product or visit the official Alpine website for detailed warranty terms and conditions. For technical support, service, or further assistance, please contact Alpine customer service.
Поддршка за корисници на Alpine: Refer to your product packaging or the official Alpine webстраница за тековни информации за контакт.


