1. Вовед
The Viltrox JY-610C is a compact and lightweight mini speedlite designed for Canon DSLR cameras. It supports E-TTL, Manual (M), and Multi (Stroboscopic) flash modes, offering versatile lighting control. This manual provides detailed instructions for the proper setup, operation, and maintenance of your JY-610C flash unit.
2. Информации за безбедност
- Не расклопувајте го уредот и не обидувајте се сами да го поправите. Обратете се кај квалификуван сервисер.
- Чувајте го уредот сув. Не го изложувајте на дожд или влага.
- Користете само одредени AA батерии. Не мешајте стари и нови батерии или различни типови батерии.
- Избегнувајте директно изложување на очите на блицот, особено од блиску, бидејќи тоа може да предизвика привремено оштетување на видот.
- Да се чува подалеку од дофат на деца.
3. Содржина на пакетот
Проверете дали сите артикли се присутни во пакувањето:
- Viltrox JY-610C Mini Speedlite
- Торба за носење
- User Manual (English and Chinese)
Забелешка: AA батериите не се вклучени и мора да се купат одделно.
4. Производот завршиview
Familiarize yourself with the components and controls of the Viltrox JY-610C Mini Flash Light.
Слика 4.1: Предна страна View
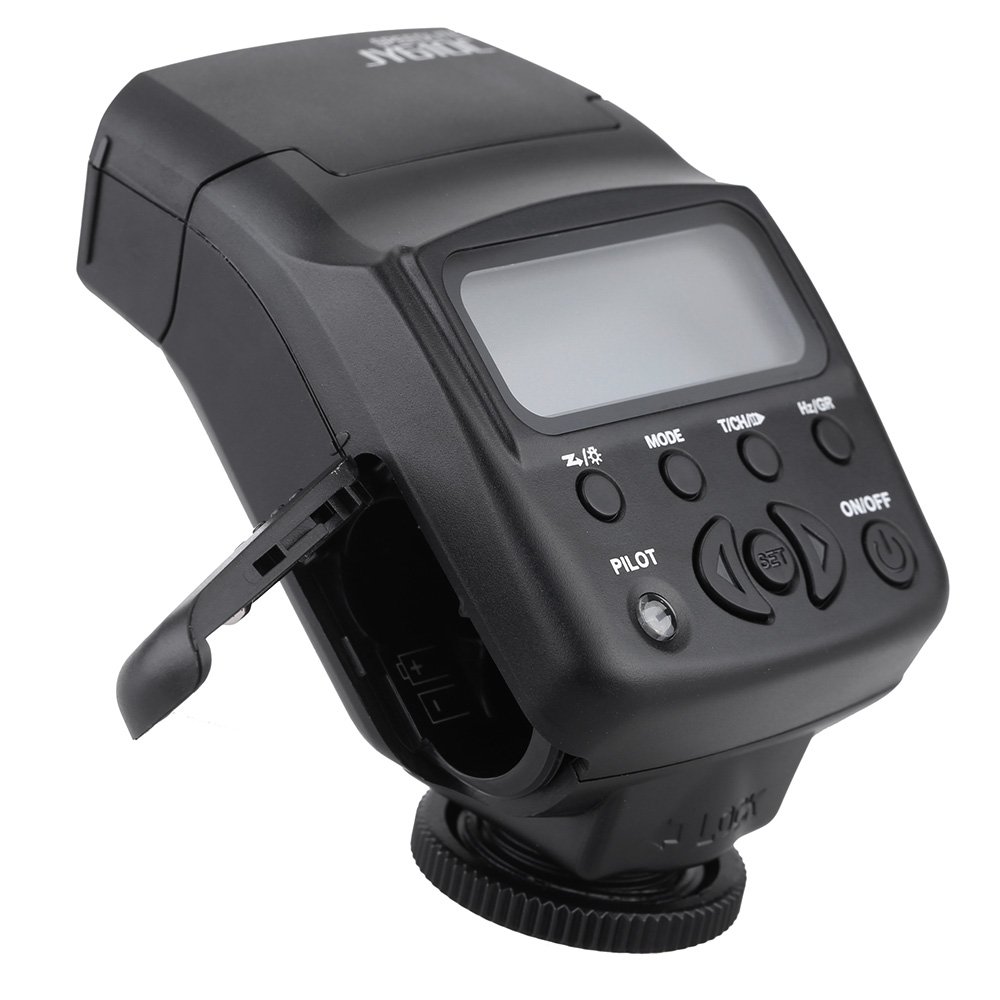
This image shows the front of the Viltrox JY-610C flash unit, highlighting the LCD display, control buttons (Pilot, Mode, T/CH/D, Hz/GR, ON/OFF), and the hot shoe mount with its locking mechanism.

Слика 4.2: Врв View
Врвот view of the Viltrox JY-610C, displaying the "SPEEDLITE JY610C" branding and the flash head. This perspective shows the compact design of the unit.

Слика 4.3: Страна View with Battery Compartment Open
This image illustrates the side of the flash unit with the battery compartment door open, revealing the slots for AA batteries. This is where batteries are inserted or replaced.
Слика 4.4: Заден дел View
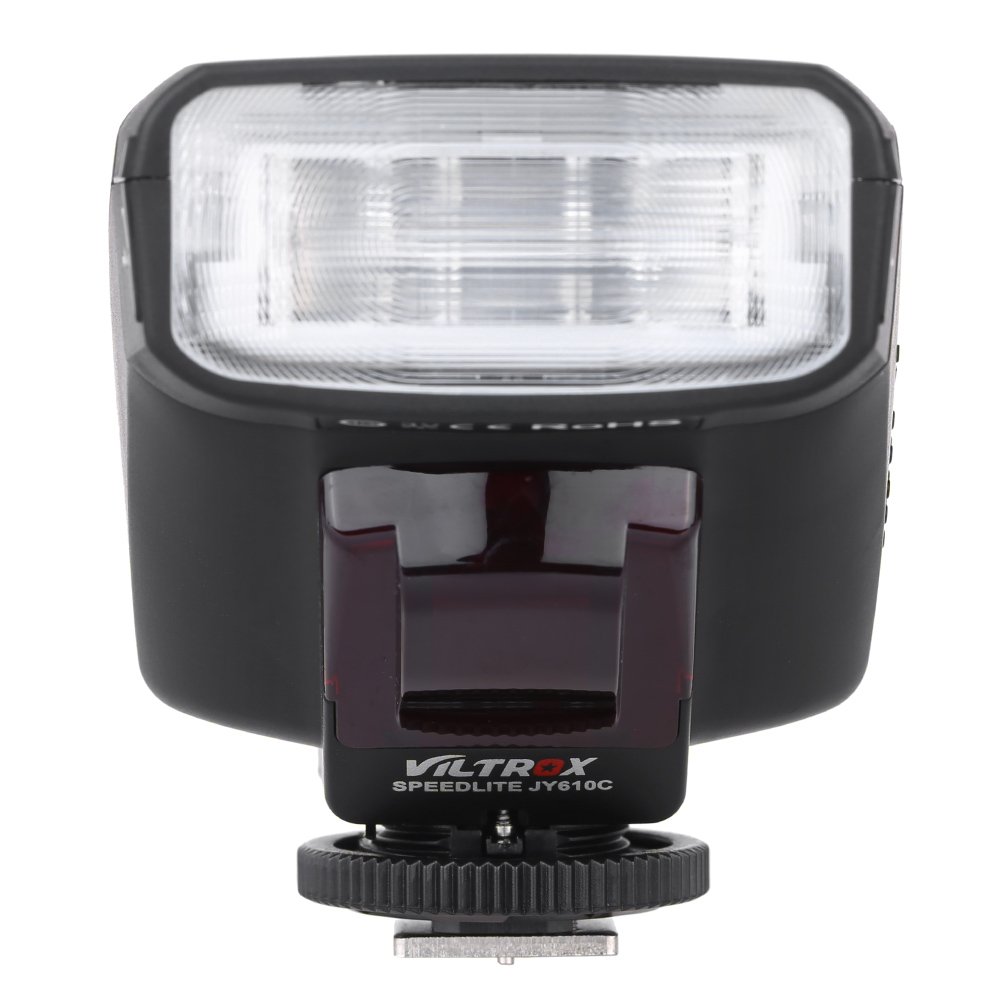
Задниот дел view of the Viltrox JY-610C, showing the hot shoe connection point for mounting on a camera, the slave sensor (red window), and regulatory markings. The locking ring for secure attachment is also visible.

Figure 4.5: LCD Display Modes
This composite image shows the Viltrox JY-610C flash unit alongside close-ups of its LCD screen displaying different operational modes: Manual (M) with power setting, Multi (Stroboscopic) with frequency and flash count, and E-TTL with exposure compensation. This demonstrates the user interface for mode selection and settings adjustment.
4.1. Контролен панел
- LCD екран: Displays current settings and mode.
- Копче за вклучување/исклучување: Го вклучува или исклучува уредот.
- Копче MODE: Cycles through E-TTL, M (Manual), and Multi (Stroboscopic) flash modes.
- T/CH/D Button: Used for setting channels/groups in slave mode or other parameters.
- Hz/GR Button: Used for setting frequency in Multi mode or groups.
- PILOT Button: Test flash button. Also serves as a flash-ready indicator (red light).
- Копчиња за насока (горе/долу/лево/десно): Навигирајте низ менијата и прилагодете ги поставките.
- Копче SET: Ги потврдува изборите.
5. Поставување
5.1. Инсталација на батерија
- Open the battery compartment cover located on the side of the flash unit (refer to Figure 4.3).
- Insert two (2) AA-size batteries according to the polarity indicators inside the compartment.
- Добро затворете го капакот на преградата за батерии.
Забелешка: Осигурајте се дека батериите се правилно вметнати за да спречите оштетување на уредот.
5.2. Монтирање на камерата
- Slide the hot shoe mount of the JY-610C into the hot shoe of your Canon DSLR camera.
- Rotate the locking ring clockwise until the flash unit is securely fastened to the camera's hot shoe. Do not overtighten.
- To remove, rotate the locking ring counter-clockwise and slide the flash unit off the hot shoe.
6. Работни режими
Притиснете го РЕЖИМ button to cycle through the available flash modes: E-TTL, M (Manual), and Multi (Stroboscopic).
6.1. E-TTL Mode (Automatic Flash)
In E-TTL mode, the flash output is automatically controlled by the camera to achieve optimal exposure. This mode is ideal for general photography.
- Притиснете РЕЖИМ until "E-TTL" appears on the LCD screen (refer to Figure 4.5).
- You can adjust Flash Exposure Compensation (FEC) using the directional buttons (e.g., +1/3, +2/3, etc.) if needed. Press ПОСТАВЕТЕ да се потврди.
- The flash will fire automatically based on the camera's metering.
6.2. Рачен (M) режим
Manual mode allows you to set the flash output power manually, providing precise control over lighting.
- Притиснете РЕЖИМ until "M" appears on the LCD screen (refer to Figure 4.5).
- Use the directional buttons to adjust the flash output from 1/1 (full power) to 1/128, with 22 levels of fine tuning.
- Притиснете ПОСТАВЕТЕ to confirm the power setting.
6.3. Multi (Stroboscopic) Mode
Multi mode fires the flash multiple times during a single exposure, creating stroboscopic effects for capturing motion.
- Притиснете РЕЖИМ until "Multi" appears on the LCD screen (refer to Figure 4.5).
- Use the directional buttons to set the flash frequency (Hz) and the number of flashes.
- Притиснете ПОСТАВЕТЕ да се потврди.
6.4. Slave Modes (S1/S2)
The JY-610C can function as an optical slave unit, triggered by another flash.
- Режим S1: The flash will fire in response to the first flash it detects. Suitable for manual flash triggers.
- Режим S2: The flash will ignore the pre-flash from a master E-TTL flash and fire on the main flash. Suitable for E-TTL master flashes.
- To activate slave mode, press and hold the T/CH/D button until "SLAVE" appears, then use directional buttons to select S1 or S2.
- The unit supports 4 channels in 3 groups for more complex multi-flash setups.
7. Напредни карактеристики
7.1. Компензација на експозиција
In E-TTL mode, you can adjust the flash exposure compensation to fine-tune the brightness of your subject. Use the directional buttons to increase or decrease the exposure value.
7.2. Front-Curtain Sync / Rear-Curtain Sync
The JY-610C supports both front-curtain and rear-curtain sync. This setting is typically controlled via your camera's flash menu. Consult your camera's manual for specific instructions on how to enable these features.
- Синхронизација на предната завеса: Блицот се вклучува веднаш откако ќе се отвори блендата.
- Синхронизација на задната завеса: The flash fires just before the shutter closes. Useful for creating motion blur effects with the flash freezing the subject at the end of the exposure.
7.3. Adjustable Vertical Angle
The flash head can be tilted vertically to angles of 60, 75, and 90 degrees. This allows for bounce flash photography, directing the light off a ceiling or wall for softer, more natural illumination.
8. Одржување
- Чистење: Користете мека, сува крпа за чистење на блицот. За тврдокорна нечистотија, малкуamp може да се користи крпа, а потоа сува крпа. Не користете јаки детергенти или растворувачи.
- Складирање: When not in use for extended periods, remove the batteries to prevent leakage and store the unit in its carrying bag in a cool, dry place.
- Нега на батеријата: Replace batteries when the recycle time becomes excessively long or the flash-ready indicator does not light up.
9 Смена на проблеми
| Проблем | Можна причина | Решение |
|---|---|---|
| Блицот не свети. |
|
|
| Долго време на рециклирање. |
|
|
| Излезот на блицот е премногу светол/темен. |
|
|
| Slave mode not triggering. |
|
|
10. Спецификации
| Карактеристика | Детал |
|---|---|
| Број на водич | GN27 (ISO 100/m) |
| Режим на блиц | E-TTL / M / Multi |
| Режим на робови | Slave / S1 / S2 (4 channels in 3 groups) |
| Контрола на блиц | 8 levels of output control (1/128 - 1/1), 22 levels of fine tuning |
| Flash-ready indicator | Црвено пилотско светло |
| Ефективен опсег на блиц | 0.7 - 19.3m (Quick flash: 0.7 - 11.1m) |
| Време за рециклирање | 0.1 - 4 секунди |
| Flash Times | 100 - 680 times (with fresh AA batteries) |
| Напојување | 2 x AA батерии (не се вклучени) |
| Големина на ставка | 8.5 х 6 х 4.5 см / 3.3 х 2.4 х 1.8ин |
| Тежина на ставката | 145 g / 5.1 oz |
| Прилагодлив вертикален агол | 60 / 75 / 90 degrees |
| Sync Support | Front-curtain sync / Rear-curtain sync |
| Компензација на изложеност | Поддржано |
11. Гаранција и поддршка
For warranty information and technical support, please refer to the warranty card included with your product or visit the official Viltrox webлокација. Чувајте ја сметката како доказ за купување за гаранциски побарувања.


