1. Вовед
The Bionik Tetra Power is a compact charging dock designed for Nintendo Switch Joy-Con controllers. It allows for simultaneous charging of up to four Joy-Con controllers, providing a convenient and organized charging solution. This manual provides essential information for the proper setup, operation, and maintenance of your Tetra Power charging dock.

Image 1.1: Bionik Tetra Power Charging Dock in its retail packaging. The packaging highlights its ability to charge four Joy-Con controllers and its compatibility with Nintendo Switch.
Клучни карактеристики:
- Компактен дизајн: Unique cross formation allows simultaneous charging of up to four Joy-Con controllers without occupying excessive space.
- Интегрирано управување со кабли: Features a built-in system for adjusting and storing the charging cable, promoting a tidy setup.
- LED Charge Status Indicators: Provides clear visual feedback on the charging status of each connected Joy-Con controller.
- Естетска интеграција: Designed to complement the visual style of the Nintendo Switch console.
2. Упатства за поставување
- Отпакувајте го уредот: Carefully remove the Bionik Tetra Power charging dock from its packaging.
- Поврзете се на напојување: The charging dock features a built-in USB cable. Connect this USB cable to an available USB port on your Nintendo Switch dock or to a compatible USB power adapter (not included).

Image 2.1: The Bionik Tetra Power charging dock viewed from the side, showing its integrated USB cable for power connection.
- Управување со кабли: Utilize the built-in cable management system located at the base of the dock to adjust the cable length and store any excess, ensuring a neat setup.
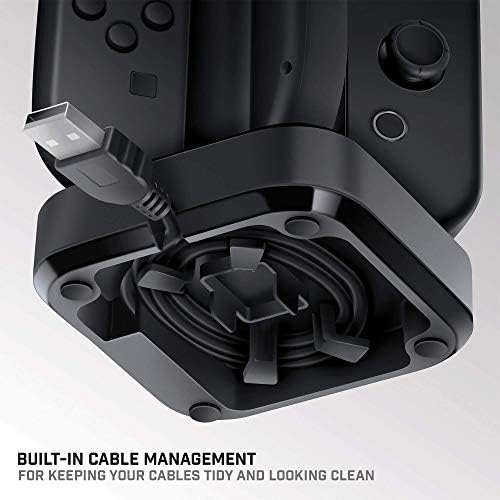
Image 2.2: The underside of the Tetra Power dock, illustrating the integrated cable management system for organizing the USB cable.
- Поставување: Place the charging dock on a stable, flat surface near your Nintendo Switch console for convenient access.
3. Упатства за работа
Charging Joy-Con Controllers:
- Ensure the Tetra Power charging dock is connected to a power source.
- Align a Joy-Con controller with one of the four charging slots on the dock. Gently slide the Joy-Con downwards until it clicks into place and makes contact with the charging pins.
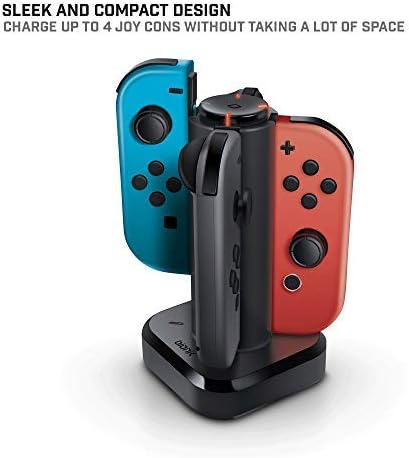
Image 3.1: The Tetra Power charging dock with two Nintendo Switch Joy-Con controllers inserted into their respective charging slots.
- Repeat for additional Joy-Con controllers, up to a maximum of four.
LED Charge Status Indicators:
Each charging slot is equipped with an LED indicator to display the charging status of the connected Joy-Con controller:
- Црвена LED диода: Indicates that the Joy-Con controller is currently charging.
- Зелена ЛЕР: Indicates that the Joy-Con controller is fully charged.
- Без ЛЕР: Indicates no Joy-Con is connected or the dock is not receiving power.
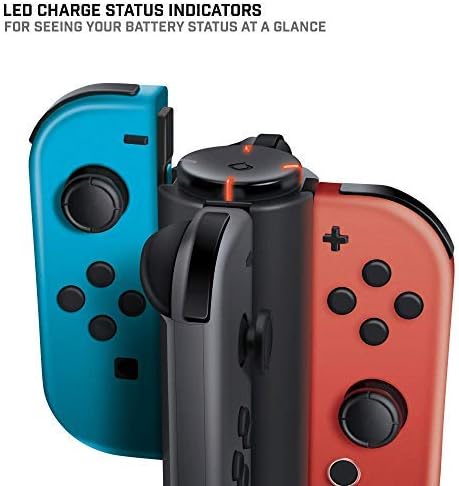
Слика 3.2: Крупен план view of the LED charge status indicators on the Tetra Power dock, showing the illuminated status lights.
4. Одржување
- Чистење: Disconnect the charging dock from its power source before cleaning. Use a soft, dry cloth to wipe the exterior surfaces. Avoid using abrasive cleaners, solvents, or harsh chemicals.
- Складирање: Кога не го користите подолг период, чувајте го полначот на ладно и суво место, подалеку од директна сончева светлина и екстремни температури.
- Ракување: Handle the device with care. Avoid dropping it or subjecting it to strong impacts, which could damage internal components.
5 Смена на проблеми
- Joy-Con not charging:
- Ensure the charging dock is properly connected to a powered USB port.
- Verify that the Joy-Con controller is correctly seated in the charging slot and making full contact with the charging pins.
- Check if the USB cable is securely connected to both the dock and the power source.
- Try connecting the dock to a different USB port or power adapter.
- LED индикаторот не свети:
- Confirm the charging dock is receiving power.
- Ensure a Joy-Con controller is properly inserted into the slot.
- If the Joy-Con is fully charged, the LED will be green. If no Joy-Con is present, the LED will be off.
6. Спецификации
| Број на модел | БНК-9019 |
| Бренд | Bionik |
| Димензии на производот | 6.1 x 4.1 x 3.9 инчи |
| Тежина на ставката | 6.4 унци |
| Компатибилни уреди | Nintendo Switch Joy-Con Controllers |
| Тип на конектор | Mini USB (integrated cable) |
| Влез волуменtage | 5.4 волти |
| Ampбес | 5 Amps |
| Вкупно USB порти | 4 (за Joy-Cons) |
| Специјална карактеристика | Fast Charging, LED Charge Status Indicators, Cable Management |
7. Гаранција и поддршка
Bionik products are manufactured with quality and reliability in mind. For specific warranty information, product support, or to register your product, please visit the official Bionik webстраницата или директно контактирајте ја нивната служба за корисници. Чувајте ја сметката за купување како доказ за купување за какви било рекламации за гаранција.
Производител: Bionik
Webсајт: bionikgaming.com

Image 7.1: The back of the Tetra Power retail box, displaying multilingual features, specifications, and manufacturer contact details including the webсајт.


