Вовед
This manual provides detailed instructions for the setup, operation, and maintenance of your Alvoxcon UHF Wireless Dynamic Handheld Microphone System. Please read this manual thoroughly before using the product to ensure proper function and longevity.
Содржина на пакетот
По распакувањето, проверете дали сите предмети наведени подолу се присутни и во добра состојба:
- Alvoxcon UHF Wireless Handheld Microphone
- UHF Wireless Receiver (1/4 inch plug)
- AA Batteries (for microphone)
- USB кабел за полнење (за приемник)
- 1/4-inch to 1/8-inch TRS Adapter
- 1/8-inch TRRS Splitter Cable (for smartphones/laptops)
- Упатство за употреба
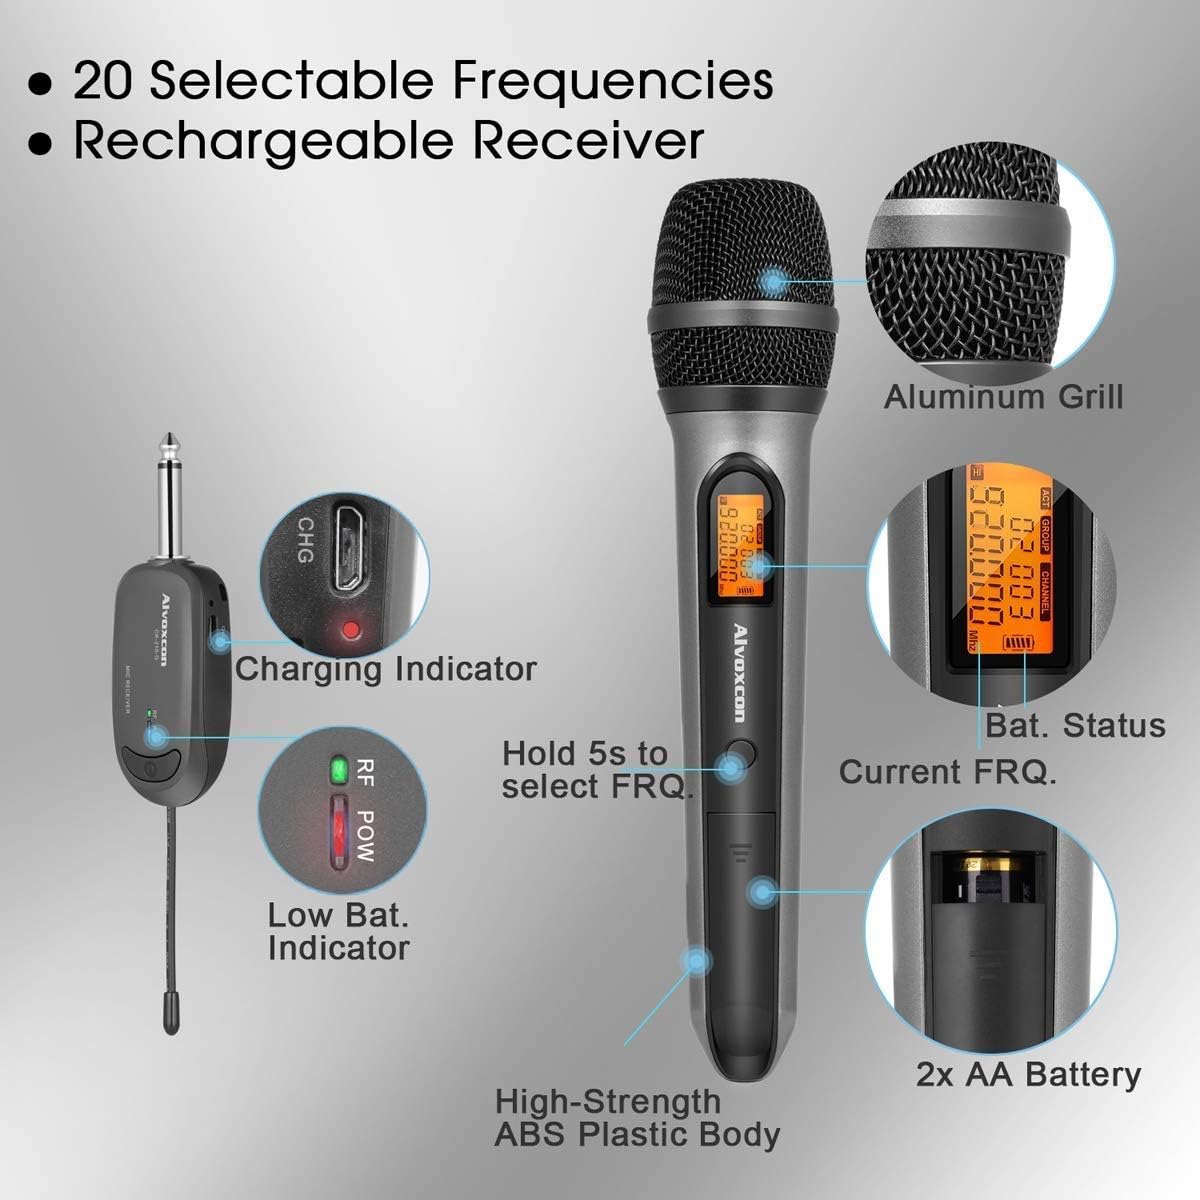
Image: All components of the Alvoxcon Wireless Microphone System, including the handheld microphone, mini receiver, AA batteries, USB charging cable, and various adapters, neatly arranged on a white surface.
Видео: Распакување и повеќеview of the Alvoxcon single wireless handheld microphone system (CK210), demonstrating the contents of the package and initial setup steps.
Инструкции за поставување
1. Инсталирање батерии во микрофонот
- Unscrew the bottom part of the microphone to open the battery compartment.
- Вметнете две AA батерии, внимавајќи на правилниот поларитет (+/-).
- Зашрафете го долниот дел безбедно.
2. Полнење на приемникот
- Connect the USB charging cable to the receiver's charging port.
- Вклучете го другиот крај од USB кабелот во стандарден USB адаптер за напојување (не е вклучен) или во USB порт на компјутерот.
- The charging indicator light on the receiver will illuminate during charging and turn off when fully charged.
3. Поврзување на приемникот со аудио уред
The receiver features a 1/4-inch (6.35mm) plug for direct connection to devices with a 'MIC IN' jack. Use the provided adapters for other connections.
- For PA Systems, Amplifiers, Mixers: Plug the 1/4-inch receiver directly into the 'MIC IN' jack.
- За DSLR фотоапарати: Use the 1/4-inch to 1/8-inch TRS adapter to connect the receiver to the camera's 1/8-inch microphone input.
- For Smartphones/Tablets/Laptops (for recording): Use the 1/4-inch to 1/8-inch TRS adapter, then connect it to the 1/8-inch TRRS splitter cable. Plug the microphone icon end of the splitter into your device's headphone/microphone combo jack. Note: This setup is primarily for recording; real-time sound projection to speakers from smartphones/computers is not supported.
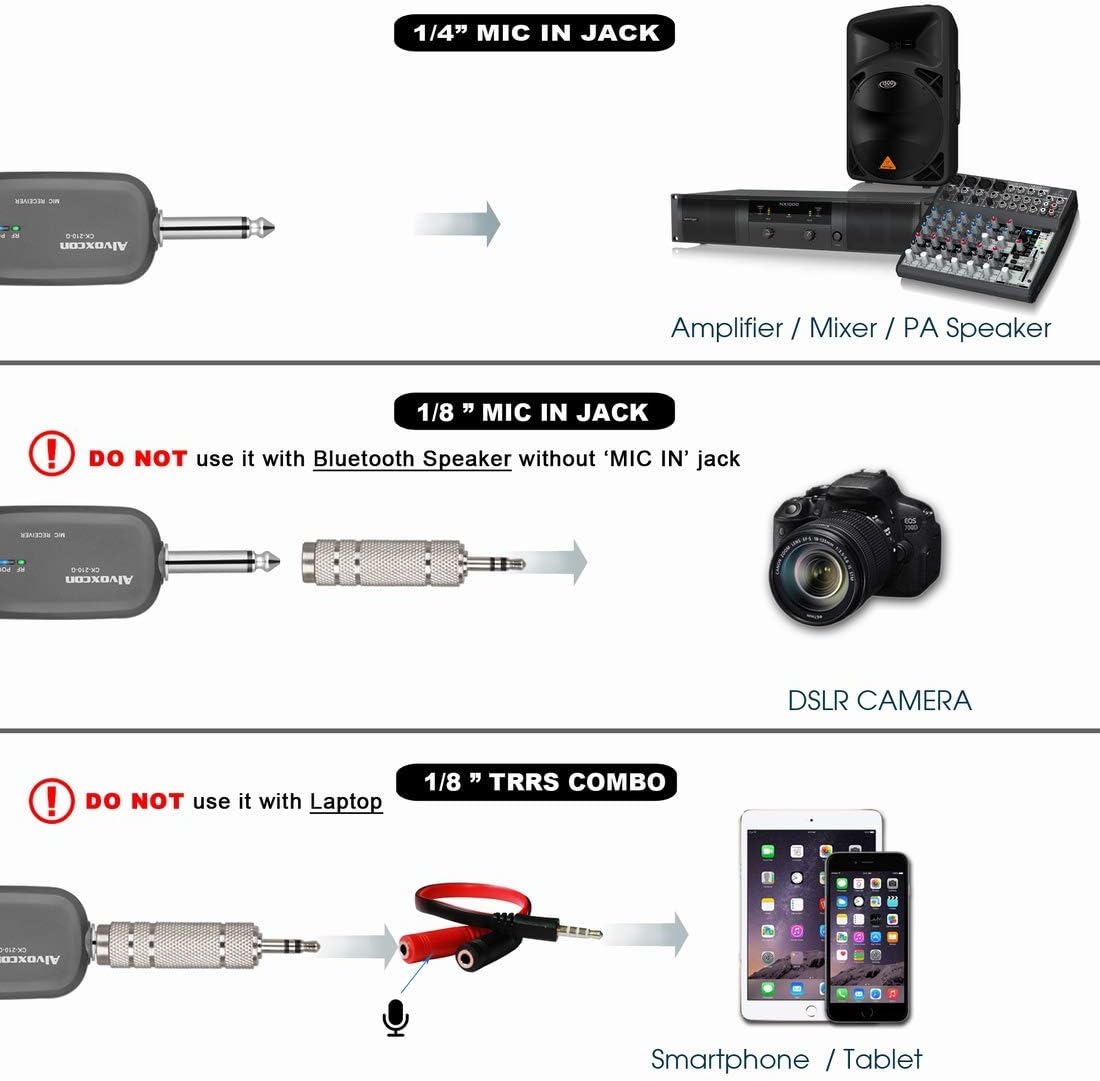
Image: Connection diagram illustrating how to connect the wireless receiver to an amplifier/mixer (1/4" jack), a DSLR camera (1/8" jack), and a smartphone/tablet (1/8" TRRS combo).
Важно: Do not use with Bluetooth speakers that only have 'LINE' or 'AUX' input jacks, as this may result in insufficient sound or no sound at all. Not compatible with MacBook for real-time sound projection.
Упатства за работа
1. Вклучување/исклучување
- Микрофон: Press and hold the power button on the microphone until the display illuminates.
- Приемник: Press and hold the power button on the receiver until the indicator light turns on.
- To power off, press and hold the respective power buttons again.
2. Автоматско спарување на фреквенции
The system is designed for automatic frequency pairing. Once both the microphone and receiver are powered on, they should automatically connect. The RF POW indicator on the receiver will light up when a stable connection is established.
3. Selecting Frequencies (20 Selectable UHF Frequencies)
If you experience interference, you can change the operating frequency:
- On the microphone, press and hold the frequency selection button (often integrated with the power button or a separate 'SET' button) for approximately 5 seconds.
- The frequency displayed on the microphone will change. The receiver will automatically sync to the new frequency.
- Repeat this process until a clear channel is found.

Image: Close-up of the Alvoxcon wireless microphone and receiver, showing the charging indicator, low battery indicator, battery status, current frequency display, and the frequency selection button.
4. Optimal Usage
- Maintain a clear line of sight between the microphone and receiver for best performance.
- Keep the microphone within the recommended operating range of up to 30 meters (100 feet).
- Избегнувајте поставување на приемникот во близина на метални предмети или други електронски уреди што можат да предизвикаат пречки.
Одржување
1. Чистење
- Wipe the microphone and receiver with a soft, dry cloth.
- Do not use liquid cleaners or solvents, as they may damage the finish or internal components.
2. Нега на батерии
- Remove batteries from the microphone if it will not be used for an extended period to prevent leakage.
- Ensure the receiver is fully charged before each use for optimal battery life.
3. Складирање
- Чувајте го системот на ладно и суво место, подалеку од директна сончева светлина и екстремни температури.
- Keep components in their original packaging or a protective case to prevent damage.
Решавање проблеми
| Проблем | Можна причина | Решение |
|---|---|---|
| Нема звук од микрофонот |
|
|
| Static or intermittent sound |
|
|
| Приемникот не се полни |
|
|
Спецификации
- Форма фактор на микрофон: Микрофон систем
- Технологија за поврзување: UHF
- Број на канали: 20 selectable frequencies
- Оперативен опсег: До 30 метри (100 стапки)
- Сооднос на сигнал до бучава: 90 dB
- Microphone Power Source: 2x батерии АА
- Извор на енергија на приемникот: Rechargeable Lithium Polymer battery
- Тип на конектор: 3.5 mm Jack (with adapters for 1/4 inch)
- Компатибилни уреди: PA systems, Amplifiers, Mixers, DSLR Cameras, Smartphones, Laptops (for recording)
- Материјал: Акрилонитрил бутадиен стирен, алуминиум
- Тежина на ставката: 195 Grams (microphone)
- Димензии на производот: 11.8 x 5.11 x 2.55 инчи
- Број на модел: B07DZ44TF6

Image: Diagram detailing the extraordinary audio performance features of the microphone, such as 100 ft range, near-zero latency, UHF DQPSK processing, and a large diaphragm dynamic capsule.

Image: Close-up of the microphone displaying its polar pattern and highlighting features like good signal, extended distance, noise reduction, constant frequency, high fidelity, and overall quality.
Гаранција и поддршка
For warranty information and technical support, please refer to the official Alvoxcon website or contact their customer service directly. Contact details are typically provided in the product packaging or on the manufacturer's webсајт.
Посетете го Продавница „Алвокскон“ на Амазон за повеќе информации и ажурирања на производите.
