1. Вовед
This manual provides comprehensive instructions for the setup, operation, and maintenance of your Lorex N841A81 Series 8 Channel 4K Ultra HD Network Video Recorder (NVR). This NVR is designed to record and manage video surveillance from compatible cameras, offering advanced features for enhanced security monitoring.
2. Содржина на пакетот
Осигурајте се дека сите артикли наведени подолу се присутни во вашиот пакет:
- Lorex N841A81 NVR Unit
- Адаптер за напојување со наизменична струја
- USB глушец
- Етернет кабел
- HDMI кабел
- Водич за брз почеток / Упатство за употреба (овој документ)
3. Поставување
3.1 NVR Overview
Familiarize yourself with the front and rear panels of your NVR unit.

Figure 1: Front panel of the Lorex N841A81 NVR, showing the 4K Ultra HD NVR label and a front USB port.
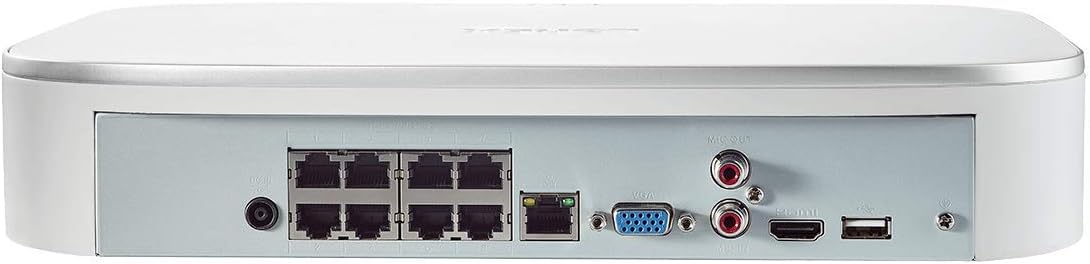
Figure 2: Rear panel of the Lorex N841A81 NVR, displaying multiple PoE ports, HDMI, VGA, USB, LAN, and audio output connections.
3.2 Почетна врска
- Поврзување со дисплеј: Connect the NVR to a monitor or TV using the provided HDMI cable. Alternatively, use a VGA cable (not included).
- Поврзете USB глушец: Plug the USB mouse into one of the NVR's USB ports (front or rear).
- Поврзете се на мрежа: Connect the NVR to your router using the provided Ethernet cable. This enables remote viewing and network features.
- Поврзување камери: Connect your compatible IP cameras to the PoE ports on the rear of the NVR. The NVR provides power and data connection through these ports.
- Вклучување: Connect the AC power adapter to the NVR's power input and then plug it into a power outlet. The NVR will power on automatically.
3.3 Волшебник за прво поставување
Upon initial power-on, the NVR will guide you through a setup wizard to configure basic settings such as language, time zone, and password creation. Follow the on-screen prompts to complete the setup.
4. Упатства за работа
4.1 Lorex Home Mobile App
The Lorex Home app allows you to remotely view your security system from your smartphone or tablet. It also provides control over active deterrence features and allows you to receive motion-activated push notifications and email alerts.
- Преземете ја апликацијата: Download the free Lorex Home app from your device's app store.
- Додај уред: Scan the QR code located on your NVR to add it to your account.
- Далечински ViewИНГ: Откако ќе се додаде, можете view live or recorded video streams from your cameras.
- Известувања: Configure push notifications and email alerts for motion detection events.
4.2 Паметно детекција на движење
The NVR features advanced smart motion detection to reduce false alarms. It can differentiate between motion caused by people or vehicles, sending only the most relevant alerts.
- Конфигурација: Access the NVR's menu via a connected display to configure motion detection zones and sensitivity for each camera.
- Известувања: Receive push notifications or email alerts when people or vehicles are detected in configured zones.
4.3 Паметно пребарување
Use the Smart Search feature to quickly review footage by filtering motion events based on area, time/date, and the type of detection (person or vehicle).
- Пристап: Navigate to the playback or search menu on your NVR.
- Филтер: Apply filters for specific events to efficiently locate relevant recordings.
4.4 Voice Control & Smart Home Compatibility
The NVR is compatible with Amazon Alexa, Google Assistant, Apple TV, and Chromecast, allowing for hands-free control and viewинг.
- Интеграција: Follow the instructions provided by your smart home assistant or streaming device to link your Lorex account.
- Гласовни команди: Use simple voice commands to activate camera features or view live/recorded footage on your smart TV.
5. Одржување
5.1 Управување со хард диск
The NVR includes a local built-in security-grade 1TB hard drive, expandable up to 10TB. Regular maintenance ensures optimal recording performance.
- Капацитет на складирање: Monitor the remaining storage space through the NVR's system settings.
- Презапишување: The NVR is configured to overwrite the oldest footage when the hard drive is full, ensuring continuous recording.
- Резервна копија: Редовно правете резервна копија на важна хранаtage на надворешен USB-уред или мрежен складишен простор.
5.2 Општа нега
- Чувајте го NVR-от во добро проветрено место за да спречите прегревање.
- Clean the exterior of the NVR with a soft, dry cloth. Avoid using harsh chemicals.
- Осигурете се дека сите приклучоци на кабли се безбедни.
6 Смена на проблеми
If you encounter issues with your Lorex NVR, consider the following:
- Нема видео приказ: Check HDMI/VGA cable connections and ensure the display is set to the correct input source.
- Нема мрежна конекција: Verify the Ethernet cable is securely connected to both the NVR and your router. Check your router's internet connection.
- No Camera Footage: Ensure cameras are properly connected to the PoE ports and powered on. Check camera compatibility with the NVR.
- Проблеми со откривање движење: Review motion detection zone settings and sensitivity levels in the NVR menu or Lorex Home app.
- Системот се замрзнува/не реагира: Try rebooting the NVR. If the issue persists, consult the Lorex support website for firmware updates or further assistance.
7. Спецификации
| Карактеристика | Спецификација |
|---|---|
| Број на модел | N841A81 |
| Видео резолуција | Up to 4K (8MP) Ultra HD |
| Канали | 8 IP Channels with built-in PoE ports |
| Големина на хард дискот | 1 TB (Preinstalled) |
| Капацитет за складирање на меморија (макс.) | 10 ТБ |
| Технологија за поврзување | Жичен |
| Компатибилни уреди | Smartphone, Tablet, Television, Smart Home Assistants |
| Димензии на пакетот | 15.7 x 13.1 x 5.5 инчи |
| Тежина на ставката | 6.93 фунти |
8. Гаранција и поддршка
For warranty information, technical support, or to access the latest firmware and documentation, please visit the official Lorex website or contact Lorex customer service. Keep your product's model number and serial number handy when seeking support.


