1. Вовед
The PULUZ Mini Photo Studio Light Box is a portable and folding photo shooting tent designed for small product photography. It features two integrated LED panels and comes with six different colored backdrops to help you achieve professional-quality images by providing even and bright lighting, minimizing shadows and reflections.
This manual provides detailed instructions for setting up, operating, and maintaining your photo studio light box to ensure optimal performance and longevity.
2. Што има во кутијата
При распакување, проверете дали се вклучени сите од следниве елементи:
- Mini Photo Studio Light Box (1 unit)
- Торба за носење (1 единица)
- Black Backdrop (1 unit)
- White Backdrop (1 unit)
- Yellow Backdrop (1 unit)
- Red Backdrop (1 unit)
- Blue Backdrop (1 unit)
- Green Backdrop (1 unit)

3. Упатства за поставување
Follow these steps to assemble your PULUZ Mini Photo Studio Light Box:
- Проширете го студискиот шатор: Carefully unfold the main body of the light box until it lays flat, revealing the pre-creased sections.
- Превиткани набори: Firmly fold along the designated creases on the left and right edges of the tent. This will begin to form the side walls.
- Fold Bottom Crease: Fold the bottom crease to create the base of the studio.
- Fold Top Crease: Fold the top crease to form the roof of the studio.
- Connect Snap Buckles: Connect the product's snap buckles to their corresponding positions to secure the structure. Ensure all connections are firm for stability.
- Инсталирањето е завршено: The basic structure of your photo studio is now assembled.
- Insert Backdrop: Choose one of the six colored backdrops provided. Align the backdrop with the hooks inside the studio and secure it in place.
- Поврзете напојување: Connect the USB cable from the LED panels to a 5V, 1A USB power source (e.g., a USB wall adapter, power bank, or laptop USB port). Забелешка: Do not use USB power output voltage more than 5V, such as Quick Charge, as this may cause the LED light to fail.


4. Упатства за работа
Once assembled and powered, your PULUZ Mini Photo Studio Light Box is ready for use. Here’s how to operate it:
- Поставување: Place the item you wish to photograph inside the light box. Ensure it is centered and positioned appropriately on the chosen backdrop.
- Осветлување: The integrated LED panels will provide bright, even illumination. If your model includes a dimmer switch on the USB cable, use it to adjust the brightness to your desired level.
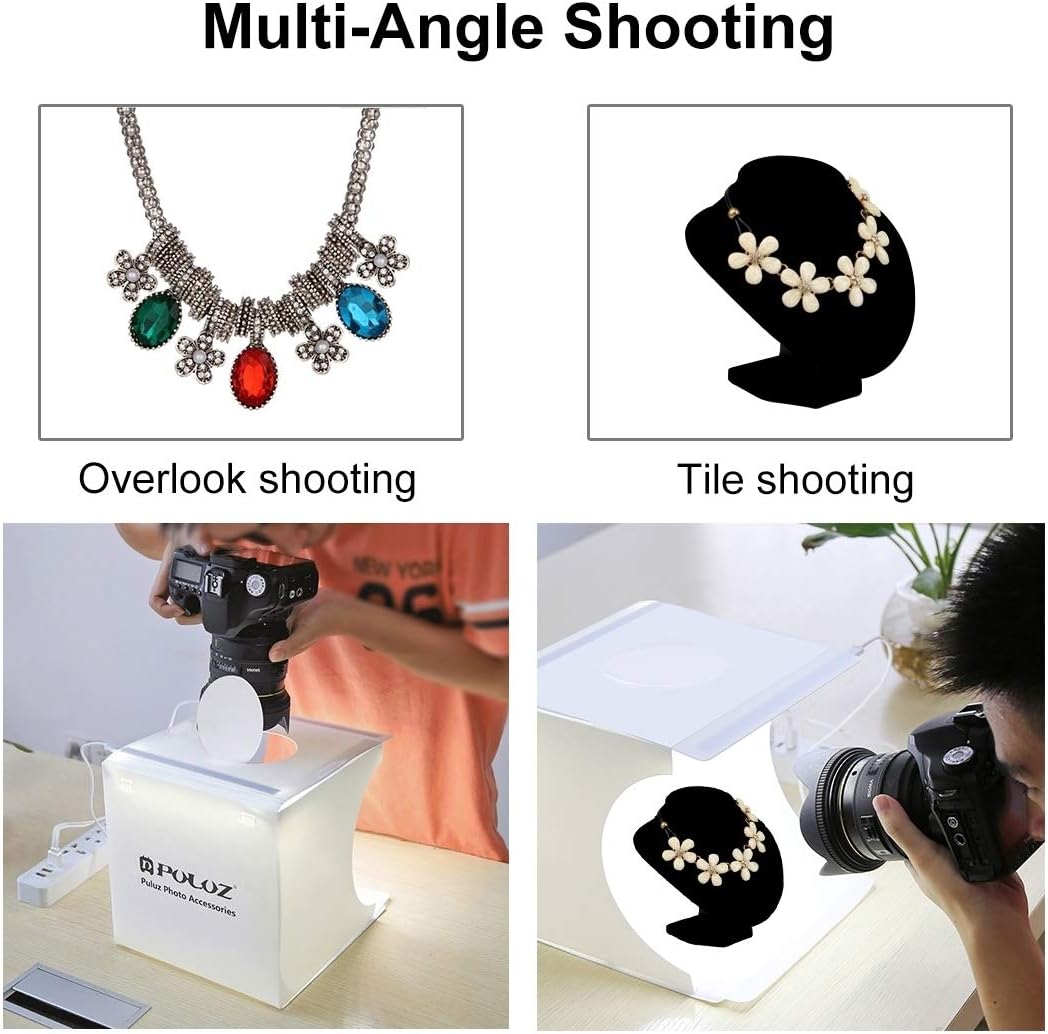
- Shooting Angles: The light box is designed for multi-angle shooting:
- Предно отворање: Use the main front opening for standard eye-level or slightly elevated shots.
- Горна дупка: For overhead shots, open the circular flap on the top of the studio tent and position your camera directly above the item. This is ideal for flat lays or capturing top-down details.
- Backdrop Selection: Experiment with the six different colored backdrops (black, white, yellow, red, blue, green) to find the best contrast and aesthetic for your product.

5. Клучни карактеристики
- High Brightness LED Panels: Equipped with 2*20 PCS bright white LED light strips, providing even and average lighting to prevent shadows and reflections, ensuring sufficient brightness for high-quality photos.
- No Strobe Effect: Designed to eliminate strobe effects, allowing for professional-quality pictures even with non-professional shooting equipment.
- Easy to Carry & Portable: The folding design allows for quick assembly and disassembly, making it highly portable. It can be set up on any surface, ideal for on-the-go photography.
- 6 Colors Backdrops: Includes black, white, yellow, red, blue, and green backdrops to suit various product types and photography needs.
- Напојување со USB: Conveniently powered via USB, compatible with chargers, mobile power banks, laptops, and desktop computers (requires a 5V, 1A USB charger, not included).
- Waterproof, Damp-proof, Anti-wrinkle Material: Constructed from durable PP material with a specially tailored 300# matte surface, designed to diffuse light uniformly and soften object shadows for a three-dimensional sense.


6. Спецификации
| Карактеристика | Детал |
|---|---|
| Димензии на производот (расклопени) | 9.45"Д x 9.06"Ш x 9.06"В (24 x 23 x 23 см) |
| Тежина на ставката | 10.9 унци |
| Број на модел | LEAFELF-6 |
| Бренд | PULUZ |
| Материјал | Полипропилен (PP) |
| LED панели | 2 x 20 PCS bright white LED strips |
| Вклучени позадини | 6 colors (Black, White, Yellow, Red, Blue, Green) |
| Напојување | USB 5V, 1A (USB charger not included) |
| Стил | Portable, Folding |

7. Одржување
To ensure the longevity and optimal performance of your PULUZ Mini Photo Studio Light Box, follow these maintenance guidelines:
- Чистење:
- Wipe the exterior and interior surfaces of the light box with a soft, damp крпа. Избегнувајте абразивни средства за чистење или растворувачи.
- For the LED panels, use a dry, soft cloth to gently wipe away any dust. Do not spray cleaning solutions directly onto the LEDs.
- The backdrops can be wiped clean with a damp cloth if they become dirty. Ensure they are completely dry before storing.
- Складирање: When not in use, fold the light box neatly and store it in the provided carrying bag to protect it from dust and damage. Store in a cool, dry place away from direct sunlight.
- Ракување: Avoid excessive force when folding or unfolding the light box to prevent damage to the creases or snap buckles. Do not pull the connected data cable vigorously.
8 Смена на проблеми
If you encounter any issues with your PULUZ Mini Photo Studio Light Box, please refer to the following common problems and solutions:
| Проблем | Можна причина | Решение |
|---|---|---|
| LED светлата не се вклучуваат |
|
|
| Светлата се слаби или треперат |
|
|
| Studio tent does not hold its shape |
|
|
9. Гаранција и поддршка
PULUZ is committed to providing high-quality photographic equipment and accessories. For any inquiries, support, or warranty claims, please contact us directly.
- Контакт е-пошта: service@puluz.com
- Интернет продавница: Посетете го официјалното лице Продавница PULUZ на Amazon за повеќе производи и информации.
If you receive a damaged product, you do not need to return it. Please contact our after-sales service directly to apply for a replacement or refund.


