1. Вовед
Welcome to the user manual for your Ulefone Armor X9 Rugged Phone. This guide provides essential information on setting up, operating, maintaining, and troubleshooting your device. The Ulefone Armor X9 is designed for durability and performance, featuring robust protection and advanced functionalities.
Key features of your Ulefone Armor X9 include:
- IP68/IP69K Grade 360 All Round Protection: Создаден да издржи сурови средини.
- Оперативен систем Андроид 11: Enjoy the latest Android experience.
- 4GB RAM + 128GB ROM: Ample memory and storage for your applications and data.
- 16MP Triple Rear Camera: Capture high-quality photos and videos.
- Massive 5580mAh Battery Capacity: Extended usage time.
- Triple Navigation System: Enhanced positioning accuracy.
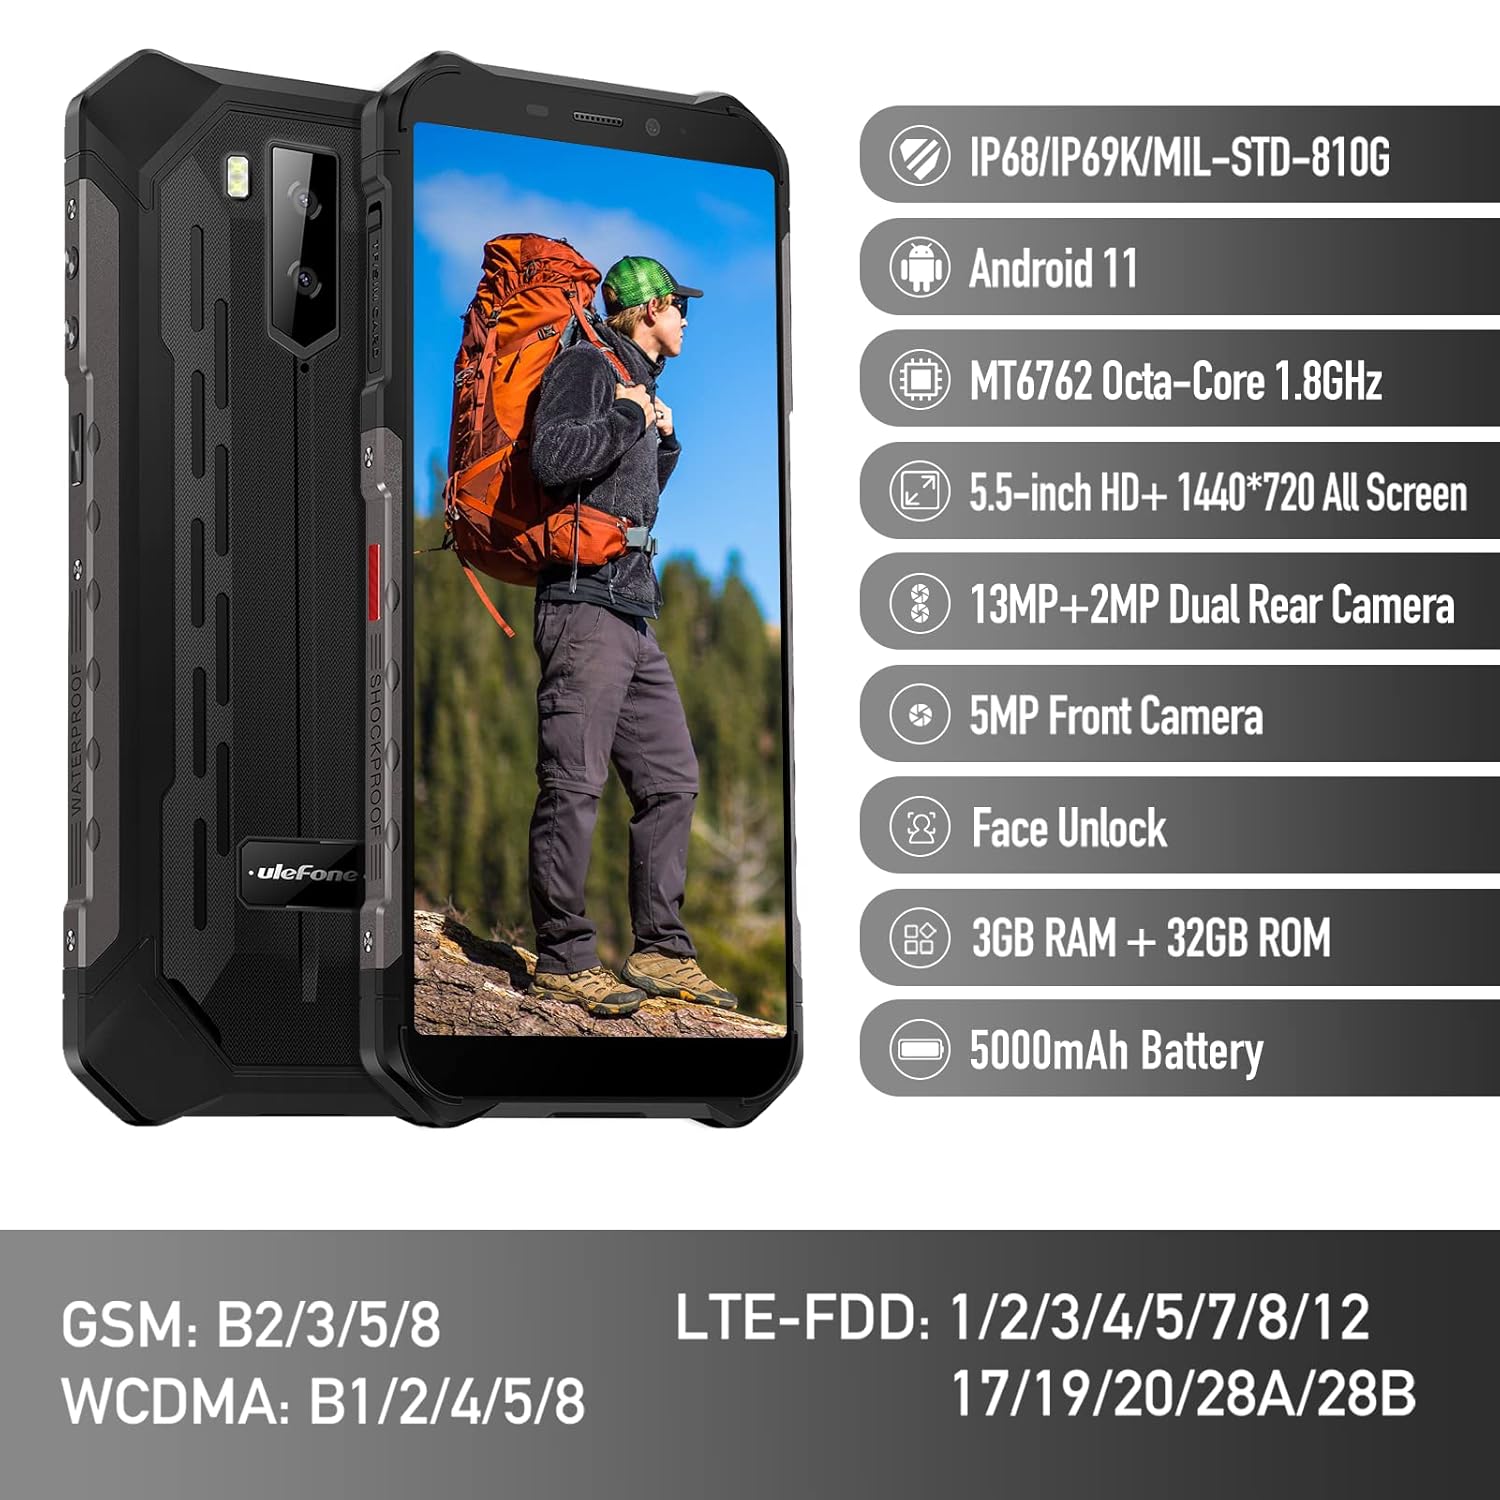
Figure 1: Ulefone Armor X9 Rugged Phone overview, highlighting its robust design and core specifications like IP68/IP69K rating, Android 11, Octa-Core processor, 5.5-inch HD+ screen, 13MP+2MP dual rear camera, 5MP front camera, Face Unlock, 3GB RAM + 32GB ROM, and 5000mAh battery.
2. Поставување
2.1. Инсталација на SIM картичка и TF картичка
The Ulefone Armor X9 supports dual SIM cards and a TF (microSD) card for expandable storage. Follow these steps to install them:
- Пронајдете го држачот за SIM-картичка од страната на телефонот.
- Користете ја испорачаната алатка за исфрлање на SIM картичката за да го отворите фиоката.
- Carefully place your Nano-SIM cards into the designated slots (SIM1 and SIM2).
- If using a TF card, place it into the dedicated TF card slot. Note that some configurations may share a slot between SIM2 and the TF card.
- Gently push the tray back into the phone until it is flush with the device body. Ensure the tray is properly sealed to maintain water and dust resistance.

Figure 2: Illustration of the dual SIM and TF card tray, showing how to insert SIM1, SIM2, and a TF card into the Ulefone Armor X9.
2.2. Почетно полнење
Before first use, it is recommended to fully charge your Ulefone Armor X9. Use the provided USB cable and power adapter.
- Поврзете го USB кабелот со портата за полнење на вашиот телефон.
- Поврзете го другиот крај на USB-кабелот со адаптерот за напојување.
- Приклучете го адаптерот за напојување во ѕиден штекер.
- Индикаторот за полнење ќе се појави на екранот. Оставете телефонот да се полни додека иконата за батеријата не се прикаже како полна.
2.3. Вклучување/исклучување
- За вклучување: Притиснете и држете го копчето за вклучување (обично од десната страна) додека не се појави логото на Ulefone.
- За исклучување: Press and hold the Power button until the power options menu appears on the screen. Select "Power off" and confirm.
- За рестартирање: Од менито со опции за напојување, изберете „Рестартирај“ и потврдете.
3. Упатства за работа
3.1. Основна навигација (Android 11)
Your Ulefone Armor X9 runs on Android 11, offering an intuitive user interface. Common gestures and navigation include:
- Повлечете нагоре: Пристапете до фиоката за апликации.
- Повлечете надолу: Open the notification panel and quick settings.
- Допрете: Изберете ставка или отворете апликација.
- Долг печат: Пристапете до контекстуални менија или преместете икони.
- Штипнете за зумирање: Зголемување или намалување на сликите и web страници.

Figure 3: Screenshots of the Android 11 interface on the Ulefone Armor X9, showing settings menus, quick toggles, and the sound recorder application.

Figure 4: The 5.5-inch 18:9 All Screen display of the Ulefone Armor X9, showcasing its immersive viewing experience with an image of a skier.
3.2. Употреба на камера
Your phone is equipped with a 16MP Triple Rear Camera and a Front Camera. To use the camera:
- Open the "Camera" application from your home screen or app drawer.
- Допрете го копчето за бленда за да фотографирате.
- Префрлувајте се помеѓу режимите за фотографирање и видео по потреба.
- Tap the icon to switch between the front and rear cameras.
- Explore various camera modes and settings for optimal results.
3.3. Поврзување
The Ulefone Armor X9 supports various connectivity options:
- Wi-Fi: Одете во Поставки > Мрежа и интернет > Wi-Fi за да се поврзете на достапните мрежи.
- Bluetooth: Go to Settings > Connected devices > Bluetooth to pair with Bluetooth devices.
- GPS: The phone features AGPS for accurate location services. Ensure location services are enabled in Settings > Location.
- USB: Поврзете го телефонот со компјутер користејќи USB кабел за пренос на податоци или полнење.
3.4. Отклучување со лице
For convenient and secure unlocking, your Ulefone Armor X9 supports Face Unlock:
- Одете во Поставки > Безбедност > Отклучување со лице.
- Следете ги упатствата на екранот за да го регистрирате вашето лице.
- Ensure good lighting and hold the phone at eye level during registration.
- Откако ќе се регистрирате, можете да го отклучите телефонот едноставно со гледање во предната камера.
4. Одржување
4.1. Чистење и нега
To maintain the performance and appearance of your rugged phone:
- Избришете го екранот и куќиштето со мека крпа што не остава влакненца.
- За тврдоглава нечистотија, користете малку damp крпа. Избегнувајте груби хемикалии или абразивни материјали.
- Ensure all port covers are securely closed to maintain water and dust resistance, especially after charging or using headphones.

Figure 5: The Ulefone Armor X9's 360° All Protection Design, showcasing its superior materials and superb durability against impacts and harsh conditions.
4.2. Отпорност на вода и прашина (IP68/IP69K)
The Ulefone Armor X9 is rated IP68/IP69K, meaning it is resistant to dust and water immersion. However, this resistance is not permanent and may decrease over time with normal wear. To ensure optimal protection:
- Do not intentionally submerge the phone in water for extended periods or beyond specified depths.
- Avoid exposing the phone to high-pressure water or extreme temperatures.
- Ensure all port covers are tightly sealed before exposure to water or dust.
- Ако телефонот се навлажни, темелно исушете го пред да го полните или да отворите било кои порти.
4.3. Нега на батерии
To prolong the life of your 5580mAh Lithium Polymer battery:
- Избегнувајте екстремни температури (топли или ладни) бидејќи тие можат да ги намалат перформансите на батеријата.
- Use only the original charger and cable or certified compatible accessories.
- Не дозволувајте батеријата често да се празни целосно. Наполнете ја пред да достигне многу ниско ниво.
5 Смена на проблеми
If you encounter issues with your Ulefone Armor X9, try the following troubleshooting steps:
5.1. Телефонот не се вклучува
- Ensure the battery is charged. Connect the phone to a charger for at least 30 minutes.
- Притиснете го и држете го копчето за вклучување 10-15 секунди за да го натерате рестартирањето.
5.2. Проблеми со полнењето
- Verify that the charging cable and adapter are working correctly. Try a different charger if available.
- Погрижете се приклучокот за полнење да биде чист и без остатоци.
- Make sure the charging cable is fully inserted into the port. Some rugged phone ports may require a firm connection due to protective covers.
5.3. SIM/TF Card Not Detected
- Ensure the SIM/TF card is correctly inserted into the tray and the tray is fully seated.
- Рестартирајте го телефонот.
- Check if the SIM card is active with your network provider.
5.4. App Crashes or Freezing
- Затворете ја и повторно отворете ја проблематичната апликација.
- Исчистете го кешот и податоците на апликацијата (Поставки > Апликации > [Име на апликација] > Складирање и кеш).
- Проверете дали апликацијата е ажурирана на најновата верзија.
- Рестартирајте го телефонот.
5.5. Фабрички ресетирање
Ако проблемите продолжат, ресетирањето на фабричките поставки може да ги реши. Предупредување: Ова ќе ги избрише сите податоци на вашиот телефон. Направете резервна копија на важните податоци пред да продолжите.
- Одете во Поставки > Систем > Ресетирај опции.
- Изберете „Избриши ги сите податоци (ресетирање на фабричките поставки)“.
- Потврдете ја вашата одлука и внесете го вашиот PIN/лозинка доколку биде побарано.
6. Спецификации
Below are the detailed specifications for the Ulefone Armor X9:

Figure 6: Details of the Ulefone Armor X9's Octa-Core Processor, highlighting its power-efficient yet powerful performance, along with 3GB RAM and 32GB ROM, and support for up to 256GB TF card extendable storage.
| Карактеристика | Спецификација |
|---|---|
| Оперативен систем | Андроид 11.0 |
| RAM меморија | 3 GB (Note: Feature bullets mention 4GB RAM, please verify actual model) |
| Капацитет за складирање на меморија | 32 GB (Expandable with TF card up to 256GB. Feature bullets mention 128GB ROM, please verify actual model) |
| Модел на процесорот | MT6762 Окта-core 1.8GHz (Note: Specifications list 'Snapdragon', but image indicates MT6762. Please verify actual model) |
| Димензии на производот | 15.8 x 7.75 x 1.38 cm |
| Тежина на ставката | 472 гр |
| Батерии | 1 Lithium Polymer battery (5580mAh, included) |
| Безжична комуникација | Cellular, Bluetooth, USB, Wi-Fi |
| GPS | AGPS |
| Посебни карактеристики | Rear Camera, Face Unlock, IP68/IP69K, MIL-STD-810G |
| Приказ | 5.5-inch HD+ 1440*720 All Screen |
| Задна камера | 13MP+2MP Dual Rear Camera (Note: Feature bullets mention 16MP Triple Rear Camera, please verify actual model) |
| Предна камера | Предна камера од 5 MP |
| Боја | Црното |
| Производител | Улефоне |
Note: Specifications are based on available product data and may vary slightly. Please refer to your product packaging for the most accurate information. There are discrepancies between feature bullets, specifications, and image text regarding RAM, ROM, CPU, and camera megapixels. This manual uses the most frequently cited or detailed information, with notes for clarification.
7. Гаранција и поддршка
7.1. Информации за гаранцијата
Your Ulefone Armor X9 is covered by a manufacturer's warranty. The specific terms and duration of the warranty may vary by region and retailer. Please refer to the warranty card included in your product packaging or contact your point of purchase for detailed information regarding warranty coverage and claims.
7.2. Поддршка за корисници
For technical assistance, troubleshooting beyond this manual, or warranty inquiries, please contact Ulefone customer support or your authorized dealer. You can typically find contact information on the official Ulefone webстраницата или во документацијата за вашиот производ.
- Посетете го официјалниот Ulefone website for FAQs, software updates, and support contact details.
- Чувајте ја сметката за купување и серискиот број на производот при рака кога контактирате со поддршката.


