1. Вовед
This manual provides detailed instructions for the safe and efficient operation of your InFocus P120 INL412 Multimedia Projector (Model INL4128). Please read this manual thoroughly before using the projector and keep it for future reference. This projector is designed for high-quality image projection, suitable for various applications including presentations, home entertainment, and gaming.
2. Информации за безбедност
Следете ги следниве безбедносни мерки за да спречите оштетување на проекторот и да ја обезбедите безбедноста на корисникот:
- Вентилација: Ensure adequate ventilation around the projector. Do not block ventilation openings. Maintain a minimum distance of 30 cm (12 inches) from walls or other objects.
- Извор на енергија: Користете само наведеното напојување и волуменtage. Безбедно поврзете го кабелот за напојување.
- Топлина: The projector generates heat during operation. Do not touch the projector's vents or exhaust areas directly after use.
- Излез на светлина: Не гледајте директно во објективот на проекторот кога lamp е вклучено, бидејќи интензивната светлина може да предизвика оштетување на очите.
- Поставување: Поставете го проекторот на стабилна, рамна површина. Избегнувајте да го поставувате на директна сончева светлина, во близина на извори на топлина или во области со голема влажност или прашина.
- Чистење: Исклучете го кабелот за напојување пред чистење. Користете мека, сува крпа. Не користете течни или аеросолни средства за чистење.
- Сервисирање: Не обидувајте се сами да го сервисирате проекторот. Сите сервиси обратете се кај квалификуван сервисер.
3. Производот завршиview
3.1 Top Panel and Lens Area
The top panel features the control buttons for basic operation and the lens area with focus and zoom adjustments.

Слика 3.1: Врв view of the InFocus P120 INL412 projector, highlighting the control panel on the right and the lens adjustment area on the left. The InFocus logo is visible on the top surface.
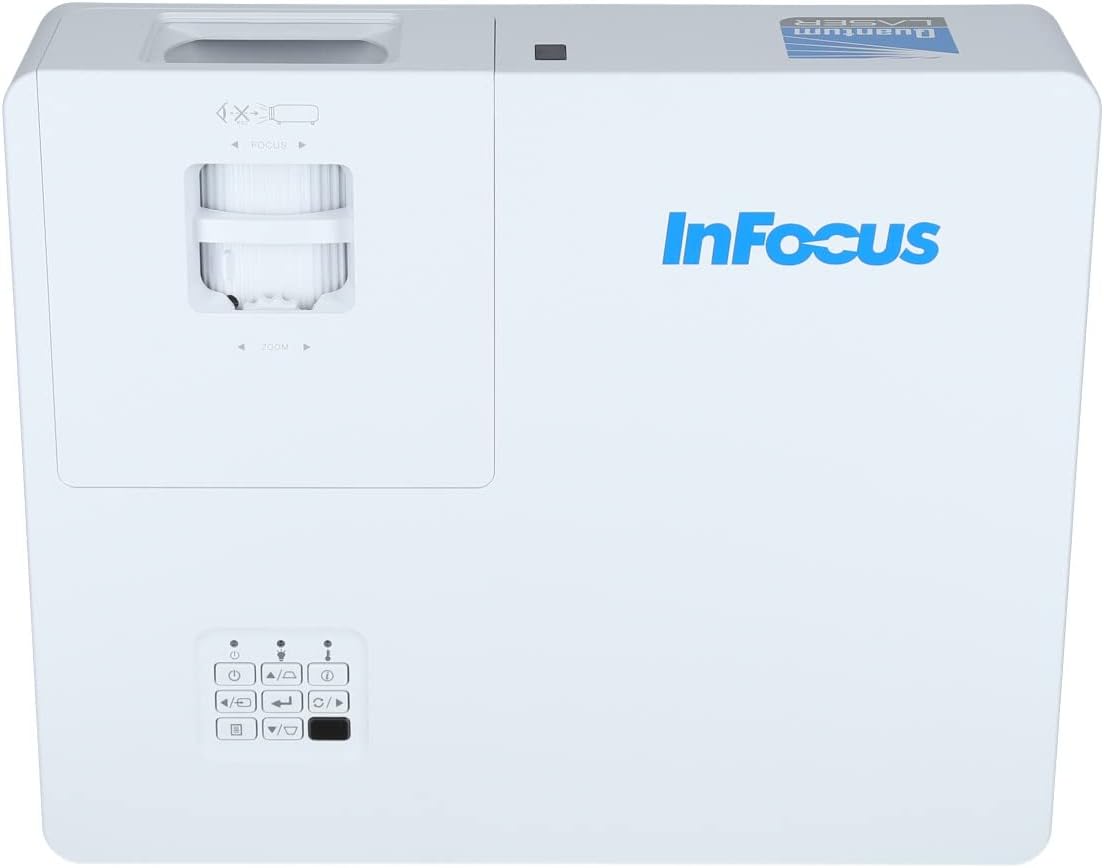
Слика 3.2: Затворач view of the projector's top panel, showing the focus and zoom rings near the lens opening and the array of control buttons for power, menu, source selection, and navigation.
3.2 Приклучоци на задниот панел
The rear panel provides various input and output ports for connecting external devices.

Figure 3.3: Rear panel of the InFocus P120 INL412 projector, displaying a comprehensive array of connectivity options including HDMI (x2), USB, S-Video, Ethernet (LAN), VGA In (x2), VGA Out, RS232, and Audio In/Out ports. The power input is located on the bottom left.
Клучните порти вклучуваат:
- HDMI 1 и 2: For connecting high-definition digital video and audio sources.
- USB: For connecting USB devices, potentially for media playback or firmware updates.
- С-видео: For connecting older video sources.
- VGA IN 1 & 2: For connecting computers or other devices with VGA output.
- VGA излез: За поврзување со надворешен монитор.
- Етернет (LAN): За мрежна поврзаност и контрола.
- Audio IN 1 & 2 / Audio OUT: За аналогни аудио врски.
- RS232: За сериска контрола.
- Влез на енергија: За поврзување на кабелот за наизменична струја.
3.3 Предни и странични панели
The front panel houses the projection lens and front ventilation, while the side panels feature additional ventilation grilles.

Слика 3.4: Предна страна view of the InFocus P120 INL412 projector, displaying the main projection lens on the right and the extensive front ventilation grille on the left, crucial for heat dissipation.

Слика 3.5: Страна view of the InFocus P120 INL412 projector, illustrating the side ventilation grilles that contribute to maintaining optimal operating temperature.
4. Поставување
4.1 Поставување на проекторот
Position the projector on a stable, flat surface or mount it securely. Ensure the projector is within the optimal projection distance for your screen size. Maintain clear space around the projector for proper ventilation.
4.2 Поврзување на уреди
Before connecting any cables, ensure the projector and all source devices are powered off.
- HDMI поврзување: Connect an HDMI cable from your source device (e.g., laptop, Blu-ray player, gaming console) to either the HDMI 1 or HDMI 2 port on the projector.
- VGA конекција: Connect a VGA cable from your computer to either VGA IN 1 or VGA IN 2. For audio, connect a separate audio cable from your computer's audio output to the corresponding Audio IN port on the projector.
- USB конекција: Insert a USB drive into the USB port for media playback (if supported by firmware) or service functions.
- Етернет (LAN) конекција: Connect an Ethernet cable to the LAN port for network control or updates.
- Аудио излез: If using external speakers, connect an audio cable from the Audio OUT port on the projector to your audio system.
4.3 Поврзување за напојување
Connect the power cord to the projector's power input and then plug the other end into a grounded electrical outlet.
5. Упатства за работа
5.1 Вклучување/исклучување
- Вклучување: Притиснете го Моќ button on the projector's control panel or the remote control. The power indicator light will change.
- Исклучено: Притиснете го Моќ button again. A confirmation message may appear. Press the button a second time to confirm shutdown. Allow the projector to cool down before unplugging it.
5.2 Прилагодување на фокусот и зумот
Ротирајте го прстенот за фокусирање околу објективот додека сликата не изгледа остра и јасна. Користете го прстенот за зумирање за да ја прилагодите големината на сликата за да одговара на вашиот екран.
5.3 Избор на влезен извор
Притиснете го Извор button on the control panel or remote control to cycle through available input sources (HDMI 1, HDMI 2, VGA 1, VGA 2, S-Video, USB). Select the input corresponding to your connected device.
5.4 Навигација на мени
Користете го Мени button to access the on-screen display (OSD) menu. Use the arrow buttons to navigate through menu options and the Внесете копче за да изберете. Притиснете Мени повторно да излезете.
6. Одржување
6.1 Чистење на објективот
Нежно избришете го објективот со мека крпа без влакненца, специјално дизајнирана за оптички површини. Не користете абразивни средства за чистење или прекумерна сила, бидејќи тоа може да го изгребе објективот.
6.2 Cleaning the Projector Exterior
Користете мека, сува крпа за чистење на проекторот.asing. For stubborn dirt, dampen the cloth slightly with water, then wipe dry immediately. Avoid getting liquids into the projector's openings.
6.3 Грижа за вентилација
Regularly check the projector's ventilation grilles for dust accumulation. Use a soft brush or a vacuum cleaner with a brush attachment to gently remove dust from the vents to ensure proper airflow and prevent overheating.
7 Смена на проблеми
7.1 Не е прикажана слика
- Ensure the projector is powered on and the power indicator light is solid.
- Verify that the video cable (HDMI, VGA, etc.) is securely connected to both the projector and the source device.
- Проверете дали е избран точниот влезен извор на проекторот.
- Confirm that the source device (laptop, player) is powered on and outputting a signal.
7.2 Сликата е заматена или не е во фокус
- Прилагодете го прстенот за фокусирање на објективот на проекторот додека сликата не стане остра.
- Ensure the projector is at the correct distance from the screen.
- Исчистете го објективот на проекторот ако изгледа валкан.
7.3 Нема звук
- If using HDMI, ensure the source device's audio output is set to HDMI.
- If using VGA, ensure a separate audio cable is connected from the source to the projector's Audio IN port.
- Проверете ги поставките за јачина на звук и на проекторот и на изворниот уред.
- If using external speakers, ensure they are properly connected to the Audio OUT port and powered on.
8. Спецификации
| Карактеристика | Детал |
|---|---|
| Бренд | ИнФокус |
| Производител | Во Фокус |
| Име на моделот | P120 INL412 |
| Број на модел | INL4128 |
| година | 2023 |
| Хардверски интерфејс | Ethernet, HDMI, S-Video, USB |
| Број на артикли | 1 |
| Сооднос на аспект | 16:9 |
| Ватtage | 341 вати |
| Вклучени батерии | бр |
| Потребни се батерии | бр |
| Форма фактор | Десктоп |
| Тип на монтирање | Поставување на маса |
| Вклучен далечински управувач | Да |
| Димензии на производот | 56.13 x 46.48 x 25.15 cm |
| Тежина на ставката | 5.5 кг |
| Максимална големина на слика | 308.28 инчи |
| Минимална големина на слика | 910.63 милиметри |
| Прво достапен датум | 5 јануари 2022 година |
9. Гаранција и поддршка
For warranty information and technical support, please refer to the documentation included with your purchase or visit the official InFocus webстраница. Зачувајте го доказот за купување за гаранциски побарувања.


