1. Производот завршиview
This manual provides instructions for the KICKER 48TRTP122 12-inch CompRT Down-Firing Loaded Subwoofer Enclosure, the DS18 CANDY-X1B Mono Class D Amplifier, and the accompanying DS18 AMPKIT4 4AWG Complete Amplifier Wiring Kit. This system is designed to enhance your vehicle's audio experience with powerful bass output.
2. Што има во кутијата
- Kicker 48TRTP122 12" CompRT Series Down-Firing Loaded Subwoofer Enclosure
- DS18 CANDY-X1B Mono Candy-X Series Car Ampживописен
- DS18 AMPKIT4 4AWG Complete Amplifier Kit, including:
- 17 ft 4 AWG Red Power Wire
- 3 ft 4 AWG Black Ground Wire
- 17 ft Remote Wire
- 17 ft Red/Black Speaker Cable
- 17 ft Red/Black Twisted RCA Cable
- Mini ANL Fuse Holder with Mini ANL 100A Fuse
- 6 ft 4 AWG Loom Tube
- 1 x Rubber Grommet
- 10 x Врски за кабли
- 2 x прстени терминали
- 2 x лопата терминали
- 5 x Small Spade Terminals

Figure 2.1: Components of the DS18 AMPKIT4 4AWG Complete Ampкомплет за лагер.
3. Поставување и инсталација
Правилната инсталација е клучна за оптимални перформанси и безбедност. Доколку не сте сигурни за некои чекори, консултирајте се со професионален инсталатер на аудио системи за автомобили.
3.1 Безбедносни мерки на претпазливост
- Исклучете го негативниот терминал на батеријата на возилото пред да започнете со какви било електрични работи.
- Осигурајте се дека сите жици се правилно изолирани и обезбедени за да се спречат кратки споеви и оштетувања.
- Користете соодветна лична заштитна опрема (ЛЗО) за време на инсталацијата.
3.2 Subwoofer Enclosure Placement
The KICKER 48TRTP122 is a down-firing enclosure, designed to be placed in the trunk or cargo area of your vehicle. Ensure it is securely fastened to prevent movement during driving.

Figure 3.1: KICKER 48TRTP122 Down-Firing Subwoofer Enclosure.
3.3 Ampпоживо монтирање
Mount the DS18 CANDY-X1B amplifier in a location that allows for adequate ventilation and protection from moisture. Common locations include under a seat, in the trunk, or on the back of a rear seat. Ensure it is securely mounted to prevent vibration damage.

Figure 3.2: DS18 CANDY-X1B Mono Class D Ampживописен.
3.4 Инструкции за поврзување
Follow these steps carefully for wiring the system. Refer to the wiring diagram below for visual guidance.
- Power Wire (Red 4 AWG): Run the 17 ft red power wire from the vehicle's positive battery terminal to the fuse holder, then from the fuse holder to the +12V terminal on the DS18 amplifier. Ensure the fuse holder is installed close to the battery (within 18 inches).
- Ground Wire (Black 4 AWG): Connect the 3 ft black ground wire from the GND terminal on the ampна чиста, необоена метална површина на шасијата на возилото. Обезбедете добра електрична врска.
- Кабел за далечинско вклучување: Connect the remote wire from your head unit's remote output to the REM terminal on the ampосветлувач. Оваа жица го врти ampВклучување и исклучување на ладилникот со вашата главна единица.
- RCA кабли: Connect the RCA cables from your head unit's subwoofer output (or full-range output if no dedicated sub output) to the RCA input jacks on the DS18 ampживописен.
- Жица за звучници: Поврзете го кабелот за звучникот од amplifier's speaker output terminals to the KICKER subwoofer enclosure's input terminals. Ensure correct polarity (+ to + and - to -). The KICKER 48TRTP122 enclosure has a 2-ohm impedance.
- Далечински управувач за бас: Connect the included bass remote to the dedicated remote port on the DS18 amplifier. Mount the remote in an accessible location for easy adjustment.
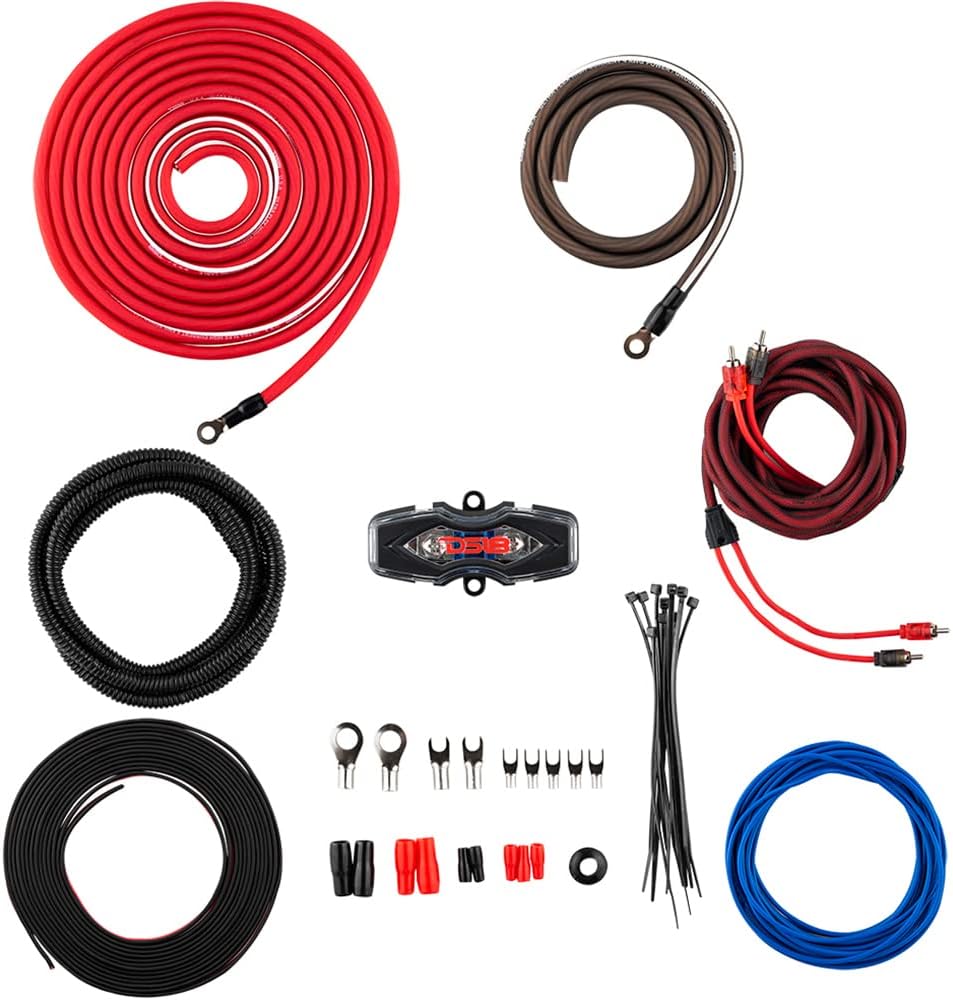
Figure 3.3: Subwoofer to Amplifier Wiring Diagram (2-ohm connection).

Figure 3.4: DS18 Bass Remote Control.
4. Упатства за работа
Once the system is installed, follow these steps to configure and operate your subwoofer and ampживописен.
4.1 Initial Power-Up and Gain Setting
- Повторно поврзете го негативниот терминал на батеријата на возилото.
- Вклучете ја главната единица. amplifier should power on (indicated by a blue LED on the ampпоживо).
- Поставете го amplifier's GAIN control to its minimum (fully counter-clockwise) position.
- Play a music track with strong bass at a moderate volume level on your head unit (around 75% of maximum volume).
- Полека зголемете ја контролата GAIN на amplifier until you hear distortion, then back it off slightly until the sound is clear. This sets the maximum clean output level.
4.2 Amplifier Controls (DS18 CANDY-X1B)
DS18 CANDY-X1B amplifier features several controls for fine-tuning your bass output:
- ДОБИВКА: Adjusts the input sensitivity to match the output of your head unit. (See 4.1)
- BASS BOOST (0-18 dB): Increases the bass output at a specific frequency (typically around 45 Hz). Use sparingly to avoid distortion and speaker damage.
- LPF (Low-Pass Filter) (50-150 Hz): This filter allows only frequencies below the set point to pass through to the subwoofer. Adjust to blend the subwoofer's output seamlessly with your main speakers.
- SUBSONIC FILTER (10-55 Hz): Filters out extremely low frequencies that are inaudible and can cause damage to the subwoofer. Set it slightly below your subwoofer's lowest usable frequency.
- PHASE (0/180 degrees): Ја прилагодува фазата на излезот на сабвуферот во однос на вашите главни звучници. Експериментирајте со обете поставки за да ја пронајдете онаа што обезбедува највпечатлив и најкохерентен бас.
- ДАЛЕЧИНСКИ УПРАВУВАЧ: Port for connecting the wired bass remote control, allowing convenient bass level adjustment from the driver's seat.
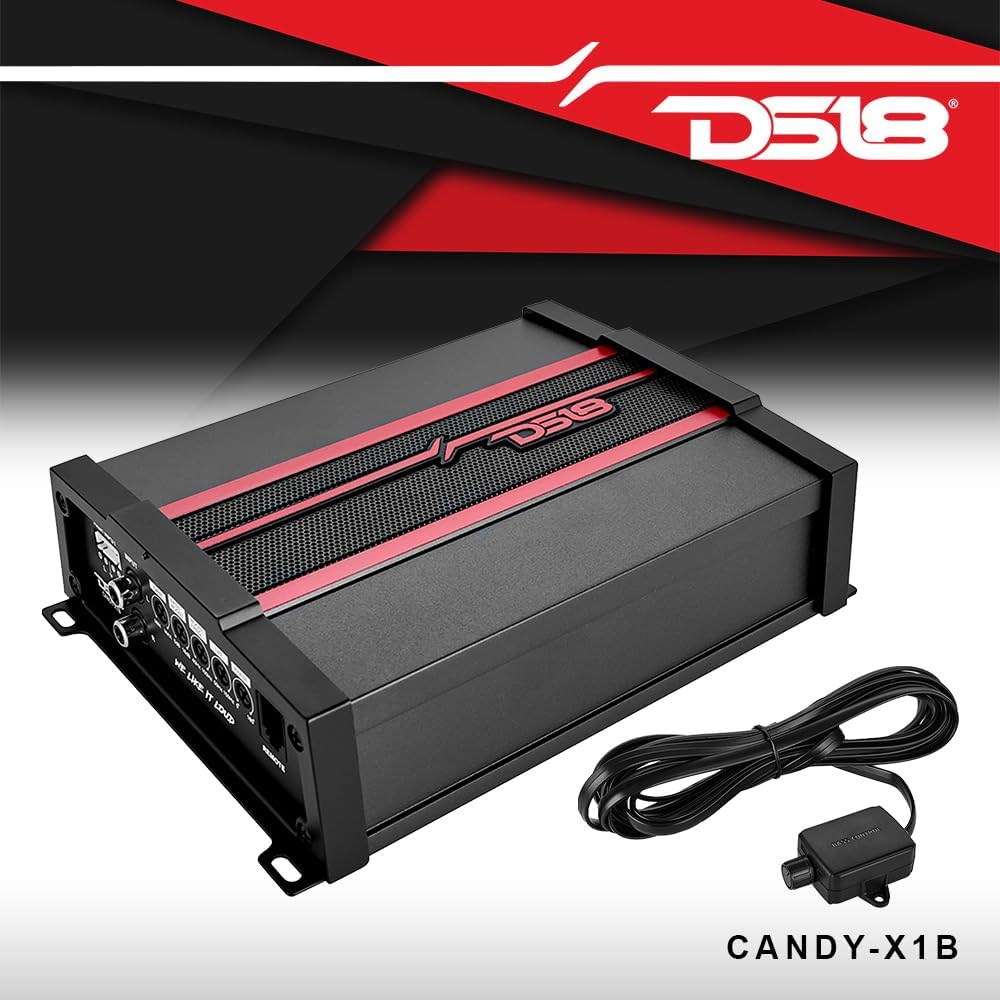
Figure 4.1: DS18 CANDY-X1B Amplifier Controls.
5. Одржување
Regular maintenance ensures the longevity and optimal performance of your audio system.
- Чистење: Чувајте го куќиштето на сабвуферот и amplifier clean and free of dust and debris. Use a soft, dry cloth. Avoid liquid cleaners directly on components.
- Врски: Периодично проверувајте ги сите жичени врски за затегнатост и корозија. Лабавите врски може да доведат до слаби перформанси или оштетување.
- Вентилација: Обезбедете го ampЛадечките перки на ладилникот не се блокирани за да се спречи прегревање.
- Проверка на осигурувачите: Ако на amplifier does not power on, check the fuse in the fuse holder near the battery. Replace with a fuse of the same rating (100A Mini ANL).
6 Смена на проблеми
Погледнете го овој дел за вообичаени проблеми и нивни решенија.
| Проблем | Можна причина | Решение |
|---|---|---|
| Нема звук од сабвуферот |
|
|
| Искривен звук |
|
|
| Ampзалажувачот се прегрее |
|
|
| Bass remote not working |
|
|
7. Спецификации
Detailed specifications for the components in this bundle.
7.1 KICKER 48TRTP122 12" CompRT Subwoofer Enclosure
- Тип на звучник: Сабвуфер
- Дијаметар на сабвуфер: 12 инчи
- Врвна моќност: 1000 вати
- RMS моќност: 500 вати
- Импеданса: 2 оми
- Чувствителност: 98 dB
- Специјална карактеристика: Down-Firing, Active thin-mount CompRT subwoofer, High-output reFLEX passive woofer
- Материјал: Лесонит со средна густина
- Димензии: 27.5" W x 6.125" H x 14.625" D (Top) x 14.625" D (Bottom)
7.2 DS18 CANDY-X1B Mono Class D Ampживописен
- RMS моќност:
- 4 оми: 240 вати x 1 канал
- 2 оми: 400 вати x 1 канал
- 1 ом: 600 вати x 1 канал
- Максимален излез на енергија: 1800 вати
- Чувствителност: 100 dB
- Фреквентен одговор: 20-150 Hz
- Далечински управувач за бас: Вклучено
- Дизајн: Класа Д
- Засилување на променлив бас: 0-18 dB
- Variable Low-pass filter (LPF): 50-150 Hz
- Субсоничен филтер: 10-55 Hz
- Димензии: 5.9" Ш x 8.3" Д x 2.16" В
7.3 DS18 AMPKIT4 4AWG Complete Ampкомплет за лагер
- Мерач на жица: 4 AWG
- Материјал за жица: High Performance CCA (Copper Clad Aluminum)
- Се препорачува за: Еден amplifier up to 1300 Watts
- Вклучени компоненти: Power wire, ground wire, remote wire, speaker cable, RCA cable, fuse holder with 100A fuse, loom tube, grommet, cable ties, various terminals.
8. Информации за гаранцијата
This product bundle typically comes with a manufacturer's warranty. The KICKER 48TRTP122 subwoofer enclosure and DS18 CANDY-X1B amplifier are covered by a full warranty from their respective manufacturers. Specific warranty terms, duration, and coverage details may vary. Please retain your proof of purchase for warranty claims.
For detailed warranty information, refer to the documentation included with each individual component or visit the respective manufacturer's official webсајт.
9. Поддршка
If you encounter issues not covered in this manual or require further assistance, please contact the manufacturer's customer support:
- KICKER Support: Visit the official KICKER webстраница за ресурси за поддршка, често поставувани прашања и информации за контакт.
- DS18 Support: Посетете го официјалниот DS18 website for product support and contact details.
When contacting support, please have your product model numbers (48TRTP122, CANDY-X1B, AMPKIT4) and proof of purchase readily available.


