Вовед
Thank you for choosing the Sharp Big Bang Alarm Clock. This manual provides detailed instructions to help you set up, operate, and maintain your new alarm clock. Please read this manual thoroughly before use and retain it for future reference.
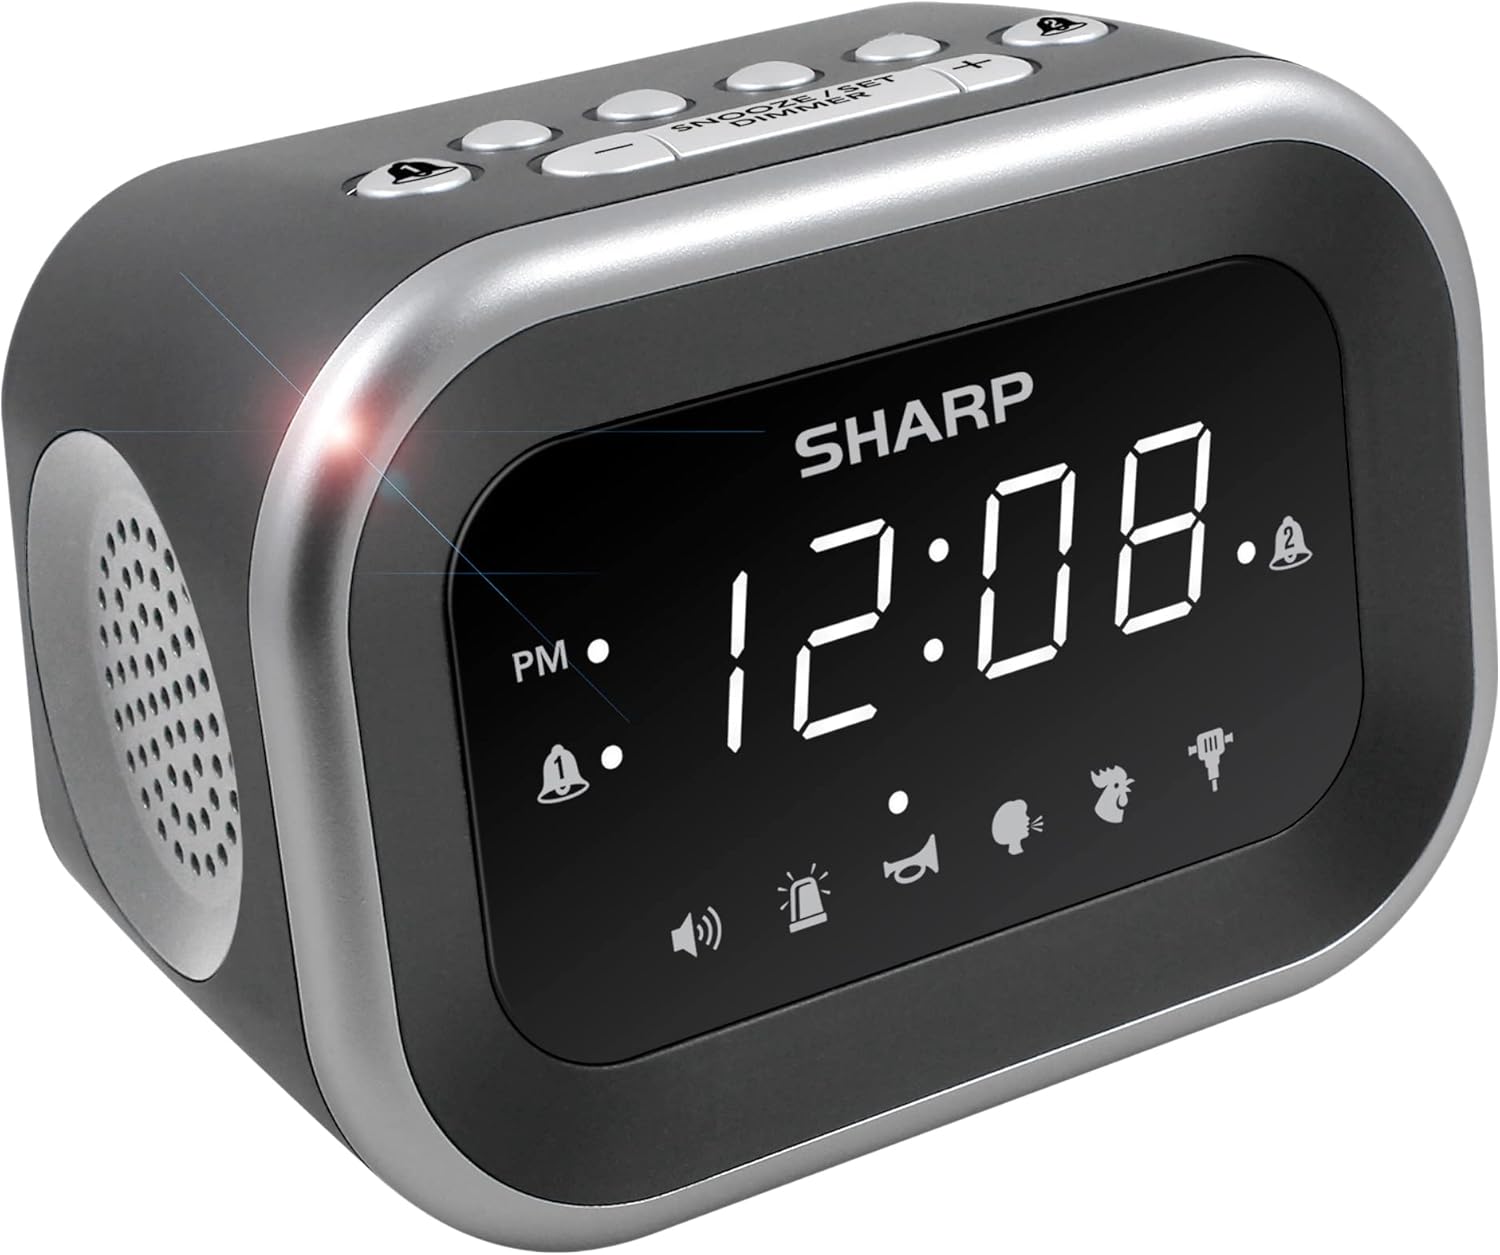
Слика: напред view of the Sharp Big Bang Alarm Clock, showing the digital display and speaker grille.
Информации за безбедност
- Не го изложувајте уредот на екстремни температури, директна сончева светлина или висока влажност.
- Држете го уредот подалеку од вода или други течности.
- Користете го само наведениот адаптер за напојување.
- Не обидувајте се да го расклопите или менувате уредот.
- Да се чува подалеку од дофат на деца.
Содржина на пакетот
- Sharp Big Bang Alarm Clock
- Адаптер за напојување со наизменична струја
- Упатство за употреба (овој документ)
Производот завршиview
Familiarize yourself with the various components and controls of your alarm clock.
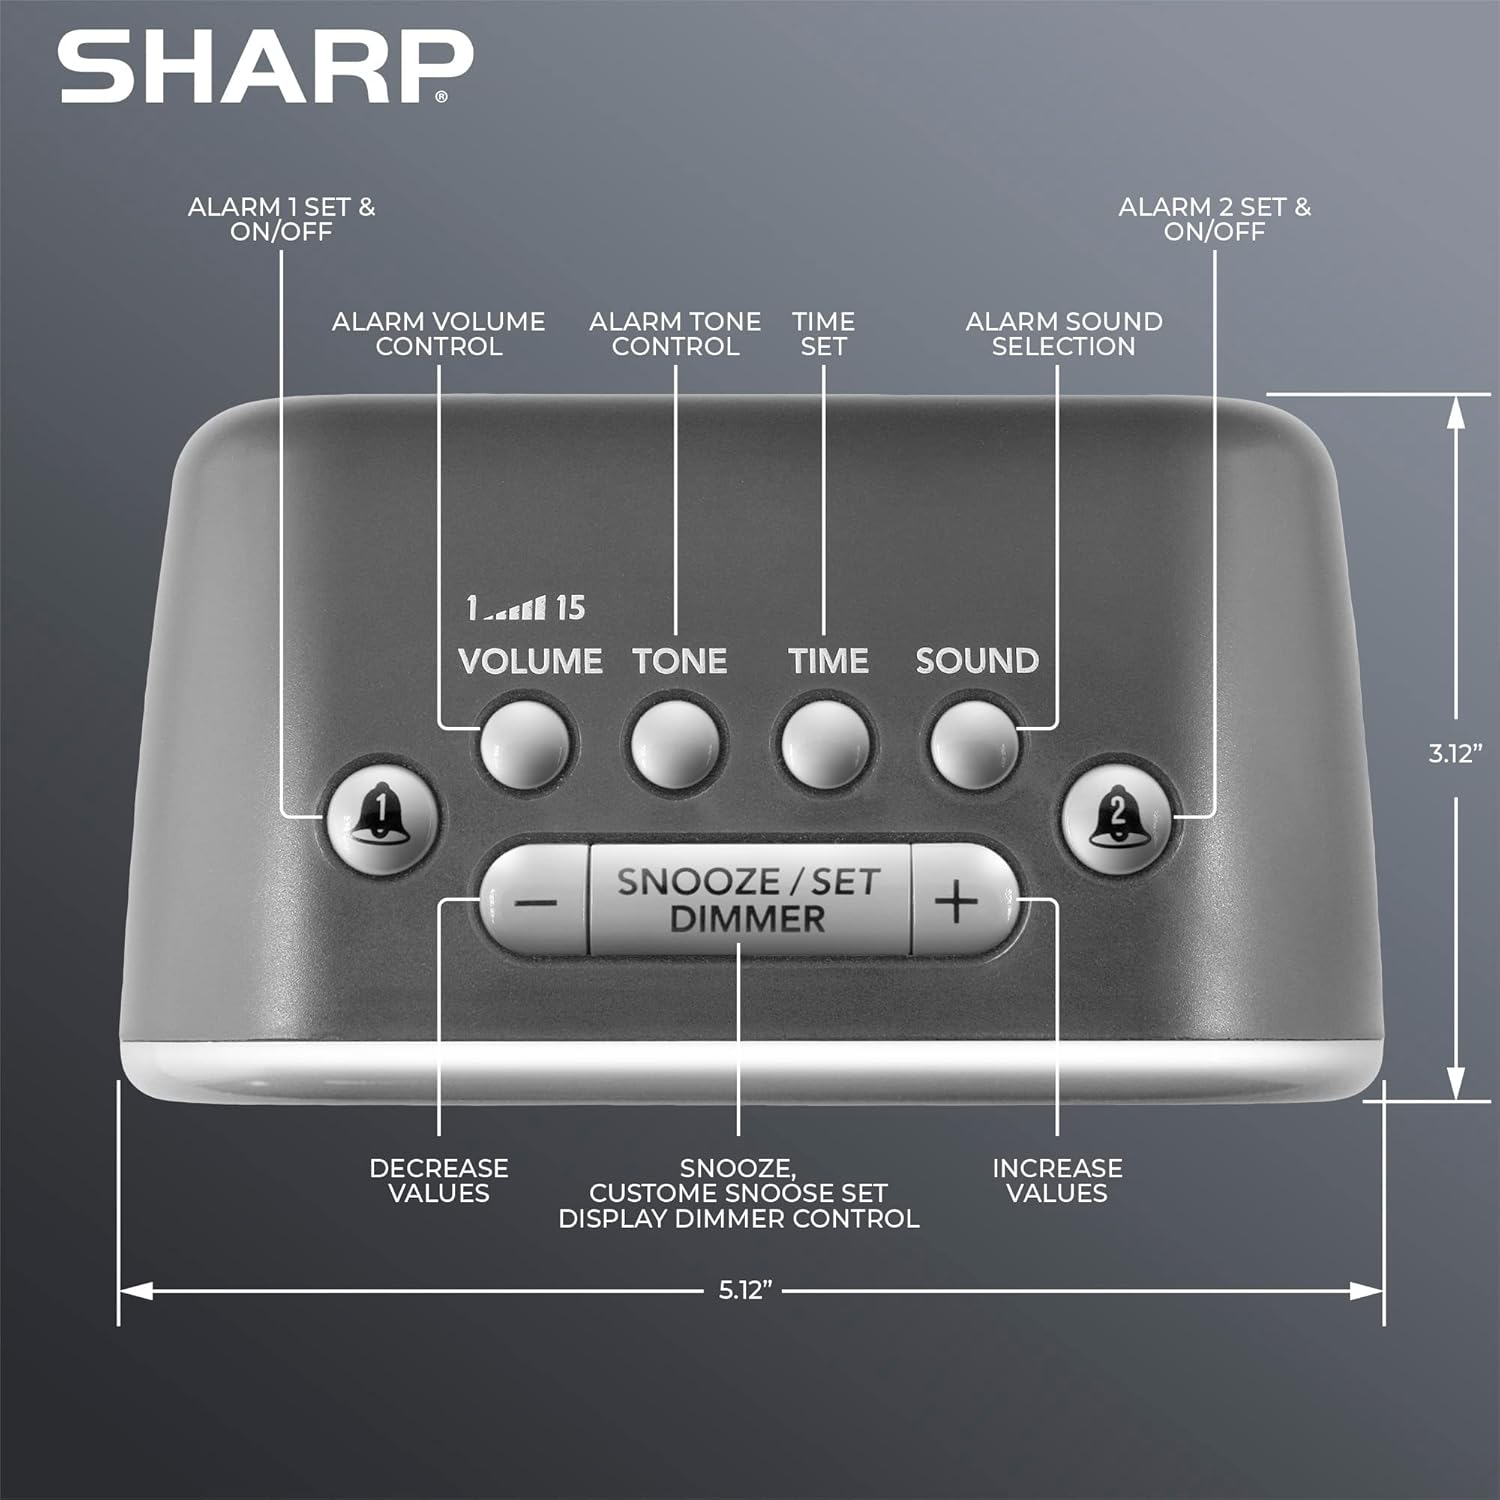
Слика: Горе view of the alarm clock, highlighting buttons for Alarm 1, Alarm 2, Volume, Tone, Time, Sound, Snooze/Set/Dimmer, and +/- controls.
- Прикажи: Large white LED display for time and settings.
- Alarm 1 & 2 Buttons: Activate/deactivate and set individual alarms.
- Копче за јачина на звук: Adjusts alarm volume (levels 1-15).
- Копче за тон: Adjusts alarm tone.
- Копче за време: Used for setting the current time.
- Копче за звук: Selects one of the six alarm sounds.
- Snooze/Set/Dimmer Button: Activates snooze, confirms settings, and adjusts display brightness.
- +/- Копчиња: Adjust values for time, volume, tone, and snooze duration.
Поставување
1. Поврзување за напојување
- Plug the AC power adapter into the DC IN jack on the back of the alarm clock.
- Plug the other end of the adapter into a standard 110V/120V household wall outlet.
- Екранот ќе светне, што укажува дека напојувањето е поврзано.
2. Инсталација на резервна копија на батеријата
The alarm clock requires 2 x AAA batteries (not included) for battery backup. This feature stores your time and alarm settings during a power interruption. The display will not be lit during battery backup mode.
- Отворете го капакот на преградата за батерии на дното од уредот.
- Insert 2 new AAA batteries, observing the correct polarity (+ and -).
- Добро затворете го капакот на преградата за батерии.

Image: The alarm clock positioned on a nightstand, ready for use.
Упатства за работа
1. Поставување на тековното време
- Притиснете и задржете го ВРЕМЕ копчето додека цифрите за часот не трепкаат.
- Користете го + or - копчиња за прилагодување на часот. Обрнете внимание на индикаторот PM.
- Притиснете го ВРЕМЕ повторно притиснете го копчето за да го потврдите часот, а цифрите за минути ќе трепкаат.
- Користете го + or - копчиња за прилагодување на минутите.
- Притиснете го ВРЕМЕ button once more to save the time setting.
2. Поставување аларми (Аларм 1 и Аларм 2)
This clock features two independent alarms.
- Притиснете и задржете го АЛАРМ 1 or АЛАРМ 2 копчето додека цифрите за часот на алармот не трепкаат.
- Користете го + or - buttons to adjust the alarm hour. Observe the PM indicator.
- Притиснете го соодветното АЛАРМ повторно притиснете го копчето за да го потврдите часот, а цифрите за минути ќе трепкаат.
- Користете го + or - копчиња за прилагодување на минутите на алармот.
- Притиснете го АЛАРМ button once more to save the alarm time. The alarm indicator (bell icon) for the set alarm will appear on the display.
- To activate or deactivate an alarm, simply press the АЛАРМ 1 or АЛАРМ 2 button briefly. The bell icon indicates if the alarm is active.
3. Selecting Alarm Sounds
The clock offers 6 distinct alarm sounds: Rooster, Bugle, Nagging Mom, Jackhammer, Siren, and Beep.

Image: Visual representation of the six available alarm sounds.
- With an alarm set, press the ЗВУК button. The current sound icon will flash.
- Користете го + or - buttons to cycle through the available sounds.
- Притиснете го ЗВУК копчето повторно за да го потврдите вашиот избор.
4. Adjusting Alarm Volume and Tone
You can customize the volume (up to 115dB) and tone of your chosen alarm sound.

Image: Decibel reference scale illustrating the loudness of the alarm clock compared to common sounds.
- Притиснете го ВОЛУМЕН button. The current volume level (1-15) will flash.
- Користете го + or - копчиња за прилагодување на јачината на звукот.
- Притиснете го ВОЛУМЕН копчето повторно за да потврдите.
- Притиснете го ТОН button. The current tone setting will flash.
- Користете го + or - buttons to adjust the tone.
- Притиснете го ТОН копчето повторно за да потврдите.
5. Функција за одложување
Кога ќе се огласи алармот, притиснете го големото копче SNOOZE/SET/DIMMER button on top of the clock to temporarily silence the alarm. The default snooze time is 9 minutes.
Customizing Snooze Duration:
- While the alarm is sounding, press and hold the SNOOZE/SET/DIMMER button until the snooze time flashes.
- Користете го + or - buttons to set your desired snooze duration (1-59 minutes).
- Притиснете го SNOOZE/SET/DIMMER button again to save the custom snooze time.
6. Контрола на затемнување на екранот
The display has 3 brightness levels (Off, Low, High).
- Накратко притиснете го SNOOZE/SET/DIMMER button (when the alarm is not sounding) to cycle through the brightness levels: High > Low > Off.

Слика: Надview of key features including display, volume, sounds, and controls.
Одржување
Чистење
- Исклучете го будилникот од штекерот пред чистење.
- Избришете ги надворешните површини со мека, сува крпа.
- Не користете абразивни средства за чистење, восоци или растворувачи.
Замена на батеријата
- Ако часовникот ги изгуби поставките за време или аларм за време на исклучување на струјатаtage, the AAA backup batteries may need replacement.
- Follow the battery installation steps in the Setup section to replace the batteries.
Решавање проблеми
| Проблем | Можна причина | Решение |
|---|---|---|
| Алармот не се огласува или е премногу тивок. | Alarm is not activated; Volume is too low; Incorrect sound selected. | Ensure the alarm bell icon is displayed. Adjust the volume using the VOLUME button. Verify the selected alarm sound. |
| Display is off during a power outage. | Battery backup only retains settings, not display power. | This is normal operation. The display will relight when power is restored. Ensure backup batteries are fresh to retain settings. |
| Time or alarm settings are lost. | Power interruption and/or dead backup batteries. | Replace the 2 x AAA backup batteries. Reset the time and alarm settings. |
| Копчињата не реагираат. | Привремен софтверски дефект. | Исклучете го уредот од штекер неколку минути, а потоа повторно вклучете го. |
Спецификации
- Бренд: Остро
- Модел: B0BDPQNVMR
- Извор на енергија: Електричен кабел (компатибилен со 110V/120V)
- Резервна копија на батеријата: 2 x AAA батерии (не се вклучени)
- Јачина на аларм: До 115 dB
- Звуци на аларм: 6 (Rooster, Bugle, Nagging Mom, Jackhammer, Siren, Beep)
- Прикажи: White LED with 3-level dimmer (High, Low, Off)
- Димензии (приближно): 5.12" (ширина) x 3.12" (висина) x 3.55" (длабочина)
- Тежина: 12.5 унци
- Материјал: Акрилонитрил бутадиен стирен (ABS)
- UPC: 049353008608
Гаранција и поддршка
For warranty information and customer support, please refer to the documentation provided at the time of purchase or contact Sharp customer service directly. You can also visit the official Sharp store for more information: