1. Вовед
This manual provides detailed instructions for the installation, operation, and maintenance of your ANTEC AX Series AX90 Mid-Tower ATX Gaming Case. Please read this manual thoroughly before beginning assembly to ensure proper setup and optimal performance.

Figure 1: ANTEC AX90 Mid-Tower ATX Gaming Case. This image shows the overall design of the case, highlighting its mesh front panel and tempered glass side panel.
2. Клучни карактеристики
- Unique Design & Powerful Heat Dissipation: Engineered for optimal airflow and cooling performance.
- Diamond-Shaped Mesh Front Panel: Provides excellent air intake and a distinctive aesthetic.
- Pre-Installed 4 x 120mm ARGB Fans: Includes three 120mm ARGB fans at the front and one 120mm ARGB fan at the rear for immediate cooling and lighting.
- Extensive Fan Support: Accommodates up to 11 x 120mm fans simultaneously for maximum cooling potential.
- Ample Cable Management Space: Features 23mm of space behind the motherboard tray to ensure a neat and organized build.
- Страничен панел од калено стакло: Showcases your internal components with a clear, durable tempered glass panel.
- Поддршка за радијатор: Supports up to 360mm radiators for advanced liquid cooling solutions.
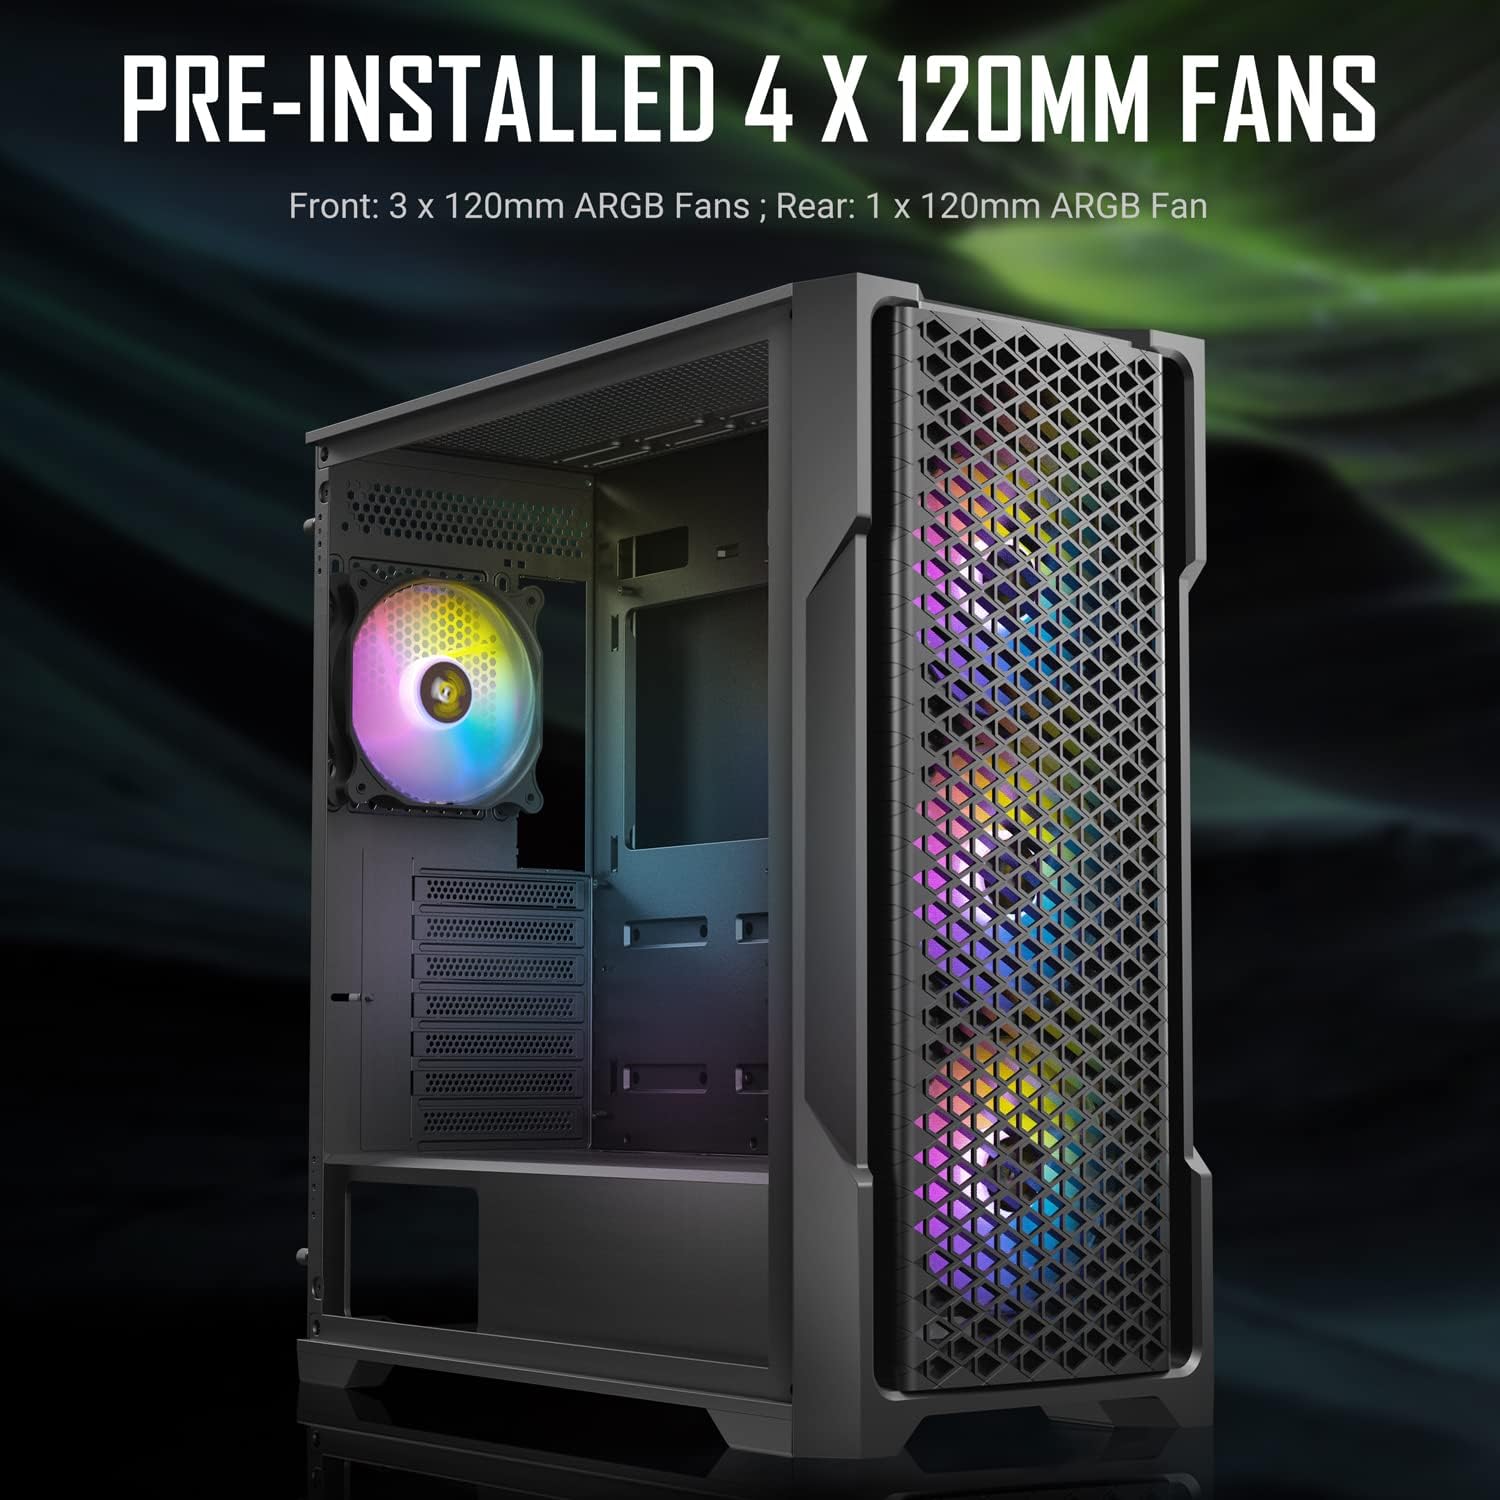
Figure 2: Pre-installed 120mm ARGB fans. This image illustrates the three front and one rear pre-installed ARGB fans, highlighting their lighting capabilities.
3. Спецификации
| Карактеристика | Детал |
|---|---|
| Име на моделот | AX90 |
| Тип на случај | Mid Tower |
| Димензии (Д x Ш x В) | 47.3 x 21 x 48.6 cm |
| Тежина | 7.2 кг |
| Компатибилност со матична плоча | ATX, Micro-ATX, ITX |
| Слотови за проширување | 7 |
| Предни влезни порти | 1 x USB 3.0, 2 x USB 2.0, HD Audio |
| Претходно инсталирани вентилатори | 3 x 120mm ARGB (Front), 1 x 120mm ARGB (Rear) |
| Максимална должина на графичкиот процесор | 385 мм |
| Максимална висина на ладилникот на процесорот | 160mm (estimated, common for mid-towers) |
| Поддршка за радијатор | Front: Up to 360mm, Top: Up to 360mm, Rear: 120mm |
| Диск Бејс | 2 x 3.5" HDD, 2 x 2.5" SSD (or 4 x 2.5" SSD) |
| Простор за управување со кабли | 23 мм |

Слика 3: Заден дел view of the ANTEC AX90 case, showing the expansion slots, rear fan mount, and power supply cutout.
4. Поставување и инсталација
Follow these steps for proper installation of your components into the ANTEC AX90 case.
4.1 Подготовка на случајот
- Отстранете ги страничните панели: Carefully remove the tempered glass side panel by unscrewing the thumb screws at the rear and gently pulling it away. Place it on a soft, flat surface to prevent scratches or damage. Remove the steel side panel similarly.
- Кутија за додатоци: Locate the accessory box inside the case, which contains screws, zip ties, and other installation hardware.

Слика 4: Страна view of the ANTEC AX90, illustrating the tempered glass panel. Exercise caution when handling the glass panel.
4.2 Инсталација на матична плоча
- Инсталирајте го I/O штитот во отворот за матичната плоча на задниот дел од куќиштето.
- Align your ATX, Micro-ATX, or ITX motherboard with the standoffs inside the case. Ensure all standoffs align with the screw holes on your motherboard.
- Secure the motherboard using the appropriate screws from the accessory box.
4.3 Инсталација на напојување
- Position your ATX power supply unit (PSU) into the PSU shroud at the bottom rear of the case.
- Secure the PSU from the rear of the case using the provided screws.
4.4 Инсталација на диск за складирање
- 3.5" хард дискови: Install 3.5" hard drives into the drive cage located under the PSU shroud. Slide the drives into the trays and secure them.
- 2.5" SSD дискови: Install 2.5" solid-state drives onto the dedicated mounting points behind the motherboard tray or on top of the PSU shroud. Secure with screws.
4.5 Инсталација на графичка картичка (GPU)
- Отстранете ги потребните капаци за слотовите за проширување на задниот дел од куќиштето.
- Вметнете ја графичката картичка во соодветниот PCIe слот на матичната плоча.
- Прицврстете ја графичката картичка со завртки. Куќиштето поддржува графички процесори со должина до 385 mm.

Слика 5: Внатрешно view demonstrating maximum GPU length compatibility. The case provides ample space for long graphics cards.
4.6 Cooling System Installation (Optional)
- Дополнителни фанови: Install additional 120mm or 140mm fans as desired on the top, front, or side mounts.
- Liquid Cooling Radiators: The case supports radiators up to 360mm at the front and top. Install radiators and fans according to your liquid cooler's instructions.

Figure 6: Illustration of liquid cooling radiator support. This image shows a 240mm radiator installed, demonstrating the case's cooling capabilities.
4.7 Управување со кабли
Utilize the 23mm space behind the motherboard tray and the numerous cable routing cutouts to organize your cables. Use zip ties (included in the accessory box) to secure cables for improved airflow and a cleaner aesthetic.

Слика 7: Заден дел view of the case highlighting the 23mm cable management space. Proper cable routing enhances airflow and aesthetics.
4.8 Завршно собрание
Once all components are installed and cables are managed, reattach the steel side panel and then the tempered glass side panel, securing them with the thumb screws.
5. Управување со ARGB осветлувањето
The ANTEC AX90 comes with pre-installed ARGB fans that can be controlled via the built-in hub or synchronized with your motherboard's ARGB software.
5.1 Using the Built-in ARGB Control Button
The case features a dedicated ARGB control button on the front I/O panel. Press this button to cycle through various pre-set lighting modes and effects. Hold the button down for a few seconds to turn the ARGB lighting on or off.
5.2 Синхронизација на матичната плоча
To synchronize the ARGB lighting with your motherboard's software (e.g., ASUS Aura Sync, MSI Mystic Light Sync, GIGABYTE RGB Fusion, ASRock Polychrome Sync), connect the ARGB cable from the case's fan hub to the 3-pin 5V ARGB header on your motherboard. Once connected, you can control the lighting effects directly through your motherboard's utility software.

Figure 8: Diagram illustrating ARGB lighting synchronization with a motherboard. This shows the connection from the fan controller to the motherboard's ARGB header.
6. Одржување
Regular maintenance helps ensure optimal performance and longevity of your ANTEC AX90 case.
- Филтри за прашина: The case is equipped with removable dust filters (e.g., top, front, bottom). Periodically remove and clean these filters using compressed air or by washing them with water and mild soap. Ensure they are completely dry before reinstallation.
- Чистење на ентериерот: Use compressed air to blow out dust from inside the case, especially from fans, heatsinks, and hard-to-reach areas. For stubborn grime, use a soft, lint-free cloth slightly dampобложена со изопропил алкохол.
- Надворешно чистење: Избришете ги надворешните површини со мека, гamp cloth. Avoid harsh chemicals or abrasive materials that could damage the finish or tempered glass.
- Калено стакло: Clean the tempered glass panel with a glass cleaner and a microfiber cloth. Avoid excessive force or impact on the glass.
7 Смена на проблеми
This section addresses common issues you might encounter with your ANTEC AX90 case.
7.1 Вентилаторите не се вртат или ARGB не свети
- Проверете ги врските: Ensure all fan power cables (3-pin or 4-pin) are securely connected to the fan hub or motherboard fan headers. Verify ARGB cables are properly connected to the ARGB hub or motherboard's 5V ARGB header.
- Напојување: Confirm the fan hub is receiving power from the PSU (usually via a SATA power connector).
- Софтвер за матична плоча: If using motherboard synchronization, ensure the correct software is installed and configured.
- Контролно копче: If using the built-in control, try pressing the ARGB button to cycle through modes or turn it on.
7.2 Poor Airflow or High Temperatures
- Филтри за прашина: Clean all dust filters regularly. Clogged filters severely restrict airflow.
- Ориентација кон обожавателите: Ensure fans are oriented correctly for optimal airflow (e.g., front fans as intake, rear/top fans as exhaust).
- Управување со кабли: Improve cable management to reduce obstructions to airflow inside the case.
- Клиренс на компоненти: Ensure large components (e.g., CPU cooler, GPU) are not blocking critical airflow paths.
7.3 Front I/O Ports Not Functioning
- Заглавија на матичната плоча: Verify that the front panel cables (USB 3.0, USB 2.0, HD Audio, Power SW, Reset SW, HDD LED, Power LED) are correctly connected to the corresponding headers on your motherboard. Refer to your motherboard manual for header locations.
- Инсталација на драјвери: Ensure necessary USB drivers are installed for your operating system.
8. Гаранција и поддршка
За информации за гаранцијата и техничка поддршка, ве молиме погледнете го официјалниот Antec webлокација или директно контактирајте ја службата за корисници на Antec. Зачувајте го доказот за купување за гаранциски барања.
Antec Official Webсајт: www.antec.com
Please note that damage to the tempered glass panel due to mishandling is typically not covered under warranty. Handle with extreme care.