1. Вовед
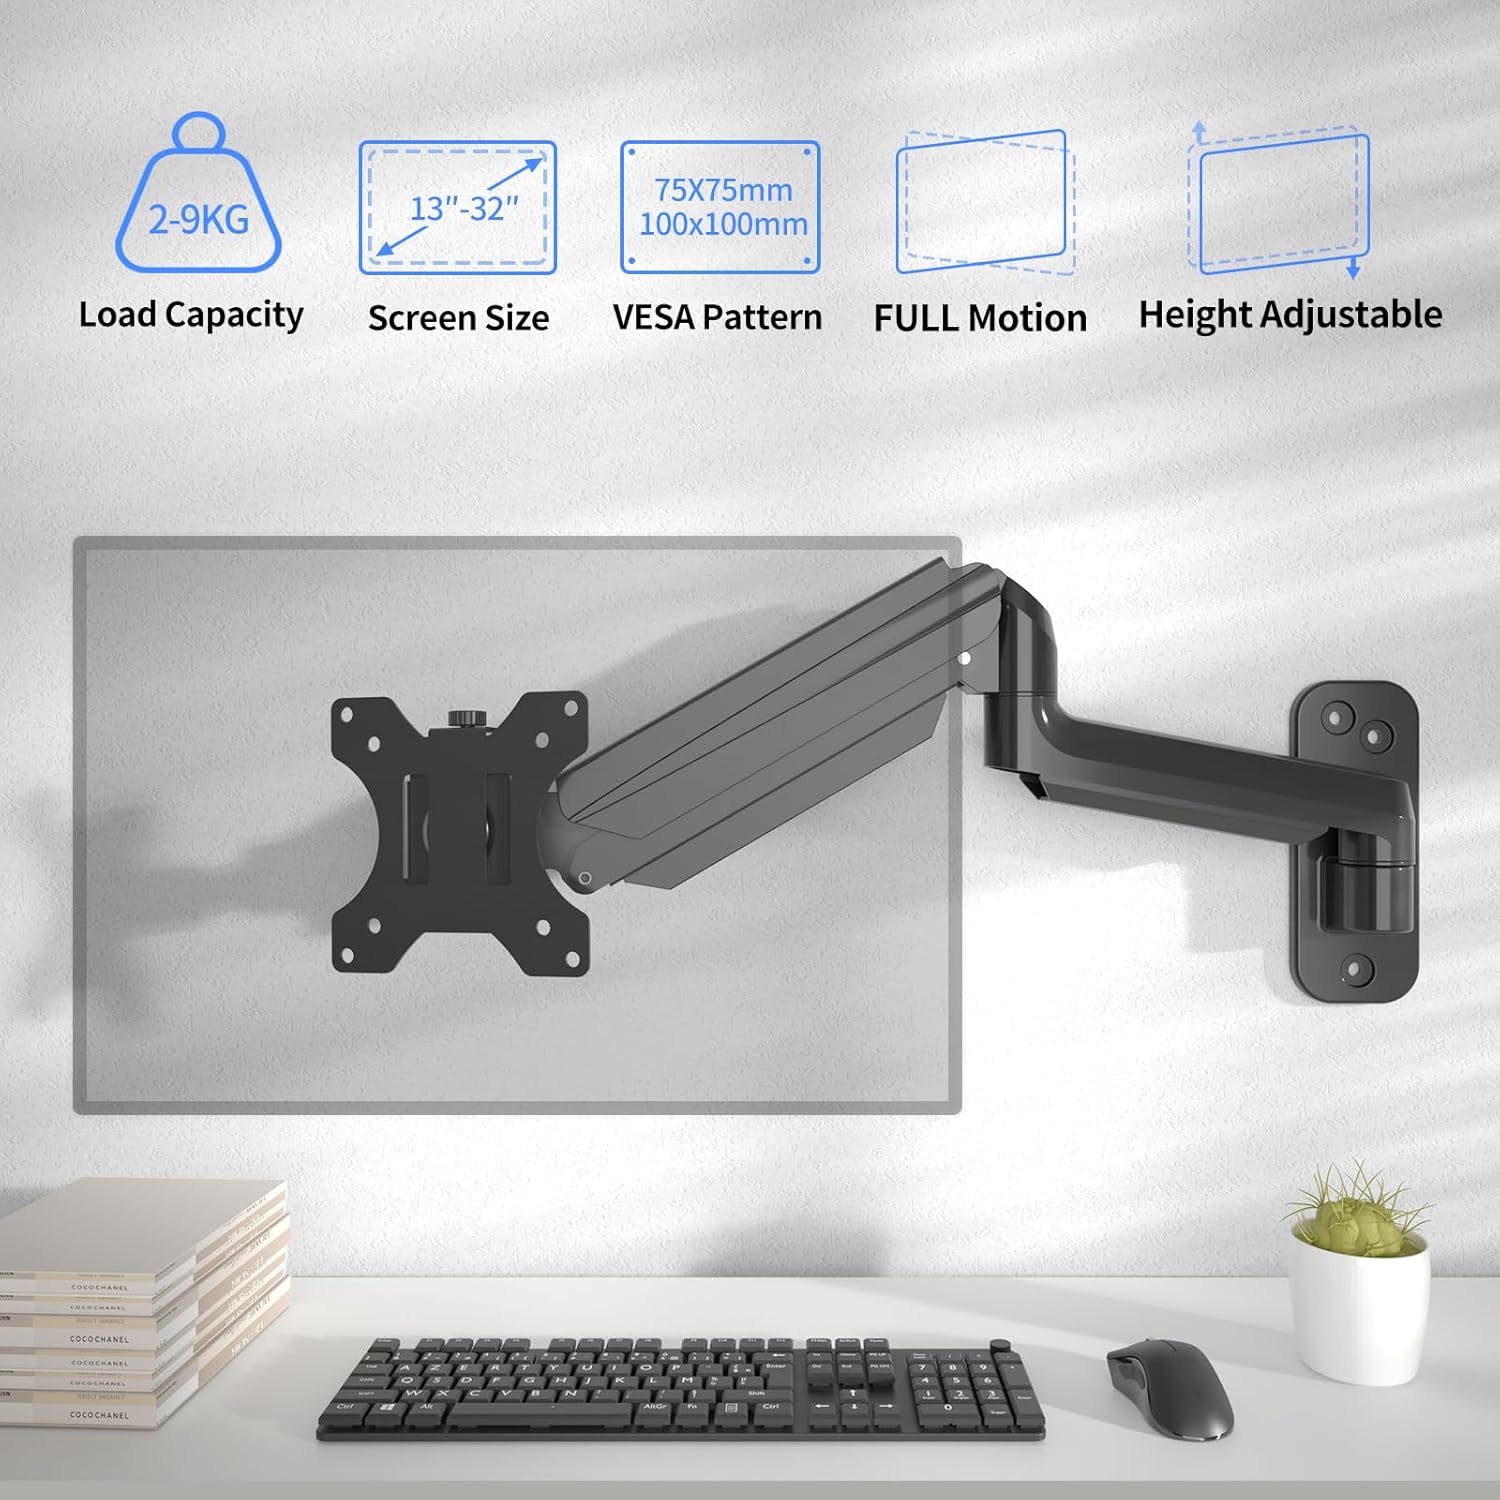
This manual provides detailed instructions for the safe and efficient installation, operation, and maintenance of your suptek Monitor Wall Mount (Model WM01A). This wall mount is designed to support LED/LCD/TV screens ranging from 13 to 32 inches and weighing up to 9 kg. It features a fully adjustable gas spring for optimal viewагли и ергономско позиционирање.
Ве молиме внимателно прочитајте го ова упатство пред инсталацијата и зачувајте го за во иднина.
2. Информации за безбедност
ПРЕДУПРЕДУВАЊЕ: Failure to read, fully understand, and follow all instructions can result in serious personal injury, property damage, or voiding of the warranty. If you have any questions, please contact customer support.
- Осигурајте се дека површината за монтирање може безбедно да ја издржи комбинираната тежина на држачот и екранот.
- Не го надминувајте максималниот капацитет на тежина од 9 кг (19.8 фунти).
- Овој производ е наменет само за внатрешна употреба.
- Use only the provided hardware. Do not use the product for any purpose not explicitly specified by the manufacturer.
- Секогаш користете квалификуван професионалец за инсталација ако не сте сигурни во врска со процесот.
- Држете ги децата и домашните миленици подалеку за време на инсталацијата.
- Редовно проверувајте ги сите врски за да бидете сигурни дека се безбедни.
3. Содржина на пакетот
Verify that all components are present and undamaged before installation. If any parts are missing or damaged, do not proceed with installation and contact customer support.
Слика: Надview of the suptek Monitor Wall Mount and its included components, such as the articulating arm, VESA mounting plate, screws, anchors, and tools.
- Monitor Wall Mount Arm with Gas Spring
- Detachable VESA Plate (75x75mm / 100x100mm compatible)
- Wall Mounting Hardware (screws, anchors for various wall types)
- Monitor Mounting Hardware (various screw sizes for different monitors)
- Hex Key for adjustments
- Spirit Level (for accurate installation)
4. Спецификации
| Карактеристика | Детал |
|---|---|
| Бренд | суптек |
| Модел | WM01A |
| Компатибилна големина на екран | 13-32 инчи |
| Тежински капацитет | До 9 кг (19.8 кг) |
| Компатибилност со VESA | 75х75мм, 100х100мм |
| Агол на навалување | -90°/+90° |
| Агол на вртење | -90°/+90° |
| Ротација | 360° |
| Прилагодување на висината | Gas spring assisted, 310-360mm range |
| Материјал | Легуриран челик |
| Тип на монтирање | Монтирање на ѕид |
| Димензии на производот (пакет) | 37.29 x 22.7 x 8 cm; 1.85 кг |
5. Клучни карактеристики
- Универзална компатибилност: Supports 13-32 inch monitors or TVs up to 9 kg with VESA 75x75mm or 100x100mm patterns.
- Целосна прилагодливост: Offers -90°/+90° tilt, -90°/+90° swivel, and 360° rotation for optimal viewинг агли.
- Gas Spring Assisted: Allows for smooth and effortless height adjustment and stable positioning at any angle.
- Дизајн што заштедува простор: Can be folded close to the wall when not in use, maximizing workspace.
- Издржлива конструкција: Made from high-quality alloy steel for long-lasting durability and stability.
- Лесна инсталација: Designed for quick and straightforward installation in three simple steps.
- Интегрирано управување со кабли: Hidden cable management system helps organize cables for a tidy workspace.
6. Поставување и инсталација
Follow these steps carefully for a secure installation. It is recommended to have assistance during certain steps, especially when mounting the monitor.
6.1. Choose Your Mounting Location
Ensure the wall type is suitable for mounting. This mount is compatible with concrete walls, brick walls, and wood studs.

Image: Visual guide for compatible wall types: concrete, brick, and wood studs, indicating where to drill for each.
6.2. Прикачете VESA плоча на мониторот
The VESA plate attaches to the back of your monitor. Use the appropriate screws provided for your monitor's VESA pattern (75x75mm or 100x100mm).
Video: Demonstrates attaching the VESA plate to the monitor, highlighting the detachable VESA plate feature and weight capacity. This video is from BONTEC, a related brand, and shows a similar monitor arm installation process.
For monitors with a curved back, ensure proper spacers are used if necessary to prevent damage.
6.3. Монтирајте ја ѕидната плоча
Use the included spirit level to mark the drilling points accurately. Drill pilot holes and secure the wall plate using the appropriate anchors and screws for your wall type.
Video: Illustrates the process of installing the wall plate to a brick wall and a wood stud, showing drilling and securing the mount. This video is from BONTEC, a related brand, and shows a similar monitor arm installation process.
6.4. Прикачете го мониторот на рачката
Carefully slide the monitor (with the attached VESA plate) onto the arm's mounting socket. Ensure it clicks securely into place.
6.5. Прилагодете ја напнатоста на плин
Adjust the gas spring tension to match your monitor's weight. This ensures the monitor stays in position without drifting up or down.

Image: Instructions for adjusting the gas spring tension. Turn clockwise for lighter monitors and counter-clockwise for heavier monitors using the provided hex key.
Use the hex key to turn the bolt clockwise for lighter monitors or counter-clockwise for heavier monitors until the monitor floats freely at any desired height.
7. Упатства за работа
Your suptek Monitor Wall Mount offers a wide range of adjustments for optimal viewудобност
7.1. Прилагодување на висината
The gas spring allows for smooth vertical movement. Gently push or pull the monitor to your desired height. The arm will hold its position once released.

Image: Shows the height adjustment range (310-360mm) and maximum arm extension (549mm) of the monitor mount.
7.2. Прилагодување на навалување
Adjust the monitor's vertical angle by tilting it up or down. The tilt range is -90° to +90°.
Video: Demonstrates the tilt, swivel, and rotation capabilities of the monitor arm, including cable management. This video is from BONTEC, a related brand, and shows a similar monitor arm in action.
7.3. Вртење и ротација
The monitor arm allows for -90° to +90° swivel, enabling you to turn the screen left or right. Additionally, the VESA plate supports 360° rotation, allowing you to switch between landscape and portrait orientations.

Image: Illustrates the full range of motion, including 360° rotation, ±90° tilt, and ±90° swivel for flexible viewинг.
Видео: 360 степени view of the monitor arm's movement and flexibility. This video is from BONTEC, a related brand, and shows a similar monitor arm in action.
7.4. Управување со кабли
Route your cables through the integrated cable management channels on the arm to maintain a clean and organized workspace.

Image: Demonstrates how cables can be routed through the arm for effective cable management, contributing to a tidy setup.
8. Одржување
- Чистење: Избришете го држачот со мека, дamp крпа. Избегнувајте абразивни средства за чистење или растворувачи.
- Инспекција: Периодично проверувајте ги сите завртки и врски за да се осигурате дека се цврсто стегнати и безбедни. Затегнете ги повторно доколку е потребно.
- Гасна пружина: The gas spring is designed for long-term use and generally requires no maintenance. If the monitor does not hold its position, re-adjust the tension as described in Section 6.5.
9 Смена на проблеми
| Проблем | Можна причина | Решение |
|---|---|---|
| Monitor drifts up or down | Gas spring tension is incorrect for monitor weight. | Adjust the gas spring tension using the hex key (refer to Section 6.5). Turn clockwise for lighter monitors, counter-clockwise for heavier monitors. |
| Монтажата се чувствува нестабилна | Завртките за монтирање или завртките на VESA плочата се лабави. | Check and tighten all mounting screws on the wall plate and the VESA plate. Ensure the wall type is appropriate and anchors are correctly installed. |
| Difficulty moving the arm | Joints are too tight or gas spring tension is too high/low. | Adjust the gas spring tension (Section 6.5). Check for any obstructions. |
| Monitor not level | Installation was not level or rotation adjustment is off. | Ensure the wall plate is level. Adjust the monitor's rotation at the VESA plate connection point. |
10. Гаранција и поддршка
For warranty information or technical support, please contact suptek customer service through the retailer where you purchased the product or visit the official suptek website. Please have your model number (WM01A) and purchase date available when contacting support.


