1. Вовед
This manual provides detailed instructions for setting up and operating your BrosTrend 5GHz 867Mbps Outdoor WiFi Bridge. This kit is designed to extend your network wirelessly over long distances, up to 1 kilometer with a clear line of sight, enabling stable internet connectivity between buildings such as houses, shops, barns, garages, sheds, farms, or RVs.
The kit includes two units: one configured as an Access Point (AP) or Transmitter, and the other as a Station (Receiver). It supports high-speed data transmission up to 867Mbps on the 5GHz band, adhering to the 802.11ac WiFi standard.
Video: Introducing 1 km Outdoor Wireless Bridge Kit. This video provides a visual overview of the product's capabilities and features.
2. Содржина на пакетот
Ве молиме проверете дали сите артикли се присутни во вашиот пакет:
- 2 x Outdoor CPEs (Customer Premises Equipment)
- 2 x адаптери за напојување
- 2 x Passive PoE Injectors
- 2 x Ethernet кабли
- 4 x завртки
- 4 x експанзиони завртки
- 2 x Plastic Straps
- 1 x Водич за брза инсталација
3. Водич за поставување
3.1 Powering the CPEs
The CPEs can be powered using one of two methods:
- Via PoE Injector (Recommended): Connect the PoE/LAN port of the CPE to the PoE port of the included PoE injector using an Ethernet cable. Then, connect the DC power adapter to the PoE injector and plug it into an electrical socket.

Image: Connection diagram for powering the CPE via PoE injector. The Ethernet cable carries both power and data.
- Via DC Power Adapter (Direct): Connect the DC power adapter directly to the DC port of the CPE.
Забелешка: The PoE injectors are designed for indoor use only.
3.2 Automatic Pairing (Plug-and-Play)
The BrosTrend WiFi Bridge kit comes pre-paired from the factory for easy setup. To initiate automatic pairing:
- Place both CPE units (one AP/Transmitter, one Station/Receiver) in the same room.
- Power on both CPEs using one of the methods described above.
- The units will automatically pair within approximately 1 minute.
You can identify the AP (Transmitter) and Station (Receiver) units by checking the labels on their backs. The AP unit's PoE/LAN indicator will light solid green, while the Station unit's PoE/LAN indicator will also light solid green upon successful power-on.

Image: Two CPE units successfully paired, indicated by a green checkmark and blue signal lines.
Video: Outdoor WiFi Bridge Setup Guide, Auto-Pairing Method. This video demonstrates the step-by-step process for automatic pairing and initial setup.
3.3 Installation and Placement
Once paired, the CPEs are ready for outdoor installation. Proper placement is crucial for optimal performance.
- Јасна линија на видливост: A clear, unobstructed line of sight between the AP (Transmitter) and the Station (Receiver) is essential. Obstacles such as trees, buildings, or large steel structures can significantly block the wireless signal and reduce performance.
- Порамнување: Aim the front of the AP (Transmitter) directly towards the front of the Station (Receiver). For optimal signal transmission, they should be 100% face-to-face. In some cases, vertical or horizontal alignment within a 60° angle range may be necessary.
- Опции за монтирање: The units support both wall-mounted and pole-mounted installations.
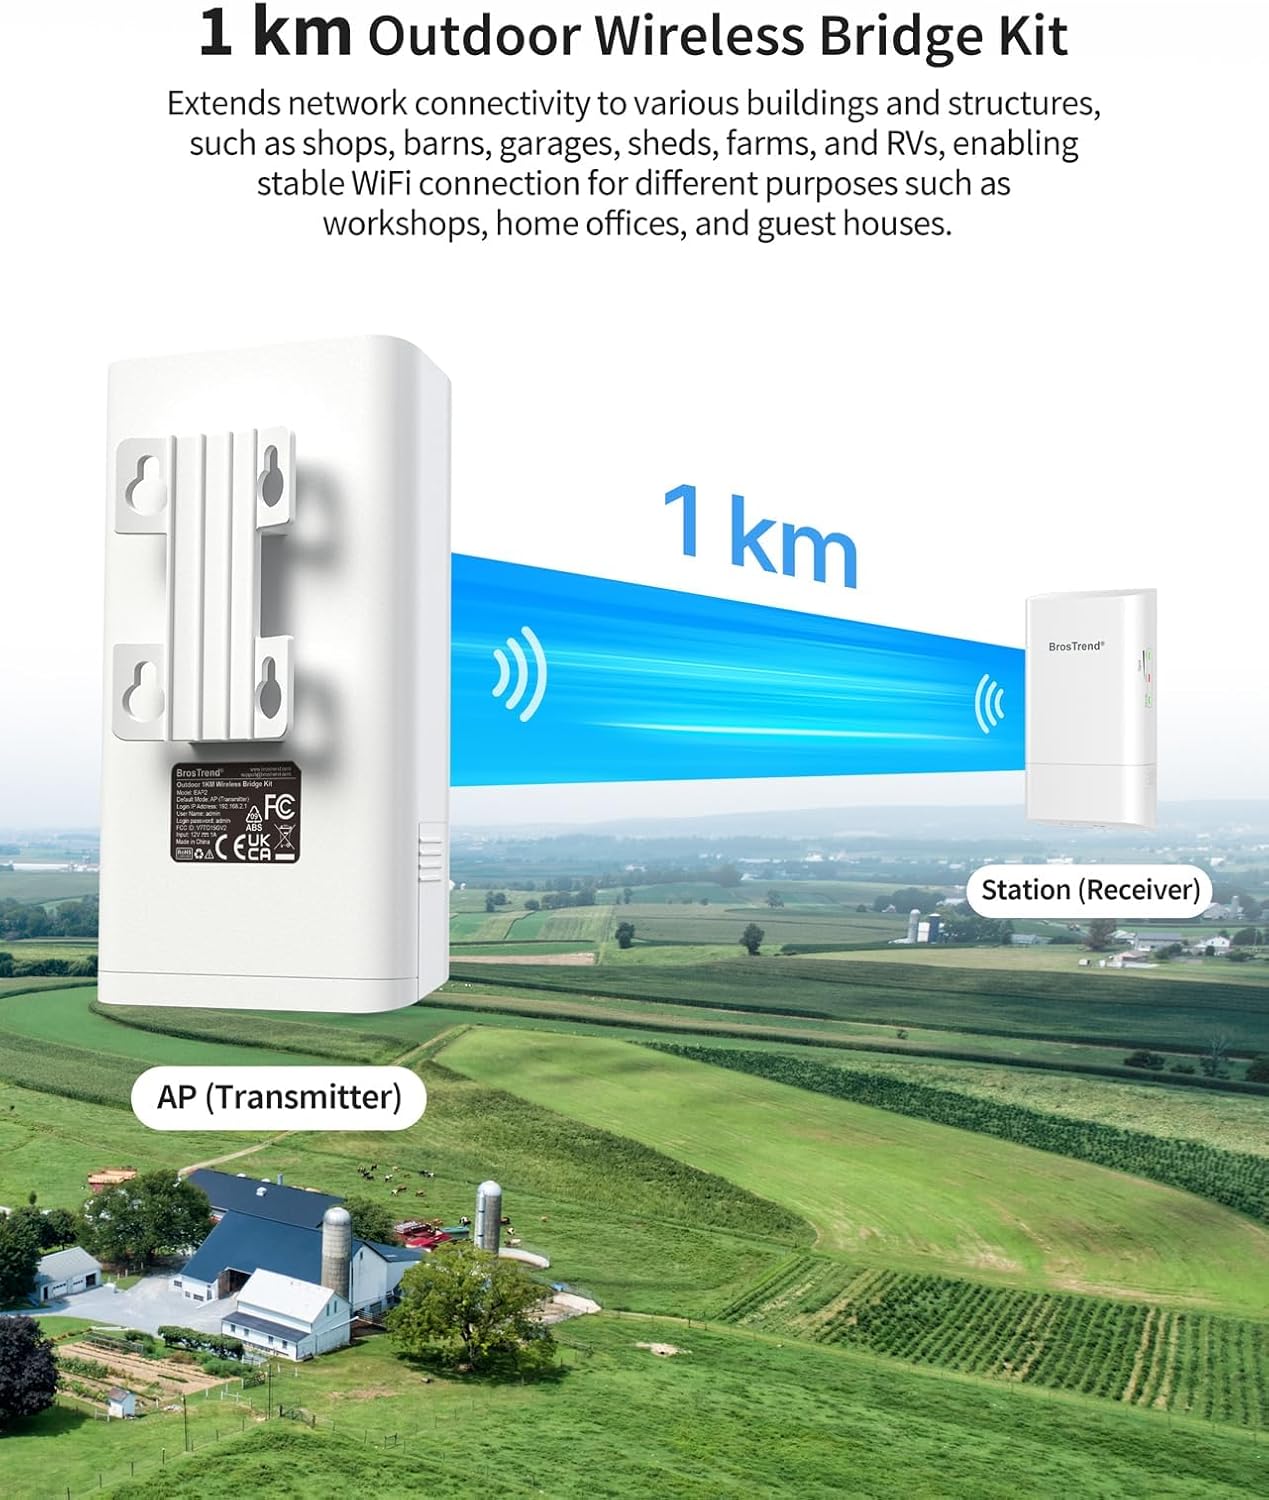
Image: Visual representation of a 1 km outdoor wireless link between an AP and a Station, emphasizing clear line of sight over a rural area.

Image: Detailed diagram of a Point-to-Point connection, showing how the AP connects to the main router and the Station connects to devices in a remote building.

Image: A user installing one of the CPE units on an exterior wall, demonstrating the physical installation process.
4. Operating the WiFi Bridge
4.1 Signal Strength Indicators
The CPE units feature LED indicators to help you assess the signal strength and ensure proper alignment:
- Good Signal: Both LED1 and LED2 indicators on the AP (Transmitter) stay solid on. On the Station (Receiver), both LED1 and LED2 blink slowly.
- Decent Signal: The LED1 indicator on the AP (Transmitter) stays solid on, while LED2 turns off. On the Station (Receiver), LED1 blinks slowly, and LED2 turns off.
- Fair or No Signal: Both LED1 and LED2 indicators on both the AP (Transmitter) and Station (Receiver) turn off.

Image: Close-up of the signal strength indicators on a CPE unit, showing green and red LEDs.
4.2 Point-to-Point (PtP) Connection
The primary function of this kit is to establish a Point-to-Point wireless link. The AP (Transmitter) connects to your main network (e.g., router/modem) and transmits the signal. The Station (Receiver) receives this signal and can then connect to another router, switch, or individual devices (like cameras, laptops) in the remote building, extending your network.
4.3 Point-to-Multipoint (PtMP) Application
For Point-to-Multipoint applications, you can connect up to 15 Station (Receiver) units to one AP (Transmitter). This is ideal for scenarios requiring multiple remote network extensions, such as surveillance camera systems across a large property. For PtMP setup, manual configuration of the AP (Transmitter) and Station (Receiver) via the user interface pages is required. This process requires a good understanding of network configuration knowledge.

Image: Illustration of a Point-to-Multipoint topology, demonstrating how one AP can connect to multiple Station units for extended coverage, particularly for surveillance.
5. Одржување
The BrosTrend Outdoor WiFi Bridge is designed for durability in various weather conditions:
- Weatherproof Enclosure: Rated IP65 for protection against dust and water ingress.
- Заштита од гром: Features 6KV lightning protection.
- Оптимална заштита: While designed for outdoor use, placing the units under eaves or other sheltered locations can further extend their lifespan and maintain performance.
- Грижа за кабел: Use qualified Cat5e or higher outdoor PoE-compatible Ethernet cables that are waterproof, shielded, UV-resistant, and capable of withstanding high and low temperatures for outdoor installations.

Image: Visual representation of the CPE's durability, highlighting its IP65 weatherproof and 6KV lightning protection features against diverse environmental conditions.
6 Смена на проблеми
- No Signal / Poor Connection:
- Ensure a clear line of sight between the AP (Transmitter) and Station (Receiver). Obstacles like trees or buildings can severely degrade signal quality.
- Verify that both units are correctly aligned and facing each other. Use the signal strength LEDs to assist with alignment.
- Проверете ги сите кабли за да се осигурате дека се безбедни и правилно поставени.
- Проблеми со моќноста:
- Confirm that the power adapters are plugged into working electrical outlets.
- If using PoE, ensure the Ethernet cable is correctly connected to the PoE port on the injector and the PoE/LAN port on the CPE.
- Наизменична врска:
- Environmental factors (heavy rain, snow, strong winds) can temporarily affect signal stability.
- Ensure outdoor-rated Ethernet cables are used to prevent degradation from weather exposure.
- Check for new obstructions that may have appeared in the line of sight.
- Network Speed is 100Mbps ONLY:
- The 10/100 Mbps RJ45 Ethernet port of the WiFi bridge provides wired speeds up to 100Mbps ONLY. The 867Mbps speed refers to the wireless data transmission between the two CPEs.
7. Спецификации
| Карактеристика | Детал |
|---|---|
| Димензии на производот | 2.8 x 1.7 x 5.2 инчи |
| Тежина на ставката | 3.5 унци |
| Име на моделот | 1 km Outdoor Wireless Bridge Kit |
| Бренд | BrosTrend |
| Производител | BrosTrend Technology LLC |
| Стандарди за Wi-Fi | IEEE 802.11a/n/ac |
| Фреквенција | 5 GHz |
| Брзина на WiFi | До 867 Mbps |
| Пропусен опсег на каналот | 20/40/80 MHz |
| Безжична безбедност | WPA-PSK, WPA2-PSK, Mixed WPA/WPA2-PSK |
| Интерфејси | 1 x 10/100Mbps PoE/LAN Port; 1 x DC Power Jack; 1 x Reset Button |
| Антена | 2 x 9dBi Polarization Directional Antennas |
| Ширина на зракот на антената | 60° (Horizontal), 60° (Vertical) |
| Потрошувачка на енергија | 4.7W per Piece |
| Начин на напојување | 12V 1A Passive PoE; 12V 1A DC |
| Maximum Passive PoE Cable Length | Passive Power over Ethernet via PoE/LAN up to 60 Meters (196 Feet) |
| Работна температура | -22°F - 131°F (-30°C - 55°C) |
| Водоотпорно ниво | IP65 |
| Заштита од гром | 6 KV |
| Распоредување | Монтирање на столб/ѕид |
8. Гаранција и поддршка
For warranty information and technical support, please refer to the official BrosTrend website or contact their customer service directly. Contact details are typically found on the product packaging or the manufacturer's webсајт.
BrosTrend Technology LLC is the manufacturer of this product.


