Вовед
Thank you for choosing the Mastech MS8233D Digital Multimeter. This manual provides essential information for the safe and effective operation, maintenance, and troubleshooting of your device. Please read this manual thoroughly before use and keep it for future reference.
Информации за безбедност
ПРЕДУПРЕДУВАЊЕ: За да избегнете електричен удар или телесна повреда, прочитајте ги и разберете ги сите безбедносни информации пред да го користите овој производ.
- Секогаш осигурајте се дека мултиметарот е во точна функција и опсег пред да правите мерења.
- Не применувајте повеќе од оценетиот томtage, as marked on the meter, between terminals or between any terminal and earth ground. The MS8233D has a Safety Rating of CATII 600V.
- Бидете внимателни кога работите со волtagнад 30V AC RMS, 42V врв или 60V DC. Таквиот волуменtagтие претставуваат опасност од шок.
- Keep your fingers behind the probe barriers during measurements.
- Do not use the meter if it is damaged or if the case is open. Inspect the meter and test leads before use.
- Веднаш заменете ја батеријата кога ќе се појави индикаторот за слаба батерија за да се обезбедат точни мерења.
- Не го користете мерачот во средини со експлозивен гас, пареа или прашина.
Клучни карактеристики
The Mastech MS8233D Digital Multimeter offers a range of functionalities for various electrical measurements:
- Прикажи: 2000 се брои за прецизни отчитувања.
- Опсег: Auto and Manual Ranging capabilities.
- Тест за диоди: Features a Diode Open Voltage од 1.5V.
- Тест за континуитет: Audible buzzer for resistance less than 60Ω.
- Задржување на податоци: Го замрзнува прикажаното отчитување за погодност.
- Автоматско исклучување: Заштедува траење на батеријата.
- Бесконтактно волtage Detection (NCV): For identifying live wires without direct contact.
- Максимално мерење: Records the highest value measured.
- Позадинско осветлување на екранот: За видливост во услови на слаба осветленост.
- Low Battery Display: Означува кога е потребна замена на батеријата.
- Напојување: Operates on 1x 9V 6F22 Battery.
- Сертификати: Усогласен со RoHS.
- Оценка за безбедност: CATII 600V.
Слика 1: Предна страна view of the Mastech MS8233D Digital Multimeter, highlighting the display, rotary function switch, and input terminals.
Производот завршиview и Компоненти
The MS8233D multimeter is designed for ease of use and durability. Familiarize yourself with its main parts:

Слика 2: Готовоview of the MS8233D Digital Multimeter, illustrating its physical dimensions, power supply, and typical applications in domestic, industrial, and electronics settings.
- LCD дисплеј: Ги прикажува отчитувањата на мерењата, единиците и индикаторите за функции.
- Функција Ротационен прекинувач: Used to select the desired measurement function (e.g., ACV, DCV, Resistance, Diode, Continuity, Temperature, NCV).
- Влезни дигалки: Terminals for connecting test leads.
- COM Џек: Заеднички (негативен) влезен терминал за сите мерења.
- VΩmA Џек: Позитивен влезен терминал за voltage, resistance, diode, continuity, and small current measurements.
- 10A Џек: Positive input terminal for high current (up to 10A) measurements.
- Функциски копчиња: For features like Data Hold, Backlight, and Range selection.
Поставување
Инсталација на батерија
The MS8233D requires one 9V 6F22 battery for operation. To install or replace the battery:
- Осигурајте се дека мултиметарот е исклучен и исклучете ги сите тест кабли од влезните терминали.
- Пронајдете го капакот на преградата за батерии на задната страна од мерачот.
- Use a screwdriver to loosen the screw(s) on the battery cover and remove the cover.
- Connect the new 9V battery to the battery clips, observing the correct polarity.
- Ставете ја батеријата во преградата и вратете го капакот, прицврстувајќи го со завртката/шрафовите.
Забелешка: The meter includes a low battery indicator. Replace the battery promptly when this indicator appears to maintain measurement accuracy.
Упатства за работа
Before making any measurement, ensure the test leads are properly connected and the function switch is set to the desired range.
Мерење DC Voltage (DCV)
- Вметнете ја црвената мерна сонда во VΩmA приклучокот, а црната мерна сонда во COM приклучокот.
- Set the rotary switch to the desired DCV range (e.g., 200mV, 2V, 20V, 200V, 600V). If unsure, start with the highest range or use auto-ranging if available.
- Поврзете ги тест сондите преку компонентата или колото што треба да се мери, почитувајќи ја поларноста.
- Прочитајте го томtagе вредност на LCD екранот.
Мерење AC Voltage (ACV)
- Вметнете ја црвената мерна сонда во VΩmA приклучокот, а црната мерна сонда во COM приклучокот.
- Set the rotary switch to the desired ACV range (e.g., 2V, 20V, 200V, 600V).
- Поврзете ги тест сондите преку компонентата или колото што треба да се мери.
- Прочитајте го томtagе вредност на LCD екранот.
Measuring DC/AC Current (DCA/ACA)
CAUTION: Never connect the meter in parallel to a voltage source when measuring current. This can damage the meter and the circuit.
- For currents up to 200mA, insert the red test lead into the VΩmA jack. For currents up to 10A, insert the red test lead into the 10A jack. Insert the black test lead into the COM jack.
- Set the rotary switch to the desired DC or AC current range (e.g., 200µA, 2000µA, 20mA, 200mA, 10A).
- Отворете го колото каде што треба да се мери струјата и поврзете го мерачот сериски со товарот.
- Прочитајте ја моменталната вредност на LCD дисплејот.
Measuring Resistance (Ω)
- Вметнете ја црвената мерна сонда во VΩmA приклучокот, а црната мерна сонда во COM приклучокот.
- Set the rotary switch to the desired Resistance range (e.g., 200Ω, 2kΩ, 20kΩ, 200kΩ, 2MΩ, 20MΩ).
- Пред мерење на отпорот, проверете дали колото или компонентата се исклучени од струја.
- Поврзете ги тест сондите преку компонентата.
- Прочитајте ја вредноста на отпорот на LCD екранот.
Тест за диоди
- Вметнете ја црвената мерна сонда во VΩmA приклучокот, а црната мерна сонда во COM приклучокот.
- Set the rotary switch to the Diode symbol (usually shared with Continuity).
- Поврзете ја црвената сонда со анодата, а црната сонда со катодата на диодата.
- На екранот ќе се прикаже јачината на звукот напредtagпад. Свртете ги сондите; екранот треба да прикаже „OL“ (Отворена јамка) за добра диода.
Тест за континуитет
- Вметнете ја црвената мерна сонда во VΩmA приклучокот, а црната мерна сонда во COM приклучокот.
- Set the rotary switch to the Continuity symbol (usually shared with Diode).
- Поврзете ги тест сондите преку колото или компонентата.
- If the resistance is below approximately 60Ω, the buzzer will sound, indicating continuity. The display will also show the resistance value.
Бесконтактно волtage (NCV) Откривање
- Set the rotary switch to the NCV function.
- Move the top part of the meter (NCV sensor area) close to the conductor suspected of having AC voltage.
- Мерачот ќе емитува звучен сигнал и индикаторот NCV ќе светне ако јачината на AC се зголемиtagе откриена.
Функција за задржување податоци
Притиснете го копчето „ЗАДРЖИ“ за да го замрзнете тековното отчитување на екранот. Притиснете го повторно за да го ослободите задржувањето и да продолжите со мерењата во живо.
Функција за задно осветлување
Press the 'LIGHT' button to turn on the display backlight. Press it again to turn it off. The backlight may automatically turn off after a short period to conserve battery.
Одржување
Чистење
Избришете го куќиштето на мерачот со рекламаamp крпа и благ детергент. Не користете абразивни средства или растворувачи. Пред употреба, проверете дали мерачот е целосно сув.
Замена на батеријата
Refer to the 'Battery Installation' section under 'Setup' for instructions on replacing the 9V battery. Always replace the battery when the low battery indicator is displayed to ensure accurate readings and proper operation.
Замена на осигурувачи
The MS8233D is equipped with internal fuses to protect against overcurrent. If the current measurement function stops working, the fuse may need replacement. Fuse replacement should only be performed by qualified personnel. Use only fuses of the specified type and rating (e.g., F200mA/250V for mA range, F10A/250V for 10A range).
Решавање проблеми
| Проблем | Можна причина | Решение |
|---|---|---|
| Нема екран или екранот е затемнет | Потрошена или ниска батерија | Заменете ја батеријата од 9V. |
| Неточни читања | Incorrect function/range selected; poor test lead connection; low battery | Verify function and range; check test lead connections; replace battery. |
| Мерењето на струјата не работи | Запален осигурувач | Заменете го соодветниот осигурувач (видете го делот за одржување). |
| Прикажан е „OL“ (Преоптоварување) | Measurement exceeds selected range; open circuit (for continuity/resistance) | Select a higher range; check for open circuit. |
| Нема континуиран звучен сигнал | Resistance too high; open circuit | Check for continuity; ensure resistance is below 60Ω. |
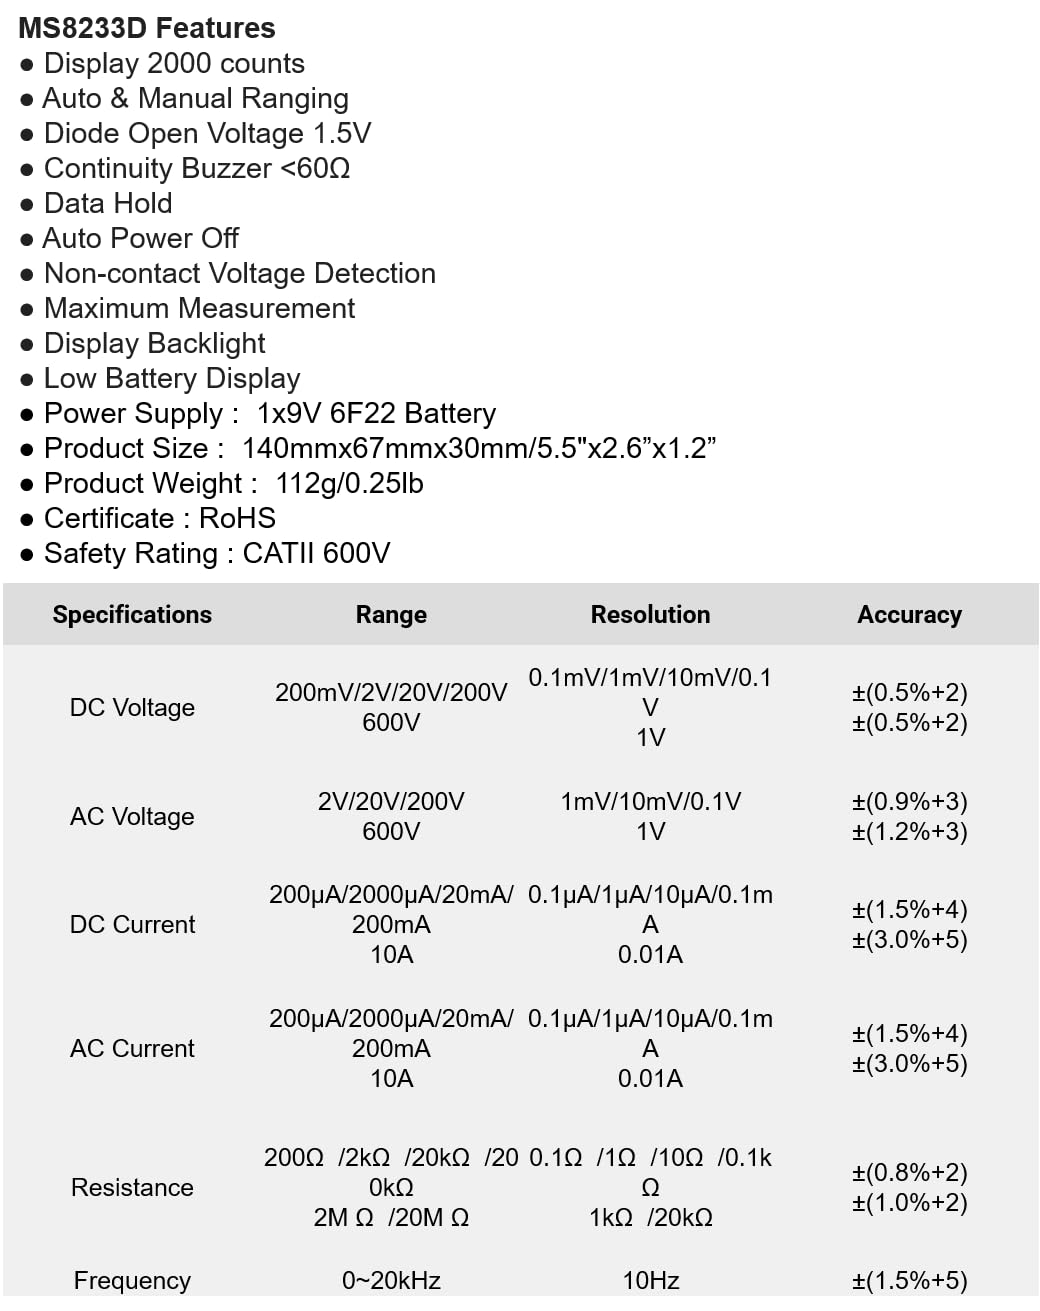
Спецификации
The following table details the measurement ranges, resolutions, and accuracies for the Mastech MS8233D Digital Multimeter:

Figure 3: Comprehensive specifications for the MS8233D, outlining measurement capabilities and precision.
| Карактеристика | Спецификација |
|---|---|
| Приказ | 2000 брои |
| DC Voltage | 200mV / 2V / 20V / 200V / 600V |
| AC Voltage | 2V / 20V / 200V / 600V |
| DC струја | 200µA / 2000µA / 20mA / 200mA / 10A |
| Наизменична струја | 200µA / 2000µA / 20mA / 200mA / 10A |
| Отпор | 200Ω / 2kΩ / 20kΩ / 200kΩ / 2MΩ / 20MΩ |
| Фреквенција | 0-20 kHz |
| Diode Open Voltage | 1.5V |
| Звучник за континуитет | <60Ω |
| Напојување | 1x 9V 6F22 Battery |
| Димензии на производот | 140mm x 67mm x 30mm (5.5" x 2.6" x 1.2") |
| Тежина на производот | 112 g (0.25 lb) |
| Оценка за безбедност | CATII 600V |
| Сертификати | CE, RoHS |
Гаранција и поддршка
For warranty information and technical support, please refer to the documentation provided with your purchase or contact the seller/manufacturer directly. Keep your purchase receipt as proof of purchase for any warranty claims.