1. Вовед
The Mastech MS8250D is a high-performance digital multimeter designed for accurate measurement of AC/DC voltage, AC/DC current, resistance, capacitance, frequency, and temperature. It features a 6600-count display, auto/manual ranging, True RMS, Non-Contact Voltage (NCV) detection, diode and continuity testing, and a USB interface for PC connectivity. This manual provides detailed instructions for safe and effective use of the device.
Клучни карактеристики:
- 6600-count digital display
- Automatic and Manual Ranging
- Вистинско мерење на RMS
- Бесконтактно волtage (NCV) откривање
- Diode and Continuity Tester (buzzer < 50Ω)
- MAX/MIN value recording
- Функција за задржување податоци
- Прикажи позадинско осветлување
- Автоматско исклучување
- Релативен режим на мерење
- Индикација за слаба батерија
- USB Interface for Windows OS
2. Информации за безбедност
ПРЕДУПРЕДУВАЊЕ: To avoid electric shock or personal injury, and to avoid damage to the meter or to the equipment under test, read all safety information carefully before using the meter. This device complies with CE, RoHS, and UL safety standards.
- Секогаш осигурајте се дека тест каблите се во добра состојба и правилно поврзани.
- Не применувајте повеќе од оценетиот томtagд, како што е означено на мерачот, помеѓу приклучоците или помеѓу кој било терминал и заземјување.
- Бидете внимателни кога работите со волtagнад 30V AC RMS, 42V врв или 60V DC. Овие волумениtagтие претставуваат опасност од шок.
- Before measuring current, ensure the circuit is de-energized and the meter is connected in series.
- Секогаш исклучувајте ги тест каблите од колото пред да ги промените функциите или опсезите.
- Не го користете мерачот ако изгледа оштетен или ако куќиштето е отворено.
- Заменете ја батеријата штом ќе се појави индикаторот за слаба батерија за да се обезбедат точни мерења.
- Adhere to the specified measurement categories (CAT III 1000V / CAT IV 600V) for safe operation.
3. Производот завршиview
Familiarize yourself with the components of your Mastech MS8250D Digital Multimeter.

Слика 3.1: Предна страна view of the Mastech MS8250D Digital Multimeter, showing the display, function dial, and input jacks. The display shows "1.987 V", indicating a voltage measurement. The function dial is set to T-RMS. Input jacks are labeled for µA mA, A, VΩHz%, and COM.
Главни компоненти:
- LCD дисплеј: Ги прикажува отчитувањата на мерењата, единиците и индикаторите за функции.
- Функциско бирање: Се користи за избор на саканата функција за мерење (на пр., Voltage, Current, Resistance, Diode, Continuity, Temperature).
- Функциски копчиња:
- ДРOLDАЈ: Го замрзнува тековното отчитување на екранот.
- ГАРАНЦИЈА: Switches between auto and manual ranging.
- REL: Го активира режимот на релативно мерење.
- MAX/MIN: Ги евидентира максималните и минималните вредности.
- ФУНК: Избира подфункции во рамките на позицијата на бројчаникот (на пр., AC/DC, Диода/Континуитет).
- T-RMS: (Indicated on dial) True RMS measurement.
- NCV: Бесконтактно волtagд откривање.
- Копче за позадинско осветлување: Activates display backlight.
- Влезни дигалки:
- COM: Common terminal for all measurements (negative lead).
- VΩHz%: Влез за voltage, resistance, frequency, capacitance, and diode/continuity measurements (positive lead).
- µA mA: Input for microampере и милиampere current measurements (positive lead). Fused for protection.
- A: Влез за ampere current measurements (positive lead). Fused for protection.
Вклучени компоненти:
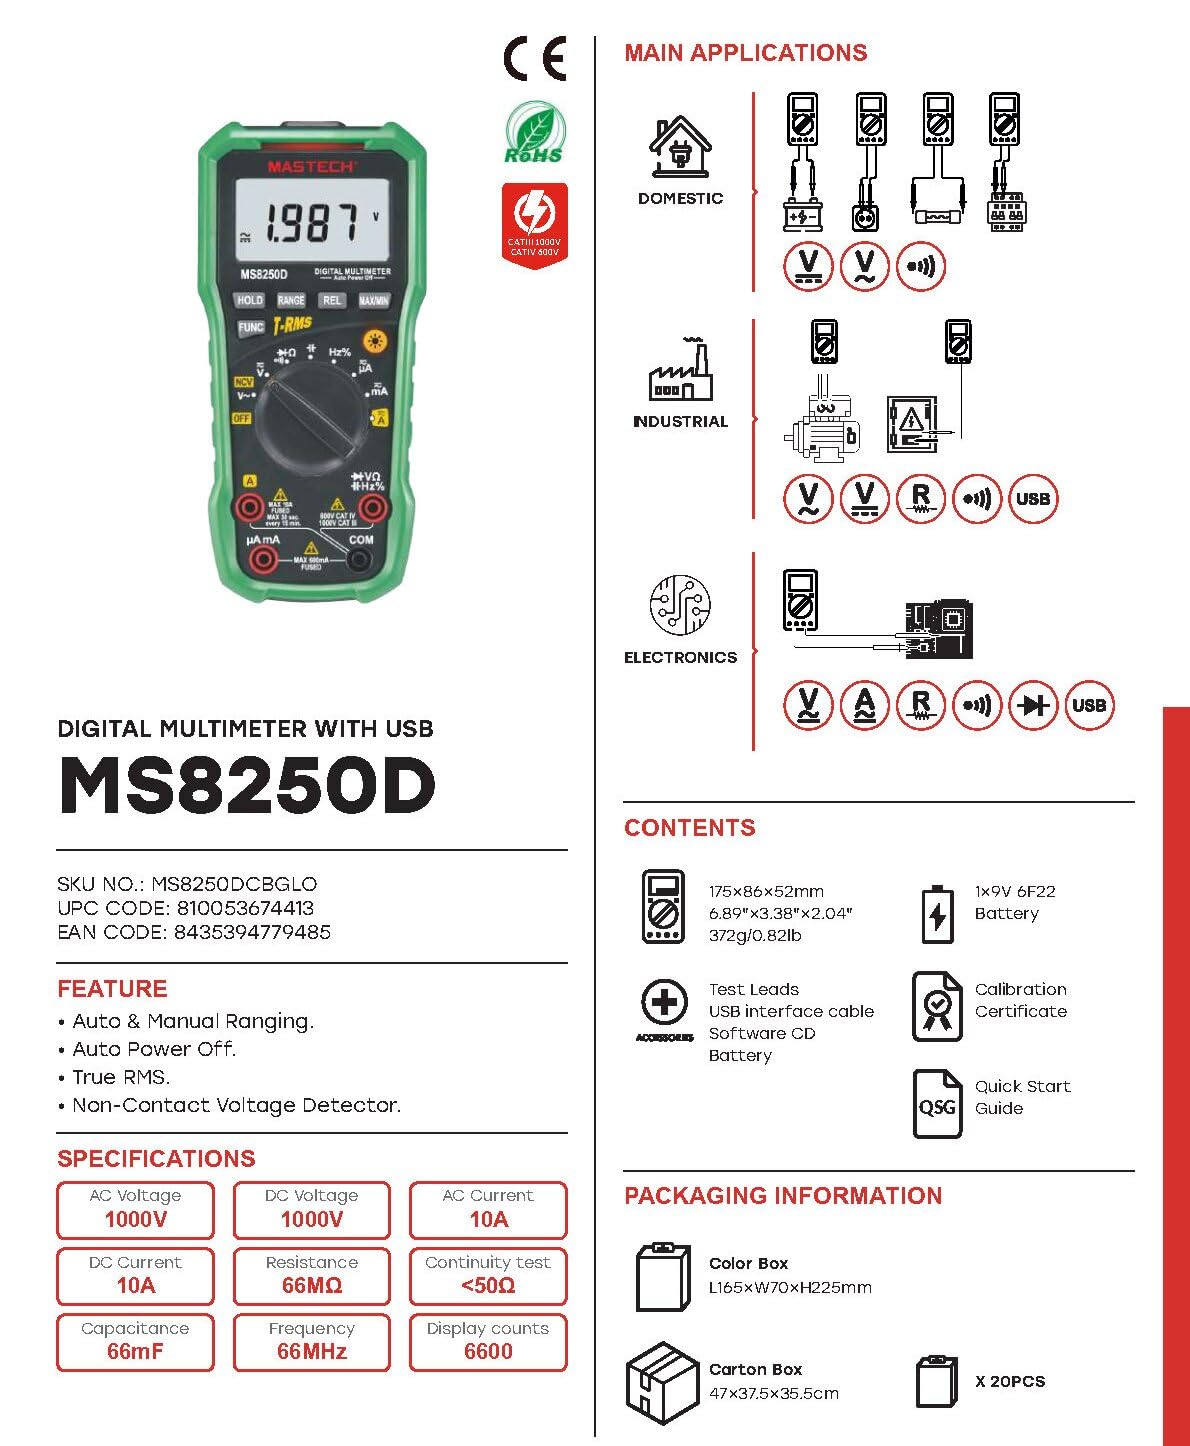
Слика 3.2: Diagram showing the Mastech MS8250D Multimeter and its included accessories. The image also illustrates typical applications in domestic, industrial, and electronics settings.
- Mastech MS8250D Digital Multimeter
- Тест кабли (црвена и црна)
- 1x 9V 6F22 Battery (pre-installed or included separately)
- USB-интерфејс кабел
- Software CD (for Windows OS)
- Сертификат за калибрација
- Водич за брз почеток
4. Поставување
4.1 Инсталација на батерија
The MS8250D requires one 9V 6F22 battery for operation. Two LR44 batteries are also mentioned in specifications, likely for a different internal component or an error in data. For the main power, use the 9V battery.
- Осигурајте се дека мултиметарот е исклучен.
- Пронајдете го капакот на преградата за батерии на задната страна од мерачот.
- Користете шрафцигер за да ги олабавите завртките што го прицврстуваат капакот.
- Отстранете го капакот.
- Connect the 9V battery to the battery clips, observing correct polarity (+ and -).
- Ставете ја батеријата во преградата.
- Вратете го капакот на преградата за батерии и прицврстете го со завртката/шрафовите.
Забелешка: The meter also uses 2 LR44 batteries, which are typically included and pre-installed for specific functions like the backlight or non-contact voltage detection. Refer to the quick-start guide for specific details on these smaller batteries if replacement is needed.
4.2 Поврзување на тест кабли
Always connect the black test lead to the COM jack. Connect the red test lead to the appropriate input jack based on the measurement type:
- За Voltage, Resistance, Capacitance, Frequency, Diode, and Continuity measurements: Connect the red lead to the VΩHz% џек.
- For Current measurements (µA or mA): Connect the red lead to the µA mA џек.
- For High Current measurements (A): Connect the red lead to the A џек.
Ensure the test leads are fully inserted into the jacks.
5. Упатства за работа
5.1 Вклучување/исклучување
To turn the meter ON, rotate the function dial from the "OFF" position to any desired measurement function. To turn the meter OFF, rotate the function dial back to the "OFF" position.
The meter features an Автоматско исклучување function to conserve battery life. It will automatically power off after a period of inactivity. To disable or re-enable this feature, refer to the quick-start guide or the full user manual provided on the software CD.
5.2 Автоматско и рачно мерење на опсегот
The MS8250D defaults to Автоматско рангирање, which automatically selects the best measurement range. Press the РАНГ копче за префрлување на Рачно рангирање. In manual ranging, each press of the РАНГ button cycles through available ranges. To return to auto ranging, press and hold the РАНГ копче.
5.3 Мерење AC/DC Voltagд (V)
- Поставете го тркалцето за функција на V~ (AC Voltagд) или V- (DC Voltagд) позиција.
- Поврзете го црниот тест кабел со COM Џек и црвената тест-сонда до VΩHz% џек.
- Поврзете ги тест сондите преку колото или компонентата што треба да се мери.
- Прочитајте го томtage value on the display. The meter will automatically detect AC or DC if the dial is set to the combined V position, or you can use the ЗАБАВА button to toggle between AC and DC if available on your model.
5.4 Мерење на AC/DC струја (A, mA, µA)
ПРЕДУПРЕДУВАЊЕ: Никогаш не го поврзувајте мерачот паралелно со зафатнинаtagизвор при мерење на струја. Ова може да го прегори осигурувачот или да го оштети мерачот.
- Исклучете го напојувањето на колото.
- Поставете го тркалцето за функција на A~ (AC струја), A- (Дициклична струја), mA~, mA-, µA~, или µA- позиција.
- Поврзете го црниот тест кабел со COM џек.
- Поврзете го црвениот тест кабел со A jack for high current, or µA mA jack for low current.
- Open the circuit where the current is to be measured and connect the meter in series with the load.
- Примени напојување на колото.
- Read the current value on the display. Use the ЗАБАВА копче за префрлување помеѓу AC и DC доколку е потребно.
5.5 Мерење на отпор (Ω)
- Поставете го тркалцето за функција на Ω позиција.
- Поврзете го црниот тест кабел со COM Џек и црвената тест-сонда до VΩHz% џек.
- Осигурајте се дека колото или компонентата што се тестира е исклучена од напон.
- Поврзете ги тест сондите преку компонентата.
- Прочитајте ја вредноста на отпорот на екранот.
5.6 Тест на диода и тест на континуитет
- Поставете го тркалцето за функција на Диода/Континуитет position (often shared with resistance or capacitance).
- Поврзете го црниот тест кабел со COM Џек и црвената тест-сонда до VΩHz% џек.
- Користете го ЗАБАВА button to select between Diode Test and Continuity Test.
- За тест на диода: Поврзете ја црвената сонда на анодата, а црната сонда на катодата на диодата. На екранот ќе се прикаже напонот напред.tage drop (typically 0.5V to 0.8V for silicon diodes). Reversing the probes should show "OL" (Open Loop).
- За тест за континуитет: Connect the probes across the circuit or component. If resistance is less than approximately 50Ω, the buzzer will sound, indicating continuity.
5.7 Мерење на капацитет (F)
- Поставете го тркалцето за функција на Капацитет position (often shared with resistance or diode).
- Поврзете го црниот тест кабел со COM Џек и црвената тест-сонда до VΩHz% џек.
- Ensure the capacitor is fully discharged before testing to avoid damage to the meter.
- Поврзете ги тест сондите преку терминалите на кондензаторот.
- Прочитајте ја вредноста на капацитетот на екранот.
5.8 Мерење на фреквенцијата (Hz) и работниот циклус (%)
- Поставете го тркалцето за функција на Hz% position (often shared with voltagд)
- Поврзете го црниот тест кабел со COM Џек и црвената тест-сонда до VΩHz% џек.
- Поврзете ги тест сондите преку изворот на сигнал.
- The display will show the frequency. Press the ЗАБАВА button to toggle to Duty Cycle measurement if available.
5.9 Неконтактни томtage (NCV) Откривање
- Поставете го тркалцето за функција на NCV позиција.
- Hold the meter with the NCV sensor (usually at the top of the meter) near a live AC voltagе извор.
- Мерачот ќе покаже присуство на наизменична струја.tage through an audible beep and/or visual indicator (e.g., LED).
5.10 USB Interface (Windows OS)
The MS8250D includes a USB interface for connecting to a computer running Windows OS. This allows for data logging and real-time monitoring of measurements. Install the provided software from the CD and follow the on-screen instructions for driver installation and software usage.
6. Одржување
6.1 Чистење
Избришете го куќиштето на мерачот со рекламаamp крпа и благ детергент. Не користете абразивни средства или растворувачи. Пред употреба, проверете дали мерачот е целосно сув.
6.2 Замена на батеријата
When the low battery indicator appears on the display, replace the 9V battery immediately to ensure accurate readings. Follow the steps in Section 4.1 Battery Installation.
6.3 Замена на осигурувачите
If the meter fails to measure current, the fuse may be blown. Fuses are located inside the meter. To replace a fuse:
- Ensure the meter is turned OFF and all test leads are disconnected.
- Open the battery compartment cover (and potentially the main case, depending on design).
- Внимателно отстранете го стариот осигурувач.
- Replace with a fuse of the exact same type and rating (e.g., F600mA/250V for mA/µA range, F10A/250V for A range). Refer to the meter's internal markings or the full manual for specific fuse ratings.
- Повторно составете го мерачот, осигурувајќи се дека сите завртки се затегнати.
ПРЕДУПРЕДУВАЊЕ: Never use a fuse with a different rating or bypass the fuse. This can damage the meter and pose a serious safety hazard.
7 Смена на проблеми
| Проблем | Можна причина | Решение |
|---|---|---|
| Мерачот не се вклучува. | Почина батерија. | Заменете ја батеријата од 9V. |
| Се прикажува „OL“ (Преоптоварување). | Мерењето го надминува избраниот опсег или максималниот капацитет на мерачот. | Switch to a higher range (if in manual ranging) or ensure the measurement is within the meter's limits. |
| No current reading. | Blown fuse; incorrect lead connection; open circuit. | Check and replace fuse if necessary. Ensure leads are connected correctly (in series). Verify circuit continuity. |
| Неточни читања. | Low battery; poor lead contact; external interference. | Replace battery. Ensure leads are firmly connected. Move away from strong electromagnetic fields. |
| Display shows "USB" but no PC connection. | Drivers not installed; incorrect software settings. | Install drivers from the provided CD. Refer to software manual for connection instructions. |
8. Спецификации
The following table details the technical specifications of the Mastech MS8250D Digital Multimeter.

Слика 8.1: Detailed specifications table for the Mastech MS8250D, outlining ranges, resolutions, and accuracies for various measurement functions.
| Функција | Опсег | Резолуција | Точност |
|---|---|---|---|
| DC Voltage | |||
| 660mV | 0.1mV | ±(0.8%+3) | |
| 6.6V/66V/660V/1000V | 1mV/10mV/0.1V/1V | ±(0.5%+5) | |
| AC Voltage (Вистински RMS) | |||
| 660mV | 0.1mV | ±(1.5%+5) | |
| 6.6V/66V | 1mV/10mV | ±(1.2%+5) | |
| 660V/1000V | 0.1V/1V | ±(1.0%+3) | |
| DC струја | |||
| 660µA/6600µA/66mA/660mA | 0.1µA/1µA/10µA/0.1mA | ±(1.0%+5) | |
| 10 А | 10 mA | ±(2.0%+5) | |
| AC струја (вистински RMS) | |||
| 660µA/6600µA/66mA/660mA | 0.1µA/1µA/0.01mA/0.1mA | ±(1.5%+5) | |
| 10 А | 10 mA | ±(3.0%+5) | |
| Отпор | |||
| 660Ω / 6.6kΩ / 66kΩ / 660kΩ / 6.6MΩ | 0.1Ω / 1Ω / 10Ω / 100Ω / 1kΩ | ±(0.8%+5) | |
| 66MΩ | 10kΩ | ±(1.5%+5) | |
| Капацитет | |||
| 6.6nF/66nF/660nF/6.6µF/66µF | 1pF/10pF/0.1nF/1nF/10nF | ±(4.0%+5) | |
| 600 μF | 1 μF | ±(3.0%+5) | |
| 6.6mF/66mF | 1µF/10µF | ±(4.0%+5) | |
| Фреквенција | |||
| 66Hz/660Hz/6.6kHz/66kHz | 0.01Hz / 0.1Hz / 1Hz / 10Hz | ±(1.5%+5) | |
| 660 kHz/6.6MHz/66MHz | 0.1 kHz / 1 kHz / 10 kHz | ±(1.5%+5) | |
| Циклус на должност | |||
| 0.1% ~ 99.9% | 0.1% | ±(2.0%+5) | |
Општи спецификации:
- Прикажи: 6600 брои
- Извор на енергија: 1x 9V 6F22 Battery (main power), 2x LR44 batteries (auxiliary, e.g., backlight)
- Автоматско исклучување: Да
- Вистински RMS: Да
- Бесконтактно волtage (NCV) Detector: Да
- Diode Open Voltage: 3.2V
- Звучник за континуитет: < 50 Ω
- MAX/MIN: Да
- Задржување на податоци: Да
- Low Battery Display: Да
- Позадинско осветлување на екранот: Да
- USB интерфејс: Yes (Windows OS)
- Оценка за безбедност: CAT III 1000V / CAT IV 600V
- Точност на мерење: 0.4% (general, specific accuracies per function in table)
- Оперативен волtage (мин.): 3.2 волти
- Оценка на горната температура: 50 степени Целзиусови
- Димензии (Д x Ш x В): 20 x 15 x 25 cm
- Тежина на ставката: 1 кг
- Материјал: Акрилонитрил бутадиен стирен (ABS)
- Боја: Сино
- Производител: МАСТЕХ
- Земја на потекло: Тајван
- Сертификати: CE, RoHS, UL
9. Гаранција и поддршка
Mastech products are designed for reliability and durability. For specific warranty information, please refer to the warranty card included with your product or contact Mastech customer support directly. Typically, Mastech offers a limited warranty against defects in materials and workmanship.
For technical support, troubleshooting assistance, or warranty claims, please contact your authorized Mastech dealer or visit the official Mastech webсајт за информации за контакт.
Времетраење на достапноста на резервни делови во ЕУ: 1 Година