1. Вовед
This manual provides essential instructions for the safe and efficient use of your DALI IO-8 Wireless/Wired Hi-Fi Headphones. Please read this manual thoroughly before using the product and retain it for future reference. The DALI IO-8 headphones are designed to deliver a high-fidelity audio experience with advanced features such as Active Noise Cancellation (ANC), Bluetooth AptX Adaptive connectivity, and a long-lasting battery.
2. Производот завршиview
Familiarize yourself with the components and controls of your DALI IO-8 headphones.

Слика 2.1: Предна страна view of the DALI IO-8 headphones, showcasing the caramel and white color scheme and overall design.

Слика 2.2: Горе-надолу view of the DALI IO-8 headphones, highlighting the earcups and visible control buttons on the side.
Слика 2.3: Внатрешност view of a DALI IO-8 earcup, showing the soft padding and driver grille, designed for comfort and sound delivery.

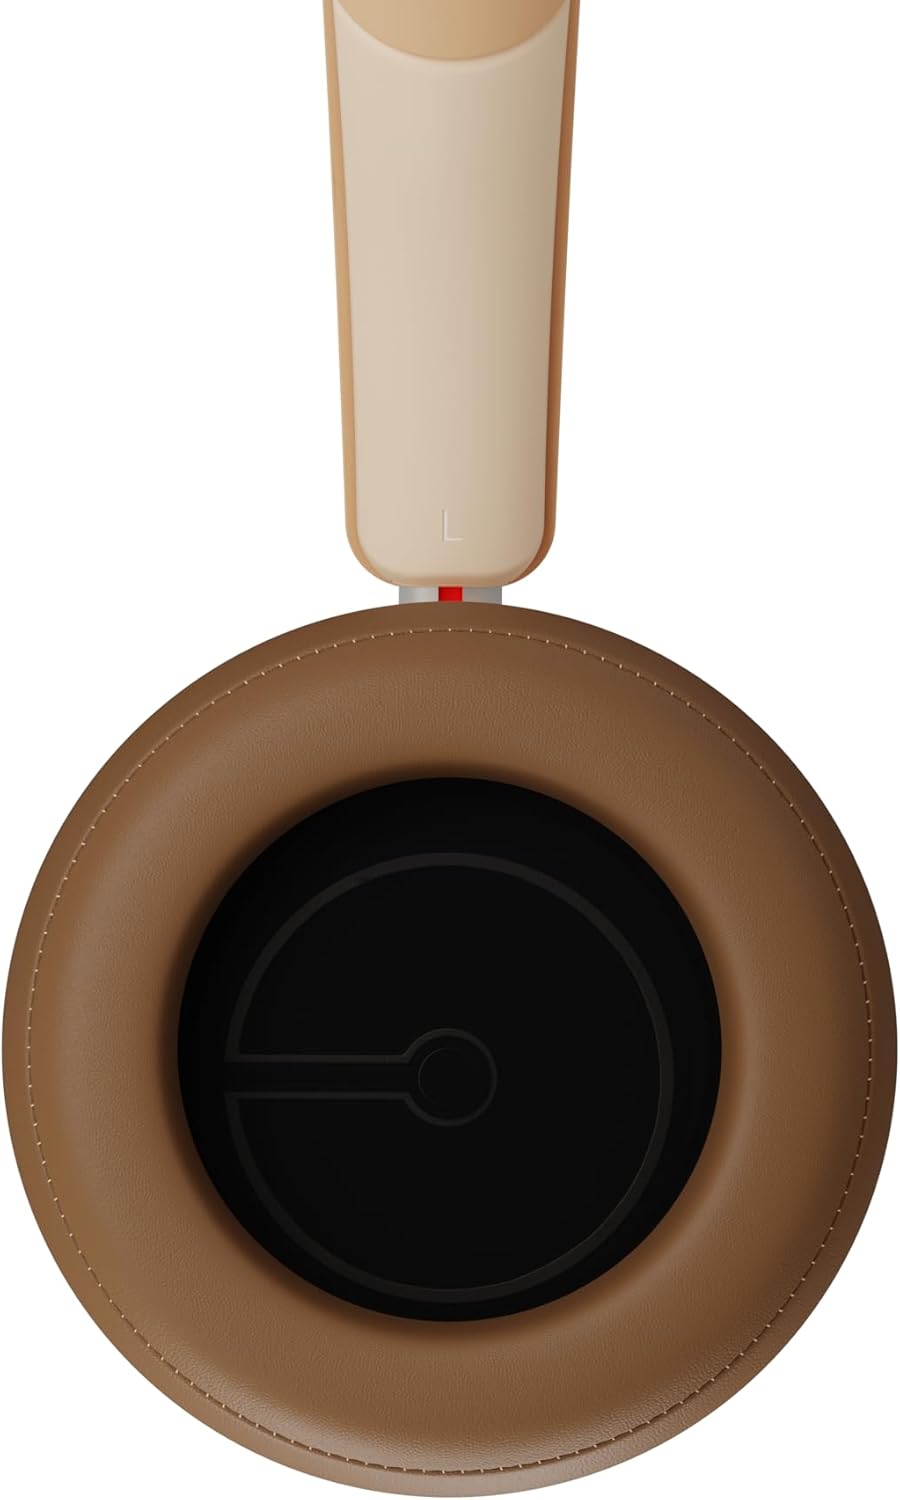
Слика 2.4: Одблиску view of the DALI IO-8 earcup, showing the USB-C charging port and other control buttons.
2.1 Содржина на пакетот
- Слушалки DALI IO-8
- USB-C кабел за полнење
- Аудио кабел од 3.5 мм
- Travel Case (if included)
- Упатство за употреба (овој документ)
2.2 Компоненти на слушалките

Слика 2.5: Експлодираше view illustrating the internal components of the DALI IO-8 headphones, including the 50mm driver, circuitry, and earcup structure.
- Headband (Adjustable)
- Earcups (Over-ear design with genuine leather)
- 50mm Driver (SMC Driver Technology)
- Control Buttons (Power, Volume, ANC, Multifunction)
- USB-C Port (Charging and Wired Audio)
- 3.5mm Audio Jack (Wired Audio)
- Microphones (for ANC and calls)
3. Поставување
3.1 Полнење на слушалките
Before initial use, fully charge your DALI IO-8 headphones.
- Connect the supplied USB-C cable to the USB-C port on the headphone earcup.
- Поврзете го другиот крај од USB-C кабелот со компатибилен USB извор на напојување (на пр., USB порт на компјутер, USB адаптер за ѕид).
- The LED indicator will show charging status. A full charge provides up to 35 hours of playback with ANC enabled.
- Откако ќе се наполни целосно, исклучете го кабелот.
3.2 Вклучување/исклучување
- За вклучување: Притиснете и задржете го копчето за вклучување приближно 2 секунди додека не светне LED индикаторот.
- За исклучување: Притиснете го и задржете го копчето за вклучување приближно 3 секунди додека LED индикаторот не се исклучи.
3.3 Спарување преку Bluetooth
The DALI IO-8 supports Bluetooth AptX Adaptive for high-quality wireless audio.
- Проверете дали слушалките се исклучени.
- Press and hold the Power button for approximately 5 seconds until the LED indicator flashes blue rapidly. This indicates pairing mode.
- На вашиот аудио уред (паметен телефон, таблет, компјутер), овозможете Bluetooth и пребарајте достапни уреди.
- Select "DALI IO-8" from the list of found devices.
- Once paired, the LED indicator will glow solid blue or flash slowly.
- Слушалките автоматски ќе се обидат повторно да се поврзат со последниот поврзан уред кога ќе се вклучат.
3.4 iredична врска
The DALI IO-8 can be used with a wired connection via the 3.5mm audio jack or USB-C.
- Аудио кабел од 3.5 мм: Connect one end of the supplied 3.5mm audio cable to the headphone's 3.5mm jack and the other end to your audio source's headphone output. The headphones can be used passively in this mode, or actively with ANC and amplification if powered on.
- USB-C Audio: Connect the supplied USB-C cable to the headphone's USB-C port and the other end to a compatible USB audio output on your computer or device. This mode allows for digital audio transmission and charging simultaneously.
4. Ракување со слушалките
4.1 Активно поништување на шум (ANC)
The DALI IO-8 features three distinct ANC modes and wind noise suppression.
- Press the dedicated ANC button to cycle through the available modes:
- ANC вклучено: Максимално поништување на бучавата.
- Режим на транспарентност: Allows ambient sounds to pass through for situational awareness.
- Исклучено ANC: Active noise cancellation is disabled.
- Wind noise suppression is automatically engaged in ANC modes to reduce interference from wind.
4.2 режими на звук
Customize your listening experience with two sound profiles.
- Press the Sound Mode button (if available, or refer to specific button on device) to switch between:
- Hi-Fi Mode: Delivers a balanced and neutral sound signature.
- Режим на бас: Enhances low-frequency response for a more impactful bass.
4.3 Playback and Volume Control
Use the control buttons on the earcup for media playback and volume adjustments.
- Јачина на звук нагоре: Притиснете го копчето '+'.
- Намалување на јачината на звукот: Притиснете го копчето '-'.
- Пушти/Пауза: Притиснете го копчето за повеќе функции еднаш.
- Следна песна: Double-press the Multifunction button.
- Претходна песна: Triple-press the Multifunction button.
4.4 Управување со повици
Manage phone calls when connected via Bluetooth.
- Одговори/заврши повик: Притиснете го копчето за повеќе функции еднаш.
- Одбијте го повикот: Притиснете и задржете го копчето Multifunction 2 секунди.
- Активирајте го гласовниот асистент: Press and hold the Multifunction button for 2 seconds (when not on a call).
5. Одржување
5.1 Чистење
- Избришете ги слушалките со мека, сува крпа што не остава влакненца.
- Не користете абразивни средства за чистење, растворувачи или хемиски спрејови.
- За слушалките, нежно избришете со малку дamp крпа доколку е потребно, а потоа веднаш исушете.
- Осигурајте се дека влагата не влегува во отворите или отворите.
5.2 Складирање
- When not in use, store the headphones in their protective travel case to prevent damage.
- Избегнувајте изложување на слушалките на екстремни температури, влажност или директна сончева светлина.
6 Смена на проблеми
| Проблем | Можна причина | Решение |
|---|---|---|
| Нема моќ | Батеријата е испразнета. | Полнете ги слушалките со помош на испорачаниот USB-C кабел. |
| Не може да се спари преку Bluetooth | Слушалките не се во режим на спарување; Bluetooth-от на уредот е исклучен; премногу далеку од уредот. | Ensure headphones are in pairing mode (rapid blue LED flash). Turn on Bluetooth on your device. Move headphones closer to the device. Forget "DALI IO-8" on your device and re-pair. |
| Нема звук | Volume too low; incorrect input source; headphones not connected. | Increase volume on headphones and source device. Check Bluetooth connection or wired cable. Ensure the correct audio output is selected on your device. |
| ANC не работи ефикасно | ANC mode off; poor earcup seal. | Ensure ANC is enabled. Adjust headphones for a proper seal around your ears. |
7. Спецификации
| Карактеристика | Детал |
|---|---|
| Име на моделот | DALI IO-8 |
| Бренд | ДАЛИ |
| Технологија за поврзување | Жичен, безжичен (Bluetooth) |
| Технологија на безжична комуникација | Bluetooth (AptX Adaptive) |
| Поништување на бучава | Active Noise Suppression (ANC) with Wind Noise Suppression |
| Поставување на увото | Над уво |
| Големина на возачот | 50mm (SMC Driver Technology) |
| Импеданса | 25 оми |
| Џек за слушалки | 3.5 мм |
| Траење на батеријата | До 35 часа (со ANC) |
| Материјали | Genuine Leather (earcups) |
8. Информации за безбедност
Please observe the following safety guidelines to ensure safe operation and prevent damage to your headphones or injury to yourself.
- Do not expose the headphones to water, rain, or moisture.
- Избегнувајте екстремни температури.
- Do not disassemble, repair, or modify the headphones. This voids the warranty.
- Слушајте на умерени нивоа на јачина на звук за да спречите оштетување на слухот.
- Да се чува подалеку од дофат на деца.
- Отстранете го производот одговорно во согласност со локалните прописи.
9. Гаранција и поддршка
DALI products are manufactured to high standards and are covered by a limited warranty. For specific warranty terms and conditions, please refer to the warranty card included with your product or visit the official DALI website. For technical support, troubleshooting assistance, or service inquiries, please contact your authorized DALI dealer or DALI customer support.

Слика 9.1: A person wearing the DALI IO-8 headphones, demonstrating their comfortable fit and use in a real-world environment.


