1. Вовед
Thank you for choosing the FLYLINKTECH 5000A Jump Starter. This portable device is designed to provide instant power to jump-start 12V vehicles, charge electronic devices, and offer emergency lighting. Please read this manual thoroughly before use to ensure safe and optimal performance.
2. Важни безбедносни информации
- Always ensure the jump starter is fully charged before use.
- Не обидувајте се да стартувате замрзната батерија со електричен чек.
- Поврзете го clamps correctly: red to positive (+), black to negative (-). Reverse polarity can cause damage.
- Не поврзувајте го црвено-црниот clampе заедно.
- Да се чува подалеку од дофат на деца.
- Користете во добро проветрено место.
- Избегнувајте изложување на уредот на екстремни температури или директна сончева светлина подолг период.
- If the device becomes excessively hot during use, disconnect it immediately.
- Погледнете го упатството за сопственикот на вашето возило за специфични процедури за стартување со кабли.
3. Содржина на пакетот
Проверете дали сите артикли се присутни во вашиот пакет:
- FLYLINKTECH 5000A Jump Starter (Model BD10)
- Паметни кабли за скокач
- USB-C кабел за полнење
- Случај за складирање ЕВА
- Упатство за употреба

Image: Contents of the FLYLINKTECH 5000A Jump Starter package, including the jump starter unit, smart jumper cables, USB-C charging cable, and EVA storage case.
4. Производот завршиview
Familiarize yourself with the components and ports of your jump starter:
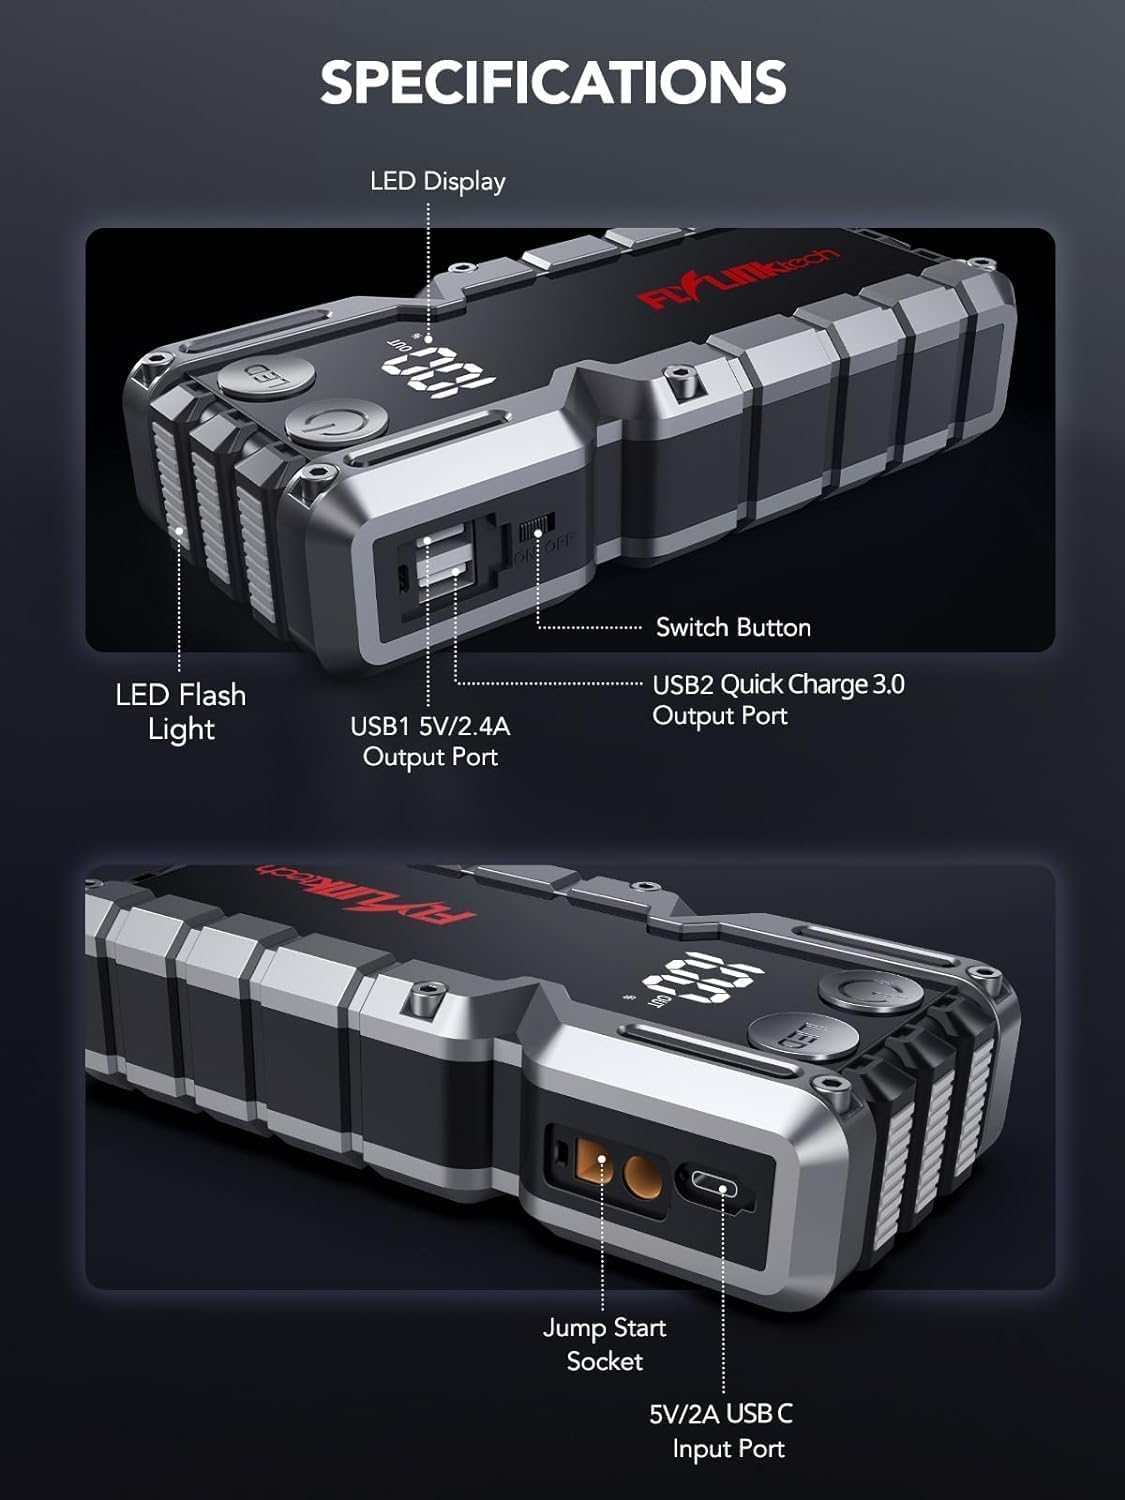
Слика: Детална view of the jump starter showing the LED display, LED flashlight, power button, switch button, USB1 5V/2.4A output port, USB2 Quick Charge 3.0 output port, Jump Start Socket, and 5V/2A USB-C input port.
- Лед екран: Ја прикажува перценијата на батеријатаtage.
- LED фенерче: Provides illumination with multiple modes.
- Копче за вклучување: Activates the device and controls flashlight modes.
- Копче за префрлување: Главно управување со напојувањето.
- USB1 Output (5V/2.4A): Стандарден USB порт за полнење.
- USB2 Output (QC3.0): Quick Charge 3.0 port for faster charging.
- Приклучок за стартување со ролер: Connects to the smart jumper cables.
- USB-C Input (5V/2A): Used to recharge the jump starter.
5. Полнење на џамп-стартерот
Before first use, fully charge the jump starter. It is recommended to recharge the unit every 3-6 months to maintain battery health.
- Поврзете го испорачаниот USB-C кабел за полнење со влезниот USB-C порт на стартерот за џампирање.
- Connect the other end of the USB-C cable to a 5V/2A USB wall adapter (not included) or a car charger.
- LED дисплејот ќе го прикаже напредокот на полнењето. Уредот е целосно наполнет кога на дисплејот ќе се прикаже 100%.

Image: The jump starter connected via USB to charge a smartphone and a tablet, demonstrating its power bank functionality.
6. Палење на возилото со џебови
Follow these steps carefully to safely jump-start your 12V vehicle:
- Подгответе го стартерот за скокање: Ensure the jump starter is at least 50% charged. Turn off your vehicle's ignition and all accessories (headlights, radio, etc.).
- Connect Smart Jumper Cables: Insert the blue plug of the smart jumper cables into the Jump Start Socket on the jump starter. Ensure a firm connection. The indicator light on the smart clamp will flash red and green.
- Поврзување со батеријата на возилото:
- Прикачете го црвена (+) клamp до позитивниот терминал на акумулаторот на вашето возило.
- Прикачете го црно (-) клоamp до негативниот терминал на акумулаторот на вашето возило.
Once connected correctly, the indicator light on the smart clamp ќе стане постојано зелена.
- Стартувајте го возилото: Go into your vehicle and start the engine. If the vehicle does not start immediately, wait 30 seconds and try again. If it still doesn't start, press the "BOOST" button on the smart clamp for 3 seconds until the green light turns solid, then try starting the car again within 30 seconds.
- Отстранување на кабли: Once the engine starts, immediately remove the smart jumper cables from the vehicle battery, then disconnect them from the jump starter.

Image: Visual guide for jump-starting: 1. Insert jump clamp into booster. 2. Connect clamps to car battery. 3. Start your car. 4. Remove clamps.

Image: The smart clamps connected to the jump starter, illustrating the 10-layer safety protections including short circuit, reverse charge, over charge, reverse polarity, over discharge, over current, reverse connection, and high temperature protection.
7. Користење како Power Bank
The jump starter can also be used to charge your electronic devices.
- Connect your device's USB charging cable to either the USB1 (5V/2.4A) or USB2 (QC3.0) output port on the jump starter.
- Стартерот автоматски ќе започне со полнење на вашиот уред.
- The LED display will show the remaining battery capacity of the jump starter.

Image: The jump starter functioning as a portable power bank, with two USB output ports (5V/2.4A and Quick Charge 3.0) actively charging a smartphone and a tablet.
8. Користење на LED фенерче
The built-in 600-lumen LED flashlight has three modes for various situations:
- За вклучување/исклучување: Press and hold the LED button for 3 seconds.
- До режими на циклус: Once the light is on, short press the LED button to switch between:
- Постојано вклучено: За општо осветлување.
- SOS режим: Flashes the international SOS signal for emergencies.
- Режим на строб: Rapid flashing for warning or signaling.

Image: The jump starter with its LED flashlight active, illustrating the three available modes: standard flashlight, SOS signal, and strobe light for emergencies.
9. Одржување
- Чистење: Wipe the unit with a soft, dry cloth. Do not use harsh chemicals or abrasive materials.
- Складирање: Store the jump starter in its EVA case in a cool, dry place away from direct sunlight. Ensure it is charged to at least 50% before storing for extended periods. Recharge every 3-6 months.
- Нега на батеријата: The internal lithium-ion battery is designed for long life. Avoid fully discharging the unit frequently.

Water-resistant design.

Rugged ABS shell for drop resistance.

Operates in extreme temperatures (-4°F to 140°F).
10 Смена на проблеми
| Проблем | Можна причина | Решение |
|---|---|---|
| Vehicle won't start after connecting. | Jump starter battery too low; incorrect clamp поврзување; батеријата на возилото е целосно празна. | Проверете дали стартерот е целосно наполнет.amp connections (red to +, black to -). Press the "BOOST" button on the smart clamp for 3 seconds and try again. |
| Smart clamp indicator light is red/flashing. | Reverse polarity; short circuit; over-temperature. | Исклучете го clamps and re-connect correctly. Check for any short circuits. Allow unit to cool down if overheated. |
| Стартерот за џамп не се полни. | Faulty charging cable or adapter; loose connection. | Ensure USB-C cable and adapter are working and connected securely. Try a different cable or adapter. |
| LED фенерчето не работи. | Not activated correctly; low battery. | Press and hold the LED button for 3 seconds to activate. Ensure the jump starter has sufficient charge. |
11. Спецификации
| Карактеристика | Детал |
|---|---|
| Врвна струја | 5000 А |
| Капацитет на батеријата | 18000 mAh (66.6 Wh) |
| Start Voltage | 12V |
| Компатибилност на моторот | До 9.0 литри бензин / 8.0 литри дизел |
| USB излез 1 | 5V/2.4A |
| USB излез 2 | QC3.0 |
| Влез USB-C | 5V/2A |
| LED фенерче | 600-Lumen (Constant, SOS, Strobe) |
| Работна температура | -4°F до 140°F (-20°C до 60°C) |
| Димензии | 4.2 x 9 x 19 cm |
| Тежина | 540 g (1.19 lbs) |
| Безбедносни заштити | 10-Layer (Short Circuit, Reverse Polarity, Over-Current, etc.) |
12. Гаранција и поддршка
The FLYLINKTECH 5000A Jump Starter comes with an industry-leading 3 година гаранција од датумот на купување. Оваа гаранција ги покрива производствените дефекти и обезбедува сигурни перформанси.
For technical support, warranty claims, or any questions regarding your product, please contact FLYLINKTECH customer service through the retailer's platform or visit our official webсајт.
Ве молиме зачувајте го доказот за купување за потврда на гаранцијата.


