1. Вовед
This manual provides detailed instructions for the installation, operation, and maintenance of your Xigmatek Aqua V AIR Arctic Mid-Tower PC Case. Please read this manual thoroughly before beginning any installation to ensure proper setup and safe operation. Retain this manual for future reference.
2. Информации за безбедност
Внимавајте на следниве безбедносни мерки за време на инсталацијата и работата:
- Секогаш исклучувајте го напојувањето од ѕидниот штекер пред да инсталирате или отстраните било кои компоненти.
- Носете антистатички ремен за зглоб за да спречите оштетување на чувствителните компоненти од електростатско празнење (ESD).
- Handle components carefully. Avoid touching pins or circuit boards directly.
- Обезбедете соодветна вентилација околу куќиштето на компјутерот за да спречите прегревање.
- Чувајте ги малите делови и алатки подалеку од деца.
- Do not attempt to modify the case or its components, as this may void your warranty and pose safety risks.
3. Содржина на пакетот
Проверете дали сите артикли се присутни во пакувањето:
- Xigmatek Aqua V AIR Arctic Mid-Tower PC Case
- Accessory kit (screws, standoffs, cable ties)
- Упатство за употреба (овој документ)
If any items are missing or damaged, contact your retailer or Xigmatek support.
4. Производот завршиview
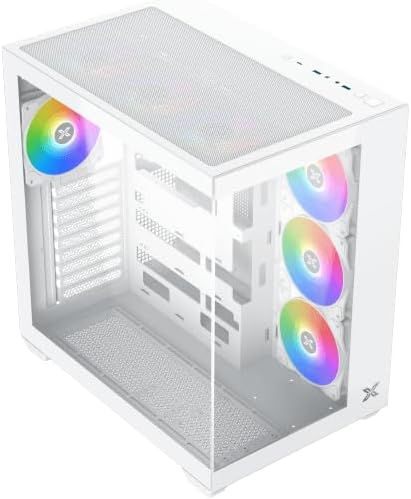
The Xigmatek Aqua V AIR Arctic is a mid-tower PC case designed for high-performance gaming configurations. It features tempered glass panels for component visibility and optimized airflow with pre-installed ARGB fans.

Слика 4.1: Напред-лево view of the Xigmatek Aqua V AIR Arctic PC case, showcasing the tempered glass front and side panels, and the pre-installed ARGB fans.

Слика 4.2: Заден дел view of the PC case, showing the I/O shield cutout, expansion slots, and rear fan mount.
Слика 4.3: Под агол од горе надолу view, highlighting the top mesh panel for additional cooling and the internal layout.
5. Поставување и инсталација
Follow these steps to install your PC components into the Xigmatek Aqua V AIR Arctic case.
5.1. Подготовка на случајот
- Поставете го куќиштето на рамна, стабилна површина.
- Remove the tempered glass side panel by unscrewing the thumb screws at the rear and carefully sliding it off. Place it on a soft, non-abrasive surface to prevent scratches.
- Remove the opposite steel side panel by unscrewing the thumb screws and sliding it off.
5.2. Инсталација на матична плоча
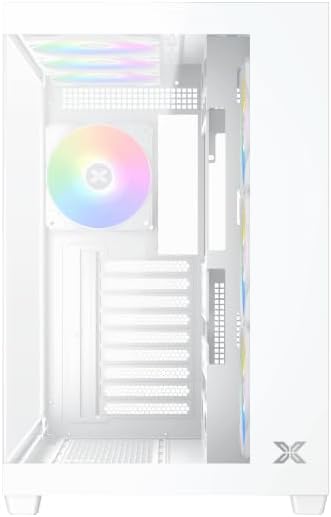
Слика 5.1: Внатрешност view of the case, illustrating the motherboard mounting area and cable routing cutouts.
- Инсталирајте го I/O штитот во отворот на задниот дел од куќиштето.
- Align your motherboard with the pre-installed standoffs. Ensure the standoffs match your motherboard's form factor (ATX, Micro ATX).
- Secure the motherboard using the provided screws from the accessory kit. Do not overtighten.
5.3. Инсталација на единица за напојување (PSU)
- Locate the PSU mounting bracket at the bottom rear of the case.
- Slide your PSU into the designated compartment from the rear of the case.
- Прицврстете го напојувањето на куќиштето со завртките што се испорачани со напојувањето.
5.4. Инсталација на диск за складирање
The case supports multiple storage drives:
- 2.5" SSD дискови: Mount directly to the SSD trays located behind the motherboard tray. Secure with screws.
- 3.5" хард дискови: Install into the drive cage located beneath the PSU shroud. Slide the drive into the tray and secure with screws.
5.5. Graphics Card (GPU) and Expansion Card Installation
- Отстранете ги потребните капаци за слотовите за проширување на задниот дел од куќиштето.
- Вметнете ја вашата графичка картичка или други картички за проширување во соодветните PCIe слотови на матичната плоча.
- Secure the cards with the provided screws.
5.6. Управување со кабли

Слика 5.2: View behind the motherboard tray, illustrating the ample space and tie-down points for effective cable management.
Користете ги отворите за насочување на каблите и точките за врзување зад фиоката на матичната плоча за да ги организирате каблите. Ова го подобрува протокот на воздух и естетиката.
- Поврзете ги сите потребни кабли за напојување од напојувањето со матичната плоча, графичката картичка и дисковите за складирање.
- Connect front panel cables (USB, audio, power/reset switches, LED indicators) to the corresponding headers on your motherboard. Refer to your motherboard manual for specific header locations.
- Connect the ARGB fan cables to the integrated fan controller or directly to your motherboard's ARGB headers if available.
5.7. Поддршка за вентилатор и радијатор
The Xigmatek Aqua V AIR Arctic comes with 7 pre-installed 120mm ARGB fans. Additional cooling options are available:
- Предна страна: Supports up to 3 x 120mm or 2 x 140mm fans / 240mm, 280mm, 360mm radiators.
- Врв: Supports up to 3 x 120mm or 2 x 140mm fans / 240mm, 280mm, 360mm radiators.
- Заден дел: Поддржува вентилатор од 1 x 120 мм.
- Долу: Supports up to 3 x 120mm fans.
Ensure proper fan orientation for optimal airflow (intake at front/bottom, exhaust at rear/top).
6. Работење
Once all components are installed and cables are connected, replace the side panels. Connect your monitor, keyboard, mouse, and power cable. Press the power button on the front panel to start your system.
The pre-installed ARGB fans can be controlled via the integrated controller (if present) or through compatible motherboard software, allowing customization of lighting effects and fan speeds.
7. Одржување
Редовното одржување помага да се обезбедат оптимални перформанси и долготрајност на компонентите на вашиот компјутер.
- Чистење прашина: Periodically clean dust filters (top, front, bottom) to maintain good airflow. Use compressed air to remove dust from inside the case and components.
- Надворешно чистење: Избришете ги надворешните површини со мека, гamp крпа. Избегнувајте абразивни средства за чистење или растворувачи.
- Проверка на управувањето со кабли: Occasionally check cable routing to ensure no cables are obstructing fans or airflow.
8 Смена на проблеми
Доколку наидете на проблеми, погледнете ги следниве вообичаени чекори за решавање проблеми:
- Системот не се вклучува:
- Проверете дали напојувањето е вклучено и правилно поврзано со ѕидниот штекер.
- Verify all power cables (24-pin ATX, 8-pin CPU, PCIe, SATA) are securely connected.
- Проверете ги врските на прекинувачот за напојување на предниот панел со матичната плоча.
- Нема излез на екранот:
- Ensure the monitor cable is connected to the graphics card (not the motherboard I/O if using a dedicated GPU).
- Повторно поставете ги графичката картичка и RAM модулите.
- Вентилаторите не се вртат или ARGB не работи:
- Проверете ги приклучоците за напојување на вентилаторот со матичната плоча или контролерот на вентилаторот.
- Verify ARGB connections to the controller or motherboard headers.
- Ensure any fan control software or BIOS settings are correctly configured.
For more complex issues, consult your component manuals or contact Xigmatek technical support.
9. Спецификации
| Карактеристика | Детал |
|---|---|
| Име на моделот | Aqua V AIR Arctic |
| Број на модел | EN45837 |
| Тип на случај | Средината на кулата |
| Компатибилност со матична плоча | ATX, микро ATX |
| Материјал | Steel Alloy, Tempered Glass |
| Боја | Бело |
| Претходно инсталирани вентилатори | 7 x 120 mm ARGB вентилатори |
| Максимална должина на графичкиот процесор | 410 мм |
| USB порти | 3 |
| Тежина | 8.8 килограми |
10. Гаранција и поддршка
Xigmatek products are manufactured to high quality standards. For warranty information, please refer to the warranty card included with your product or visit the official Xigmatek website. For technical support or inquiries, please contact Xigmatek customer service through their official channels.
Службен Webсајт: www.xigmatek.com


