1. Вовед
This manual provides detailed instructions for the setup, operation, and maintenance of your ATTACK SHARK G3PRO Wireless Gaming Mouse. Please read this manual thoroughly to ensure proper use and to maximize the performance of your device.
2. Карактеристики на производот
- Pro-Grade Precision & Speed: Equipped with PixArt PAW3311 gaming sensor and Broadcom BK52820 custom MCU for zero latency and pixel-perfect tracking. Adjustable DPI from 100 to 25000, polling rate up to 1000Hz, tracking speed 300IPS, and acceleration 40G.
- Legendary Durability & Tactile Clicks: Features genuine mechanical switches rated for 100 million clicks, providing crisp, responsive, and reliable feedback. The unique F-Switch encoder ensures precise scrolling.
- Ultra-Light Agility & Effortless Glide: Weighs only 59±3 grams, reducing wrist fatigue during extended use. Ergonomic design supports palm, claw, and finger grip styles. Double-layer premium mouse feet offer smooth, consistent glide.
- Seamless Tri-Mode Connectivity: Supports stable 2.4GHz wireless, low-latency Bluetooth, and reliable wired USB-C connections. Quickly switch between modes using the button at the bottom of the mouse. Compatible with desktops, laptops, smartphones, and tablets.
- AI Designed Driver: Utilizes an innovative cloud-driven webpage for customization, eliminating the need for traditional software installation. Allows for DPI adjustment, polling rate, competitive mode, customized buttons, macro recording, and personalized key mapping.
- RGB Backlight Charging Base: The included charging dock features cool RGB backlighting and allows for quick recharging. It also serves as a convenient passthrough for the 2.4GHz USB receiver, optimizing wireless signal reception.
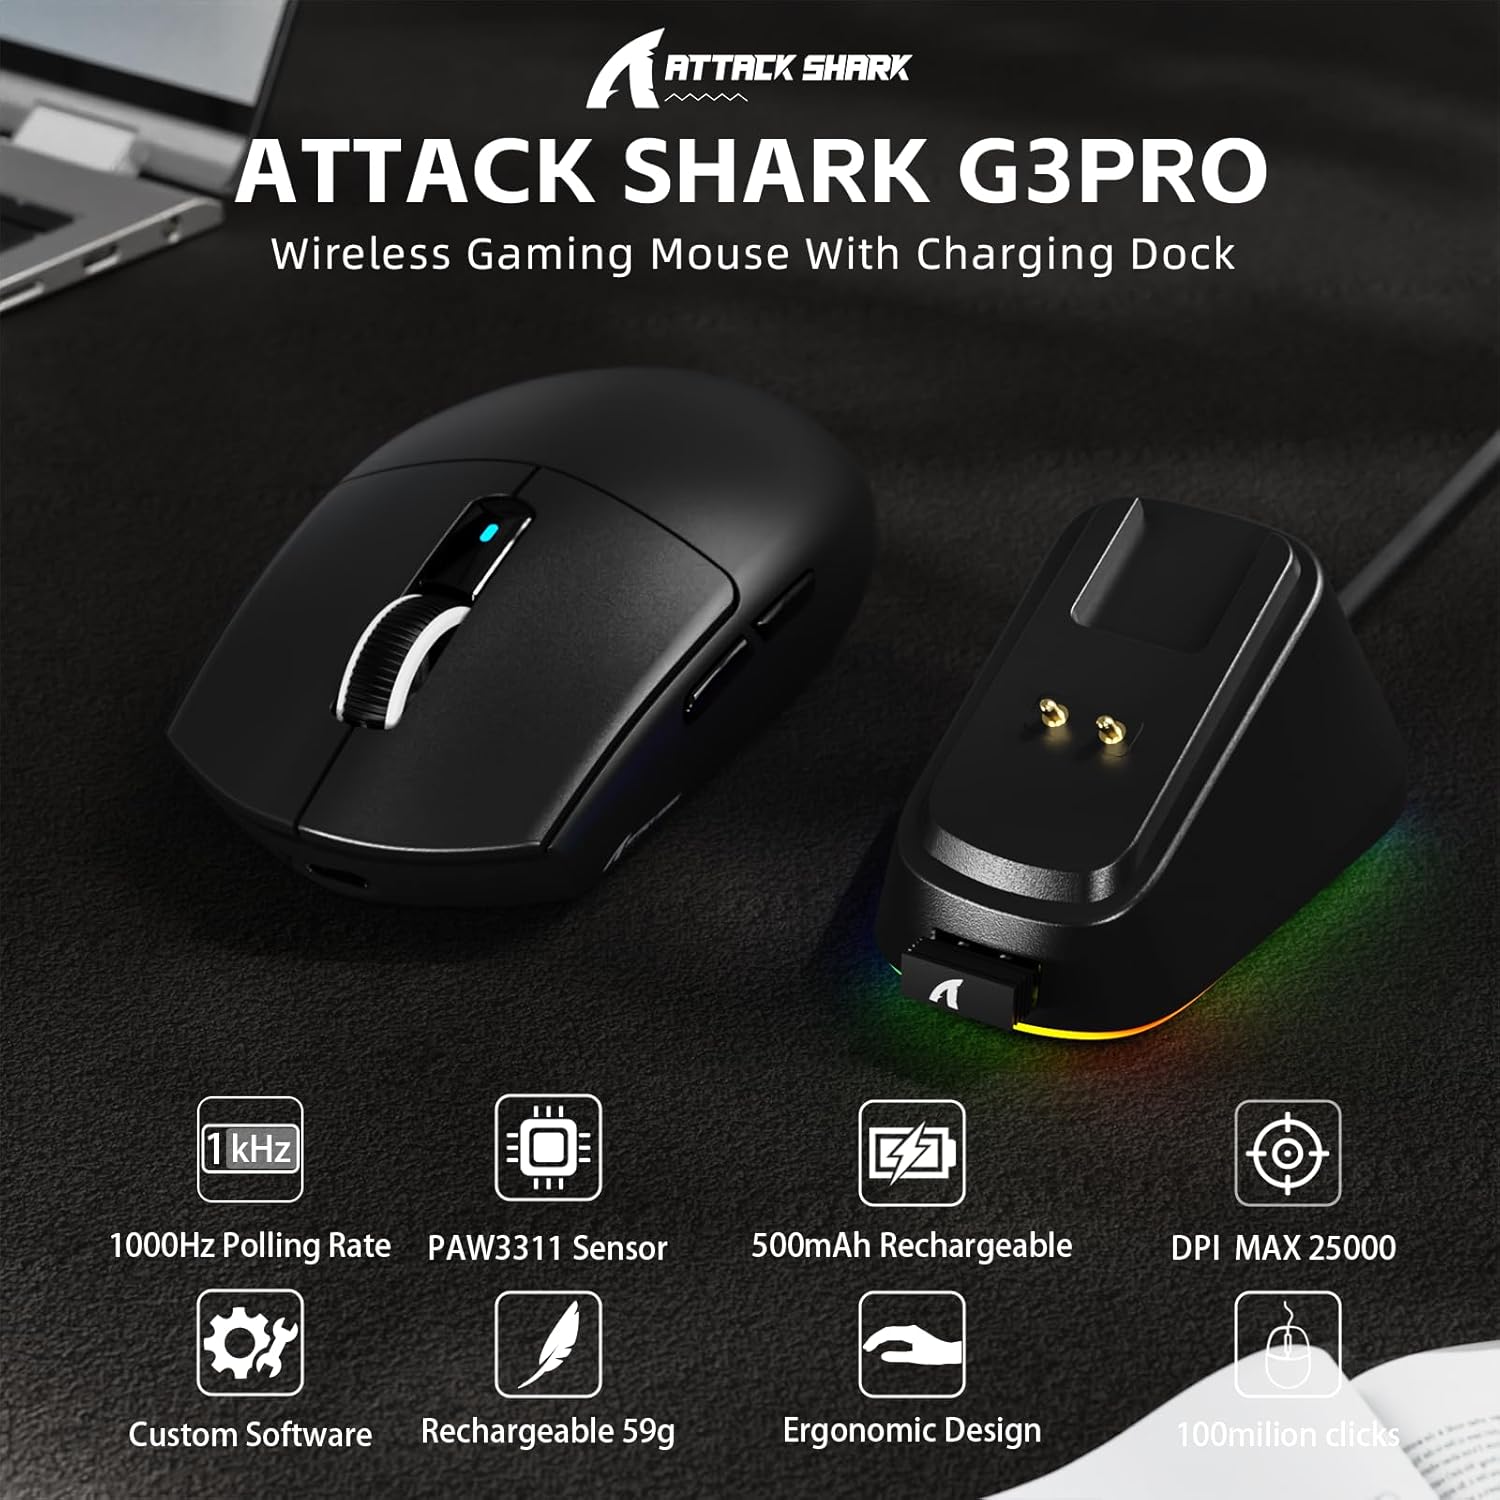
Слика: Надview of the ATTACK SHARK G3PRO mouse and its charging dock, highlighting key features such as 1000Hz polling rate, PAW3311 sensor, 500mAh rechargeable battery, 25K DPI, custom software, lightweight design, ergonomic shape, and 100 million click lifespan.

Image: A composite image detailing the internal components and features of the G3PRO mouse, including the 1K polling rate, PixArt PAW3311 sensor, Omron microswitches, 500mAh battery, BK52820 MCU, and the web интерфејс на драјверот.
3. Содржина на пакетот
Ве молиме проверете дали сите артикли се присутни во вашиот пакет:
- ATTACK SHARK G3PRO Wireless Gaming Mouse
- RGB Backlight Charging Dock
- USB-C на USB-A кабел
- USB 2.4GHz Wireless Receiver (often stored inside the mouse or dock)
- Упатство за употреба
- Stickers (may vary)
- Grip Tape (if included with your specific bundle)
4. Поставување
4.1 Полнење на глувчето
Before first use, it is recommended to fully charge the mouse. Connect the USB-C cable to the charging dock and then to a power source (e.g., computer USB port, USB wall adapter). Place the mouse onto the charging dock. The RGB lighting on the dock will indicate charging status.

Image: The ATTACK SHARK G3PRO Wireless Gaming Mouse resting on its RGB backlight charging dock, connected via a USB-C cable. This illustrates the primary charging method.
4.2 Поврзување на глувчето
The G3PRO mouse offers three connectivity modes: 2.4GHz Wireless, Bluetooth, and USB-C Wired.

Image: A visual representation of the three connectivity options for the G3PRO mouse: USB-C Wired, 2.4G Wireless, and Bluetooth, showing the mouse interacting with a charging dock and a laptop.
4.2.1 Безжична конекција од 2.4 GHz
- Locate the USB 2.4GHz receiver. It may be stored in a compartment on the underside of the mouse or within the charging dock.
- Plug the receiver into an available USB port on your computer. For optimal signal, you can plug the receiver into the USB port on the charging dock, then connect the dock to your computer.
- Switch the mode selector switch on the bottom of the mouse to the '2.4G' position.
- The mouse should automatically connect. If not, press and hold the 'Left/Center/Right' buttons simultaneously for 3 seconds to force pairing.
4.2.2 Bluetooth конекција
- Switch the mode selector switch on the bottom of the mouse to the 'BT' position.
- На вашиот компјутер или уред, одете во поставките за Bluetooth и овозможете Bluetooth.
- Пребарај за new devices. The mouse should appear as 'ATTACK SHARK G3PRO' or similar.
- Select the mouse to pair. If prompted, press and hold the 'Left/Center/Right' buttons simultaneously for 3 seconds to force pairing.
4.2.3 USB-C жична врска
- Поврзете го USB-C крајот од кабелот со глувчето, а USB-A крајот со компјутерот.
- Switch the mode selector switch on the bottom of the mouse to the 'OFF' position (or ensure it's not in 2.4G/BT mode). The mouse will operate in wired mode.
5. Упатства за работа
The ATTACK SHARK G3PRO mouse features multiple programmable buttons and adjustable settings for enhanced gaming and productivity.

Image: A detailed diagram illustrating the multi-functional buttons on the G3PRO mouse (Left Key, Right Key, Center Key, Backward Button, Forward Button, DPI Switch) and the components of the charging dock (Type C Port, Charging Thimble, Receiver Interface, RGB Light Switch, Receiver Organizer).
5.1 Функции на копчињата
- Лев клуч: Примарна функција за кликнување.
- Десен клуч: Функција за секундарно кликнување.
- Center Key (Scroll Wheel Click): Middle click function.
- Копче за напред: Навигира напред во web прелистувачи или апликации.
- Копче за назад: Навигира назад во web прелистувачи или апликации.
- Прекинувач DPI: Циклично ги менува претходно поставените нивоа на DPI.
5.2 Прилагодување на DPI
Press the DPI switch button (located on the top of the mouse, usually behind the scroll wheel) to cycle through different DPI sensitivity levels. The default DPI settings can be customized using the AI Designed Driver.
5.3 RGB контрола на осветлувањето
The RGB lighting on the charging dock can be controlled via a switch on the dock itself. The mouse's internal lighting (if any) and effects can be customized through the AI Designed Driver.
6. Customization (AI Designed Driver)
The ATTACK SHARK G3PRO features an innovative cloud-driven web driver for advanced customization. This eliminates the need for software installation.

Image: A screenshot of the web-based driver interface for the ATTACK SHARK G3PRO mouse, showing options for button settings, DPI settings, parameter settings, macro editing, and a personal center for customization.
6.1 Пристап до Web Возач
To access the customization options, open a web прелистувач и одете до URL provided in the product documentation or on the official ATTACK SHARK website. The driver is designed to automatically identify your computer system.
6.2 Опции за прилагодување
Преку web driver, you can:
- Adjust DPI levels and create custom profiles.
- Modify polling rate.
- Program individual buttons for various functions (e.g., multimedia controls, keyboard shortcuts, macros).
- Record and assign complex macros.
- Personalize key mapping.
- Configure competitive modes and other advanced functions.
7. Полнење и батерија
The G3PRO mouse is equipped with a 500mAh built-in battery for extended playtime.
7.1 Методи на полнење
- Преку док за полнење: Simply place the mouse onto the RGB backlight charging dock. The magnetic connection will ensure proper alignment and charging.
- Преку USB-C кабел: Connect the mouse directly to your computer or a USB power adapter using the provided USB-C cable.
7.2 Статус на батерија
Battery status can typically be monitored through the AI Designed Driver interface or your operating system's Bluetooth device settings.
8. Одржување
To ensure the longevity and optimal performance of your ATTACK SHARK G3PRO mouse, follow these maintenance guidelines:
- Чистење: Use a soft, dry cloth to wipe the mouse and charging dock. For stubborn dirt, a slightly damp Може да се користи крпа, но осигурајте се дека влагата не влегува во уредот. Избегнувајте груби хемикалии или абразивни материјали.
- Нега на сензорот: Одржувајте го оптичкиот сензор на долната страна од глувчето чист и без прашина или остатоци. Користете памукче или компримиран воздух доколку е потребно.
- Складирање: Кога не го користите подолго време, чувајте го глувчето на ладно и суво место.
- Избегнувајте екстремни услови: Не го изложувајте глувчето на екстремни температури, директна сончева светлина или висока влажност.
9 Смена на проблеми
If you encounter issues with your ATTACK SHARK G3PRO mouse, please refer to the following common solutions:
| Проблем | Можна причина / решение |
|---|---|
| Глувчето не реагира (Безжично) |
|
| Глувчето не реагира (жичен) |
|
| Прилагодувањето на DPI не работи |
|
| Charging dock RGB not lighting up |
|
| Mouse tracking issues / erratic movement |
|
10. Спецификации
- Бренд: НАПАДНА АЈКУЛА
- Модел: Г3ПРО
- Боја: Црното
- Технологија за поврзување: 2.4Ghz Wireless, Bluetooth, USB-C Wired
- Технологија за откривање на движење: Optical (PixArt PAW3311 Sensor)
- Опсег на DPI: 100 - 25000 DPI (прилагодливо)
- Стапка на анкети: До 1000 Hz
- Брзина на следење: 300 FPS
- Забрзување: 40G
- Прекинувачи: Mechanical (100 million click lifespan)
- Капацитет на батеријата: 500 mAh
- Тежина: 59 ± 3 грама
- Посебни карактеристики: Ergonomic Design, Lightweight, Programmable Buttons, Rechargeable, Wireless, RGB Charging Dock
- Димензии на пакетот: 6.57 x 4.37 x 1.93 инчи
- Тежина на ставката: 8.1 унци
11. Видео за производот
Видео: Официјална видео презентација на производотasing the ATTACK SHARK G3PRO Wireless Gaming Mouse, highlighting its design, features, and various color options. This video provides a dynamic view of the mouse and its charging dock.
12. Гаранција и поддршка
For warranty information and technical support, please refer to the official ATTACK SHARK webстраницата или контактирајте го продавачот од кој сте го купиле производот. Зачувајте го доказот за купување за гаранциски барања.


