1. Вовед
This manual provides detailed instructions for the installation, operation, maintenance, and troubleshooting of the MARSTEK Triple Power 63A 110/120V Automatic Transfer Switch (ATS). This device is designed to automatically switch between three power sources (e.g., utility power, generator, inverter) to ensure a continuous and stable power supply to connected loads. It incorporates advanced protection features against overvoltagд, подволtage, and overcurrent conditions.
Ве молиме внимателно прочитајте го ова упатство пред инсталација и работа за да обезбедите безбедна и ефикасна употреба на производот.
2. Информации за безбедност
WARNING: Risk of Electric Shock. Installation and servicing should only be performed by qualified personnel.
- Always disconnect all power sources before installing or servicing the ATS.
- Обезбедете правилно заземјување на уредот.
- Проверете дали сите жичени врски се безбедни и точни според шемата за поврзување.
- Не ракувајте со ATS ако изгледа оштетен.
- Придржувајте се до сите локални и национални електрични кодови.
- This device is not suitable for use with neutral-bonded generators without appropriate isolation or modification to prevent ground fault issues. Consult a qualified electrician if using with such generators.

Image: Safety warning indicating to power off and test for electricity before installation. Always ensure zero voltage is detected before proceeding with any work on the device.
3. Карактеристики на производот
The MARSTEK Triple Power 63A ATS offers a range of features designed for reliable power management:
- Triple-Source Automatic Switching: Seamlessly transfers loads between Primary, Backup 1, and Backup 2 power sources during outages, кнtage sags/surges, or irregularities. Automatically reverts to the preferred source once stable.
- Built-in Electrical Protection: Safeguards connected equipment with advanced Overvoltage (140V max), Undervoltage (90V min), and Overcurrent (63A max) protection, preventing damage from unstable power.
- Flexible Priority Phase Setting: Designate ANY input (L1/L2/L3) as Primary—optimize for cost, reliability, or grid conditions without fixed "Main" limitations.
- Real-Time LED Voltagд Мониторинг: Intuitive display shows live voltage levels (e.g., 120V, 108V) for all 3 sources, with instant status indicators for active source, transfer, and faults.
- Quick DIN Rail Installation & Compact Design: Space-saving unit installs in minutes via standard DIN rail mounting, rated for 63A at AC 110V with a 106 mechanical lifespan.

Image: Visual representation of the intelligent protection features, including overvoltagд, подволtage, and overcurrent protection, designed to safeguard connected equipment.

Image: Detailed breakdown of the comprehensive electrical protection, showing default and adjustable values for overvoltage (>140V), undervoltage (<90V), and overcurrent (>63A).

Image: Diagram demonstrating the flexibility to set any input phase (L1, L2, or L3) as the primary power source, optimizing power configuration based on reliability or cost.
4. Содржина на пакетот
Пакетот на производи вклучува:
- 1 x MARSTEK Triple Power 63A 110/120V Automatic Transfer Switch
Note: DIN rail may be included separately or integrated. Please check your packaging.
5. Спецификации
| Параметар | Вредност |
|---|---|
| Оценет Supply Voltage | AC 110V (N-L1/L2/L3) |
| Номинална оперативна струја | 63 Amps |
| Оперативен волtage | 120 волти |
| Брзина на трансфер | 1-600s (Adjustable, 5s Default) |
| Механички живот | 106 операции |
| Overvoltagд Заштита | Adjustable 120V-300V (Default 140V) |
| Подволtagд Заштита | Adjustable 80V-210V (Default 90V) |
| Заштита од прекумерна струја | Adjustable 1A-63A (Default 63A) |
| Режим на работа | ВКЛУЧЕНО ИСКЛУЧЕНО |
| Тип на контакт | Нормално затворено |
| Тип на конектор | Приклучи се |
| Терминал | Завртка |
| Тип на коло | 3-насочен |
| Материјал за контакт | Бакар |
| Димензии на производот (Д x Ш x В) | 4.3 x 3.5 x 3.3 инчи |
| Тежина | 15.2 унци |
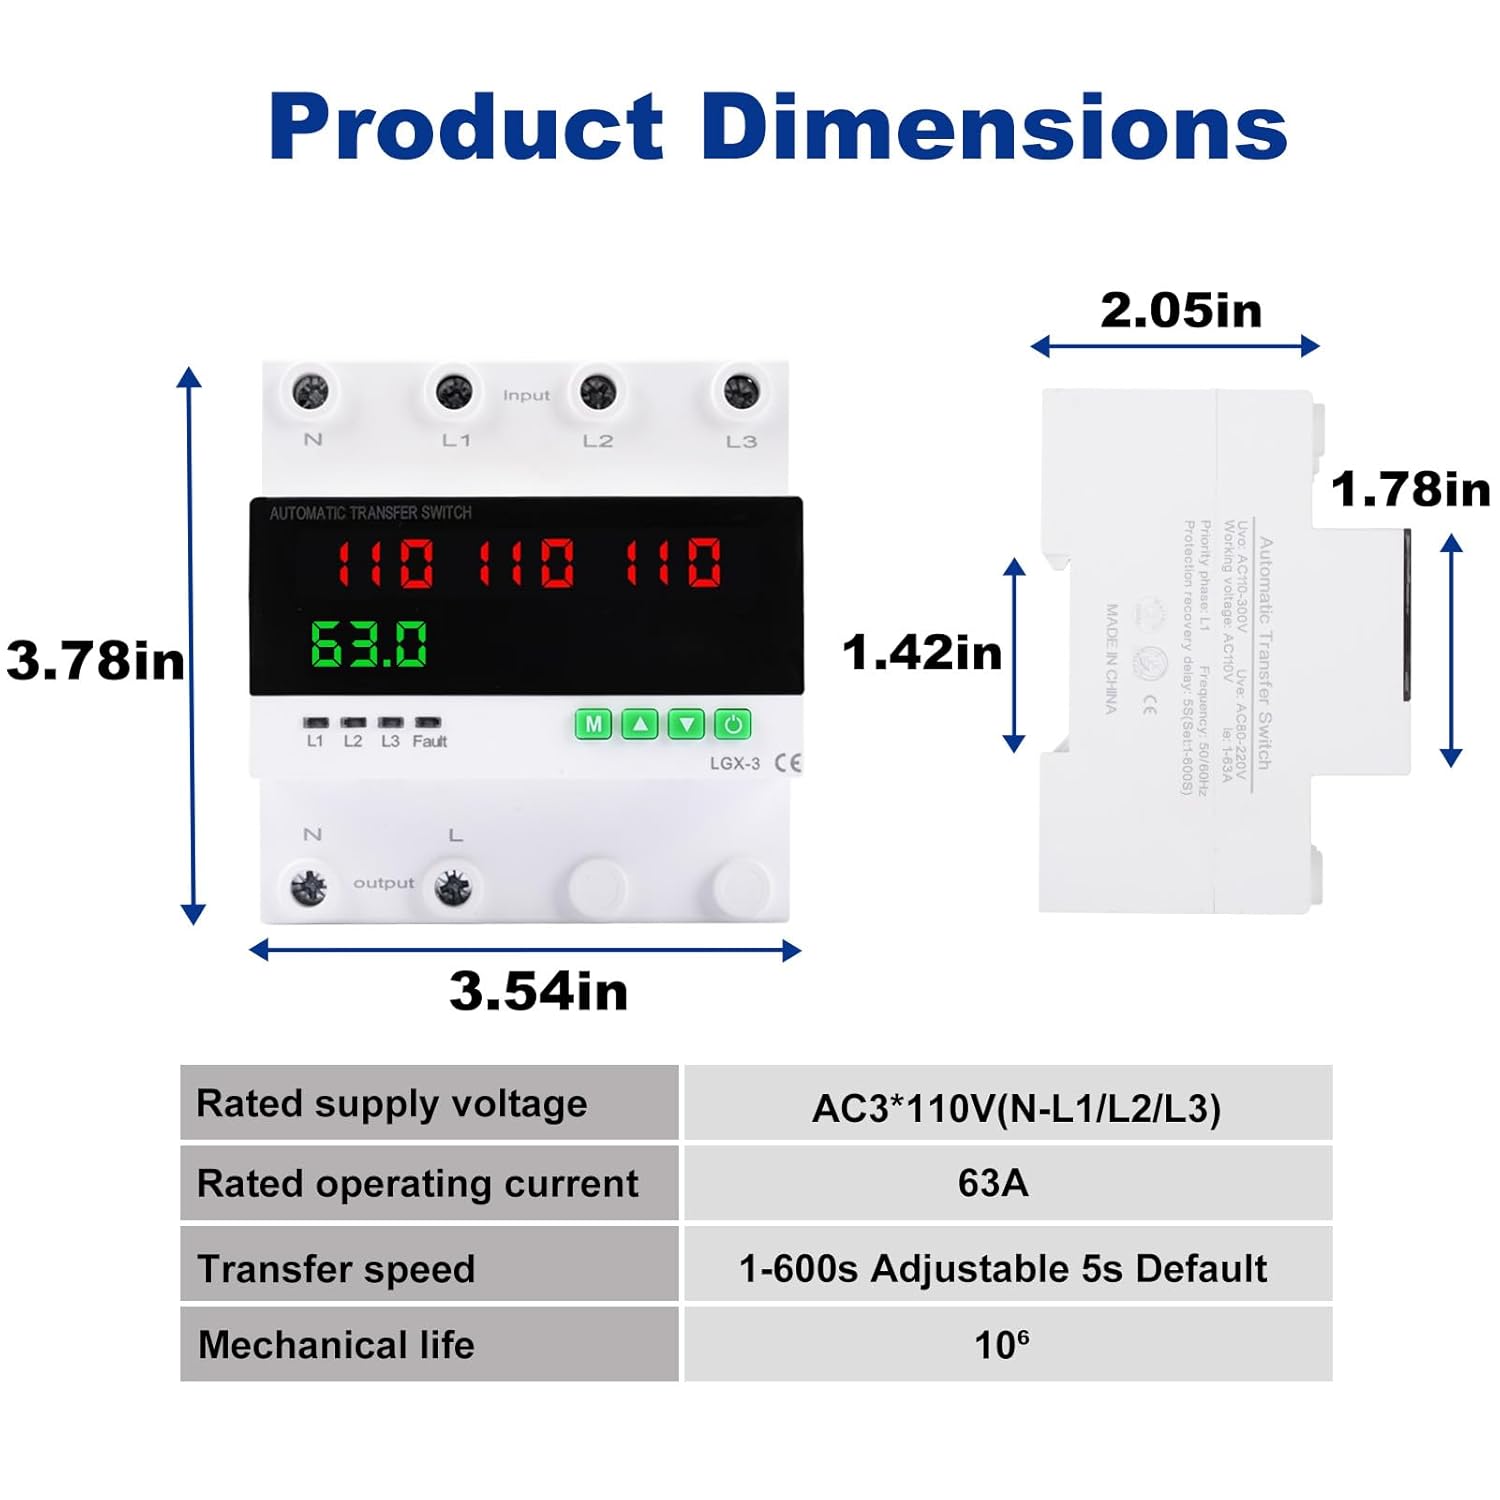
Image: Diagram illustrating the physical dimensions of the ATS and a summary table of its key electrical and mechanical specifications.
6. Инсталација
6.1 Монтирање на DIN шина
The MARSTEK ATS is designed for quick and easy installation on a standard DIN rail.
- Ensure all power sources are disconnected and verified as de-energized.
- Align the back panel display of the ATS with the DIN rail.
- Press the latch located on the bottom of the ATS.
- Insert the ATS onto the DIN rail.
- Release the latch to secure the ATS firmly in place. You should hear a "click" sound.

Image: Step-by-step visual guide for installing the ATS onto a DIN rail, demonstrating the alignment, latch pressing, insertion, and latch release process.
6.2 Дијаграм за поврзување
Refer to the following diagram for correct wiring connections. Ensure all connections are tight and properly insulated.

Image: Detailed wiring diagram illustrating the input connections for Neutral (N), Line 1 (L1), Line 2 (L2), Line 3 (L3), and output connections for Neutral (N) and Line (L).
- Влезни терминали: Connect your three power sources (e.g., Utility, Generator, Inverter) to L1, L2, and L3 respectively. Connect the neutral lines to the N terminals.
- Излезни терминали: Connect your load to the N (Neutral) and L (Line) output terminals.
- Важно: Ensure correct phase and neutral connections. Incorrect wiring can damage the device or connected equipment.
7. Операција
7.1 Power-On and Initial State
Once wired and power is applied, the ATS will perform a self-check. The LED display will show the voltage levels of the connected sources. The device will automatically select the primary source (as configured) if it is stable and within acceptable parameters.

Image: Close-up of the multi-function digital adjustment panel, featuring a high-definition LED display for real-time voltage and current monitoring, alongside menu options for customizing parameters.
7.2 Automatic Switching Logic
The ATS continuously monitors the voltage and stability of all three connected power sources. The switching logic is as follows:
- If the designated primary source (L1, L2, or L3) is stable and within acceptable voltage/current limits, the load will be connected to it.
- If the primary source experiences an outagд, томtage sag/surge, or overcurrent condition, the ATS will automatically transfer the load to the next available stable backup source (Backup 1, then Backup 2).
- Once the primary source is restored and stabilized, the ATS will automatically revert the load back to the primary source after a configurable delay.

Image: Flowchart depicting the automatic switching mechanism, showing how the ATS transitions between the normal power source and backup sources in response to power outages или voltage abnormalities, and reverts once stability is restored.
7.3 Прилагодување на параметрите
The ATS features a digital adjustment panel for customizing various parameters. Use the 'M' (Menu), 'Up' (Digit+), and 'Down' (Digit-) buttons to navigate and adjust settings.
- Power-on delay time (PE): Time delay before the ATS powers on after initial power application.
- Transfer time/Protection recovery delay time (rE): Delay before switching to a backup source or reverting to primary.
- Overvoltage protection value (oU): Sets the upper voltagд ограничување.
- Подволtage protection value (UU): Sets the lower voltagд ограничување.
- Priority phase (PS): Designate L1, L2, or L3 as the primary power source.
- Overcurrent protection value (oC): Sets the maximum current limit.
- Overcurrent protection action time (CtT): Delay before overcurrent protection trips.
- Continuous overcurrent protection frequency (CC): How often overcurrent protection can trip.
Refer to the on-screen menu for specific navigation and adjustment procedures. Always ensure settings are appropriate for your electrical system and connected loads.
8. Одржување
The MARSTEK ATS is designed for minimal maintenance. However, regular checks can ensure optimal performance and longevity:
- Визуелна инспекција: Периодично проверувајте го уредот за какви било знаци на физичко оштетување, лабави врски или промена на бојата.
- Проверки за поврзување: Ensure all wiring terminals remain tight. Loose connections can lead to overheating and device failure.
- Чистота: Чувајте го уредот чист од прашина и остатоци. Користете сува, мека крпа за чистење. Не користете течни средства за чистење.
- Тест за функционалност: If possible and safe to do so, periodically test the automatic transfer function by simulating a power outage on the primary source.
ПРЕДУПРЕДУВАЊЕ: Секогаш исклучувајте го напојувањето пред да вршите какво било одржување или чистење.
9 Смена на проблеми
| Проблем | Можна причина | Решение |
|---|---|---|
| Уредот не се вклучува. | No input power; incorrect wiring; internal fault. | Verify input power to L1/L2/L3 and N terminals. Check wiring against diagram. If power is present and wiring is correct, contact support. |
| No automatic transfer. | Backup source not stable; primary source still active; incorrect settings (e.g., transfer delay). | Проверете волtage of backup sources. Ensure primary source is truly unavailable. Review transfer delay settings (rE). |
| Frequent tripping (Overvoltage/Undervoltage/Overcurrent). | Unstable power supply; load exceeds rating; protection settings too sensitive. | Monitor power quality. Reduce load if exceeding 63A. Adjust protection thresholds (oU, UU, oC) if appropriate for your system, but do not exceed safe limits. |
| GFI/GFCI trips when using a generator. | Generator has a neutral-ground bond, creating multiple bonding points when connected to a house system. | This ATS is designed for systems where neutral and ground are bonded at a single point (e.g., main service panel). If using a neutral-bonded portable generator, consult a qualified electrician for proper isolation or alternative wiring solutions to avoid ground fault issues. |
| LED display shows "Fault". | Indicates an error condition (e.g., overvoltagд, подволtage, overcurrent). | Check the specific fault indicator (L1, L2, L3, Fault LED). Address the underlying power issue or load condition. Review поставките за заштита. |
10. Гаранција и поддршка
MARSTEK products are manufactured to high-quality standards. For warranty information, please refer to the terms and conditions provided at the point of purchase or contact MARSTEK customer support.
If you encounter any issues not covered in this manual or require further assistance, please contact MARSTEK customer service through your retailer or the official MARSTEK webсајт.