Вовед
The Thermaltake MINECUBE 360 Ultra is an advanced all-in-one liquid cooling system designed for high-performance computing. It features a 360mm radiator, three ARGB fans, and a unique cube-shaped pump block with a 3.95-inch LCD display on four sides. This manual provides essential information for the proper installation, operation, and maintenance of your liquid cooler.
Информации за безбедност
- Ensure all power is disconnected from your computer before installation or maintenance.
- Ракувајте со компонентите внимателно за да избегнете оштетување.
- Refer to your motherboard and PC case manuals for specific installation guidelines.
- Не обидувајте се да ја отворите пумпата или радијаторот, бидејќи тоа може да ја поништи гаранцијата и да предизвика протекување.
- Да се чува подалеку од дофат на деца.
Содржина на пакетот
Проверете дали сите компоненти се присутни пред да започнете со инсталацијата:
- MINECUBE 360 Ultra All-in-One Liquid Cooler (Radiator, Pump/CPU Block, Tubing)
- SWAFAN EX120 ARGB Fans (x3)
- Mounting Hardware for Intel Sockets (LGA2066/2011-3/2011/1851/1700/1200/1156/1155/1151/1150)
- Mounting Hardware for AMD Sockets (AM5/AM4/AM3+/AM3/AM2+/AM2/FM2/FM1)
- Replacement Fan Blades
- Accessory Kit (Cables, Thermal Paste, etc.)
- Упатство за употреба
Поставување и инсталација
1. Подгответе го радијаторот и вентилаторите
Attach the three SWAFAN EX120 ARGB fans to the 360mm radiator using the provided screws. Ensure the fan orientation is correct for your desired airflow (intake or exhaust). The SWAFAN EX120 ARGB fans feature a MagForce 2.0 magnetic connector for simplified wiring.

Слика: напред view of the radiator with fans.

Image: Radiator with fans configured for exhaust airflow.

Image: Radiator with fans configured for intake airflow.
2. Install the Radiator
Mount the assembled radiator and fan unit into your PC case. Common mounting locations include the top, front, or side panels, depending on your case design. Secure the radiator using the appropriate screws.
3. Подгответе го CPU Socket
Select the correct mounting bracket for your CPU socket (Intel or AMD). Install the backplate (if required for your socket) and standoffs onto your motherboard. Apply a thin, even layer of thermal paste to the center of your CPU's integrated heat spreader (IHS).
4. Install the Pump/CPU Block
Carefully place the pump/CPU block onto the CPU, aligning the mounting holes with the standoffs. Secure the pump block with the provided thumb screws or nuts, tightening them in a diagonal pattern until snug. Avoid overtightening.

Image: Pump block with LCD showing system statistics.
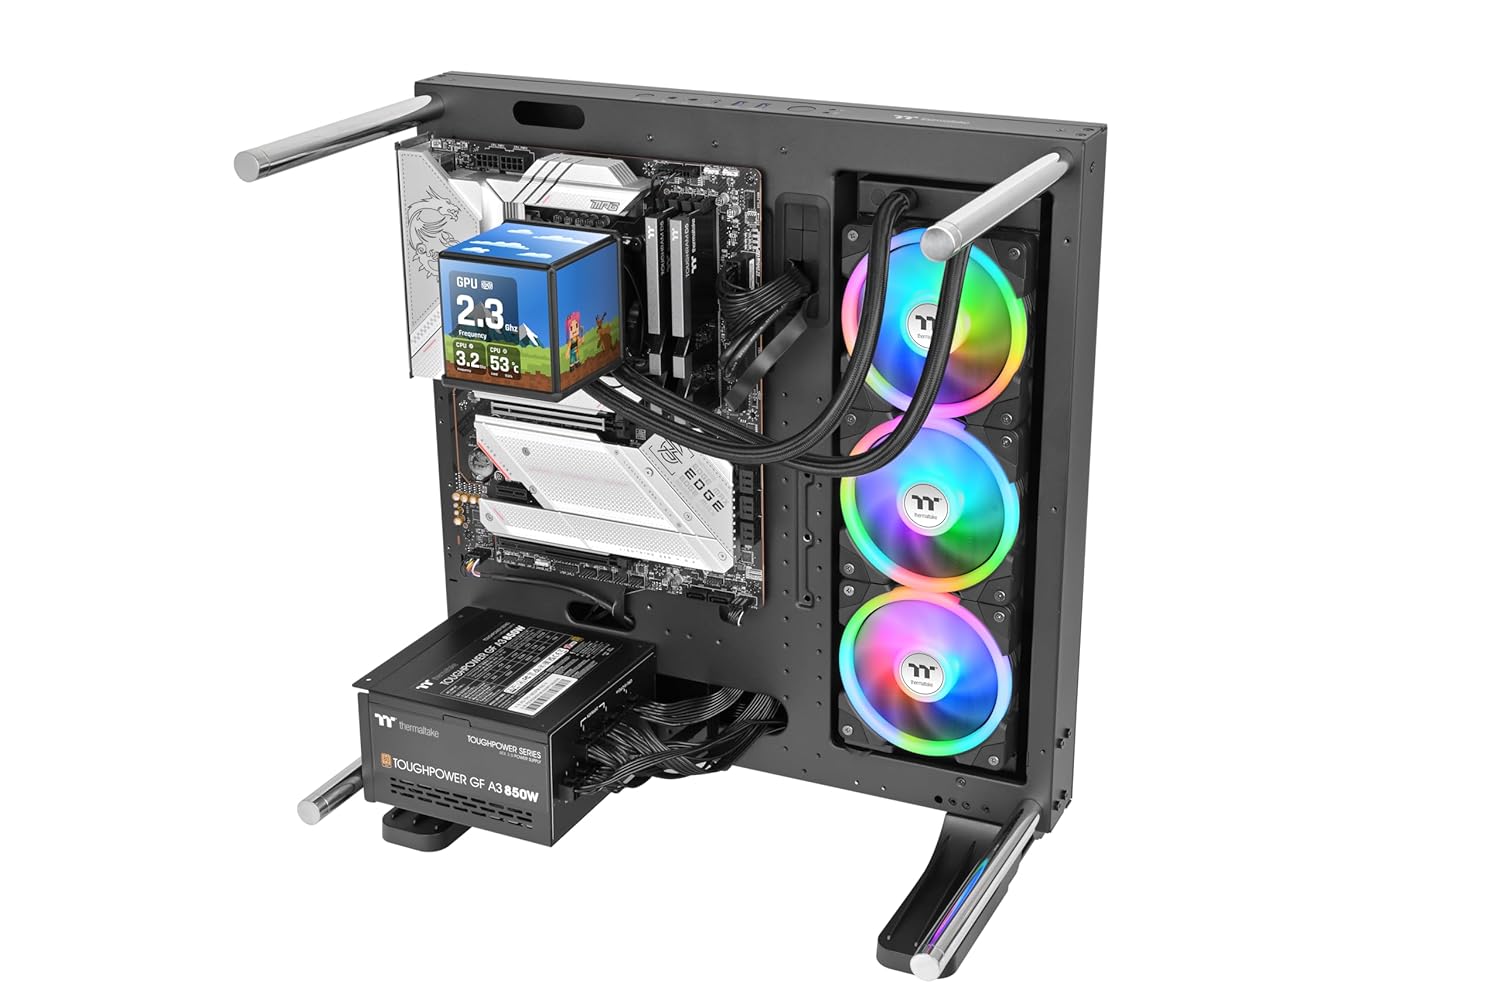
Image: Pump block with LCD showing a graphical interface.
5. Поврзете кабли
- Моќност на вентилаторот: Connect the 4-pin PWM fan cables from the fans to the motherboard's CPU_FAN or AIO_PUMP headers, or to a fan controller.
- ARGB осветлување: Connect the 3-pin (5V) ARGB cables to a compatible ARGB header on your motherboard or an ARGB controller.
- LCD дисплеј: Connect the Micro-USB cable from the pump block to an available USB 2.0 (9-pin) header on your motherboard.

Image: Cooler installed in a PC case with ARGB lighting.

Image: Cooler installed in a PC case with purple ARGB lighting.
6. Инсталација на софтвер
Download and install the latest Thermaltake software (e.g., TT RGB Plus) from the official Thermaltake website. This software is required to customize the LCD display, control fan speeds, and manage ARGB lighting effects.
Упатства за работа
Вклучување
After completing all connections, power on your computer. The cooler's fans and pump will begin operating, and the LCD display on the pump block will initialize.
Функции на LCD дисплеј
The 3.95-inch TFT-LCD display (720 x 720 pixels) on the pump block can show various system information, custom images, or animations. Use the Thermaltake software to configure the display content. You can monitor CPU temperature, GPU frequency, and other system parameters directly on the screen.
Контрола на вентилаторот и пумпата
The fan speeds (500 - 2000 RPM) and pump speed (1,500 - 3,300 RPM) are controlled via PWM signals from your motherboard or through the Thermaltake software. Adjust these settings to balance cooling performance and noise levels according to your preferences.
Одржување
Cleaning the Radiator and Fans
Periodically clean dust from the radiator fins and fan blades to maintain optimal cooling performance. Use compressed air or a soft brush. For the SWAFAN EX120 ARGB fans, the fan blades can be removed without tools for thorough cleaning or to change airflow direction.
Checking Tubing and Connections
Visually inspect the tubing and connections for any signs of leaks or damage. Ensure all cables are securely connected.
Решавање проблеми
- Нема струја/вентилаторите не се вртат: Check all power connections, especially the 4-pin PWM header on the motherboard. Ensure the pump is connected to a dedicated AIO_PUMP or CPU_FAN header.
- LCD Not Displaying: Verify the Micro-USB to USB (9-pin) cable is securely connected to both the pump block and the motherboard header. Ensure the Thermaltake software is installed and running.
- Лоши перформанси на ладење: Check for dust buildup on the radiator and fans. Ensure the pump block is properly seated on the CPU with adequate thermal paste. Verify fan orientation for optimal airflow.
- ARGB осветлувањето не работи: Confirm the 3-pin (5V) ARGB cable is correctly connected to a compatible header. Use the Thermaltake software to control lighting effects.
Спецификации
| Големина на радијаторот | 396 x 120 x 27 mm (15.6 x 4.7 x 1.1 инчи) |
| Должина на цевката | 460 мм (18.1 инчи) |
| Компатибилни Intel сокети | LGA2066/2011-3/2011/1851/1700/1200/1156/1155/1151/1150 |
| Компатибилни AMD сокети | AM5/AM4/AM3+/AM3/AM2+/AM2/FM2/FM1 |
| Големина на вентилаторот | 120 mm x 3 |
| Fan Revolutions | 500 - 2000 вртежи во минута |
| Fan Air Flow (Standard) | 57.11 CFM |
| Fan Air Pressure (Standard) | 2.39 mm-H2O |
| Fan Noise Level (Standard) | 30.6 dBA |
| Pump Revolutions | 1,500 - 3,300 вртежи во минута |
| Големина на приказ | 3.95 inch TFT-LCD x 4 |
| Резолуција на екранот | 720 x 720 пиксели |
| Конектори | Fan 4-pin (PWM), ARGB 3-pin (5V), Display Micro-USB to USB (9-pin) |
| Потрошувачка на енергија | Fan 3.24W/3.6W (per unit), Pump 5.16W, Pump fan 0.72W, Display 6W |
| Оценето волtage | Fan 12V/5V, Pump 12V, Pump Fan 12V, Display 5V |
| Поддржан ОС | Windows 11/10 |
Гаранција и поддршка
Thermaltake products are covered by a limited warranty. For detailed warranty information, please refer to the warranty card included with your product or visit the official Thermaltake website. For technical support, driver downloads, or further assistance, please visit the Thermaltake support page or contact their customer service.
Thermaltake Store: https://www.amazon.com/stores/Thermaltake/page/E7446300-D4D5-4D86-B99A-E6DBD017FB77


