Упатство за сопственик на контролер на батерии Hunter NODE
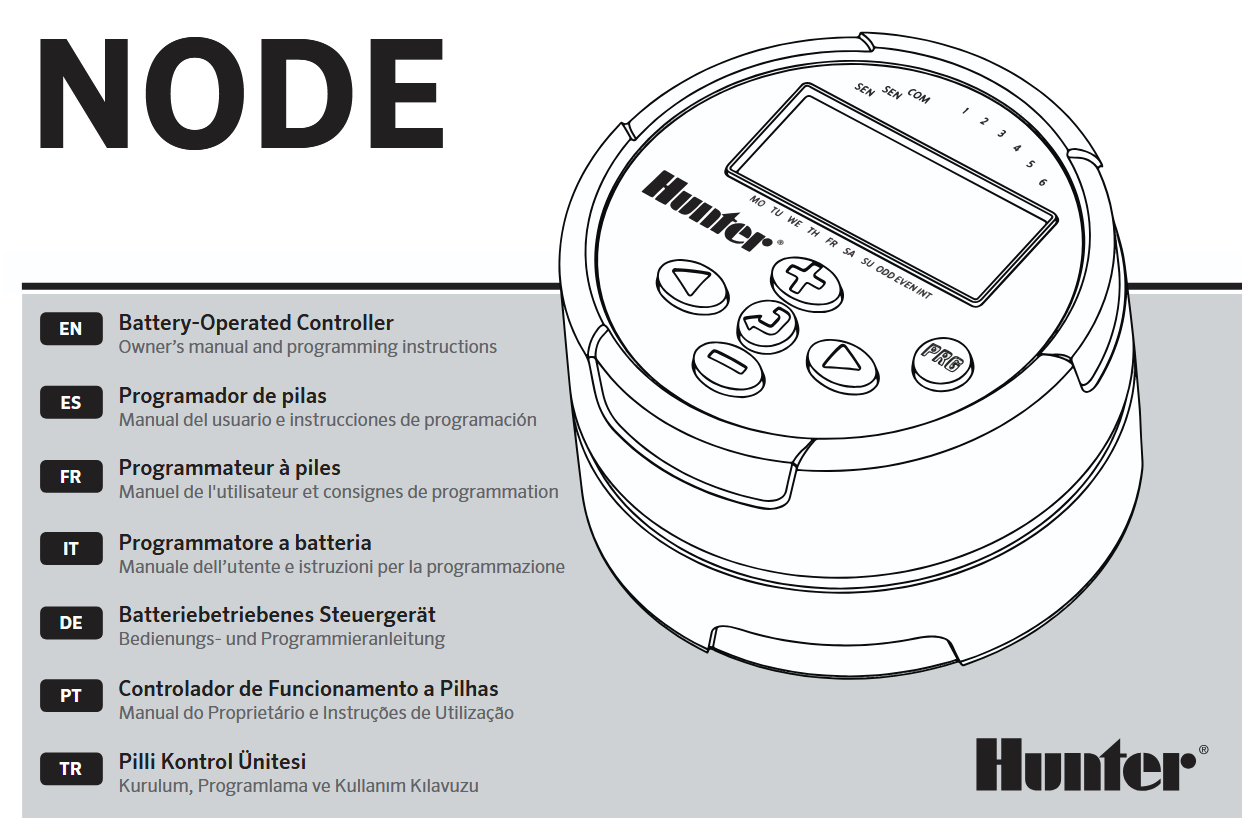

КАРАКТЕРИСТИКИ НА ЈАЗОЛИ
- Simple push-button programming
- Single-station model (NODE-100) with DC latching solenoid. Single-, two-, four-, or six-station models are also available (solenoids not included).
- Large Liquid Crystal Display (LCD) with easy-to-understand icons
- Operates using at least one standard nine-volt alkaline battery (use two for extended battery life)
- Three programs (A, B, or C) with up to four start times each
- Run times from one minute to six hours
- Manual watering capabilities
- Battery-life indicator
- Wired rain sensor compatible
- Non-volatile memory retains all program information
- Seasonal Adjustment from 10–150%
- Easy Retrieve™ memory allows saving/retrieval of preferred program data
- Manual bypass of rain sensor
- Total Run Time Calculator shows total program irrigation time per program
КОМПОНЕНТИ НА ЈАЗОЛИ
Овој дел обезбедува надview на некои од компонентите на NODE. Секоја ставка ќе биде подетално разгледана подоцна. Сепак, овој дел може да биде корисен за запознавање со различните достапни опции.
 Копче – Increases the selected flashing display
 Копче – Decreases the selected flashing display
 Копче – Selects programming function
 Копче – Advances the selected flashing display back to the next item
 Копче – Navigates the selected flashing display back to the previous item
 Копче – Selects the program (A, B, or C)
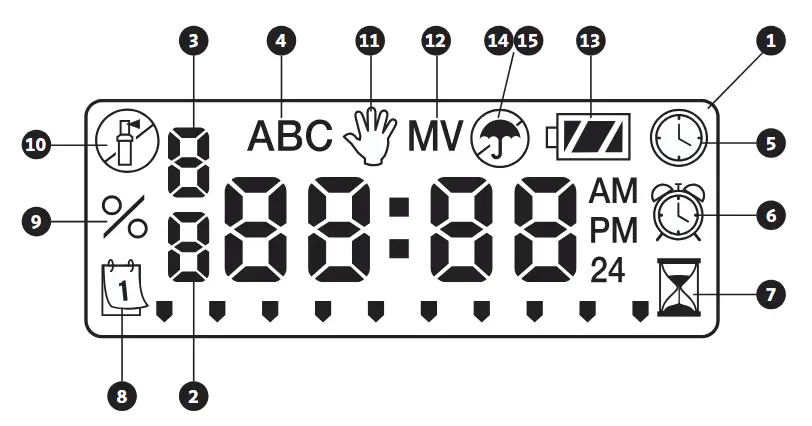
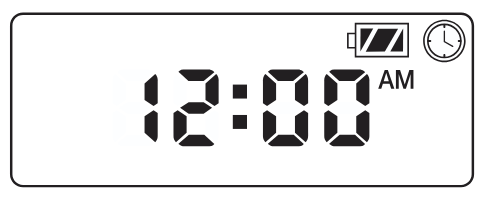
LCD дисплеј
- Главен екран – Indicates all program information
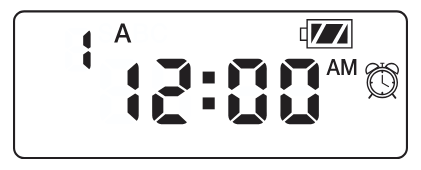
- Број на станица – Indicates the station number being programmed
- Start Time Number – Indicates the start timer number being programmed
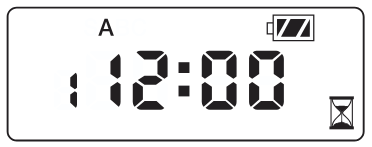
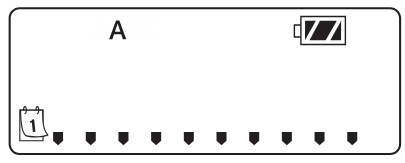
- Програма – Indicates the program (A, B, or C)
 Current Time/Day – Indicates when current day/time is being set
 почеток пати – Indicates when start times are being set
 Run Times – Indicates when Run Times are being set. Allows user to set run times from one minute to six hours.
 Денови на наводнување – Allows the user to select individual days to water or a selected number of days between watering (interval)
- % Сезонско прилагодување – Allows the seasonal adjustment to be programmed form 10–150% (default value is 100%)
 Системот е исклучен – Indicates that watering is suspended
 Рачно вклучување/исклучување – Indicates when manual watering is programmed. Allows the user to activate the station manually.
- MV – Indicates that station one is set to master valve operation (only available on two-, four-, or six-station models)
 Статус на батеријата – Indicates remaining battery life
 Чадор – Indicates the rain sensor is suspending irrigation
 Crossed Umbrella – Indicates the rain sensor has been manually bypassed
ПОВРЗУВАЊЕ НА БАТЕРИЈАТА/БАТЕРИИТЕ
NODE користи една или две стандардни деветволтни батерии (не се вклучени) за работа на вентилите и програмирање на контролерот. Контролерот може да работи со една деветволтна батерија или со две деветволтни батерии. Под нормални услови, очекуваниот век на траење е една година за една батерија и две години кога се користат две деветволтни батерии.
![]() ЗАБЕЛЕШКА: NODE има неиспарлива меморија. Ова овозможува батеријата да се отстрани без губење на информациите за програмата.
ЗАБЕЛЕШКА: NODE има неиспарлива меморија. Ова овозможува батеријата да се отстрани без губење на информациите за програмата.

За да ја инсталирате батеријата/батериите
- Unscrew the rear body of the NODE body to gain access to the battery compartment.
- Insert the battery/batteries into the battery tray and connect to the controller using the battery connector.
- Make sure that no water is inside the battery compartment.
- Завртете го задното тело на NODE назад на предната половина.
![]() ЗАБЕЛЕШКА: Проверете дали ознаката за заптивка на задната половина од NODE се порамнува со предната половина, осигурувајќи се дека е создадена соодветна заптивка.
ЗАБЕЛЕШКА: Проверете дали ознаката за заптивка на задната половина од NODE се порамнува со предната половина, осигурувајќи се дека е создадена соодветна заптивка.

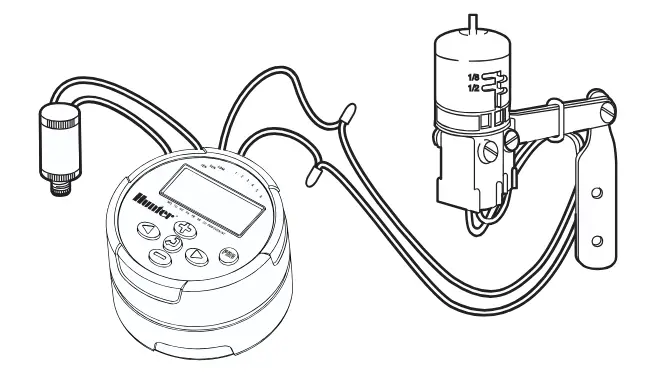
ПРИКЛУЧУВАЊЕ НА СОЛЕНОИДИ
NODE-100 е опремен со соленоид прикачен на контролерот. NODE-100-LS не вклучува соленоид. Контролерите со повеќе станици NODE-200, NODE-400 и NODE-600 ќе работат до два, четири или шест соленоиди, соодветно. Соленоидите со DC заклучување на Hunter (P/N 458200) лесно може да се инсталираат на сите пластични вентили на Hunter.
![]() ЗАБЕЛЕШКА: Користете соленоиди за заклучување на еднонасочна струја што работат помеѓу 9-11 VDC. Соленоидите од 24 VAC нема да работат со NODE.
ЗАБЕЛЕШКА: Користете соленоиди за заклучување на еднонасочна струја што работат помеѓу 9-11 VDC. Соленоидите од 24 VAC нема да работат со NODE.

За поврзување на DC соленоиди со NODE
- Attach the black leads from each solenoid to the single common wire (black lead) coming from the NODE. Secure all wire connections with waterproof connectors.
- Attach one red wire from each solenoid to the corresponding station wire (red lead) from the NODE. The station numbers are identified on the face of the NODE. Secure all wire connections with waterproof connectors.
![]() ЗАБЕЛЕШКА: Максималното растојание на жиците помеѓу соленоидот и NODE е 100′ (30 m) со минимална големина на жица од 18 AWG (1 mm).
ЗАБЕЛЕШКА: Максималното растојание на жиците помеѓу соленоидот и NODE е 100′ (30 m) со минимална големина на жица од 18 AWG (1 mm).
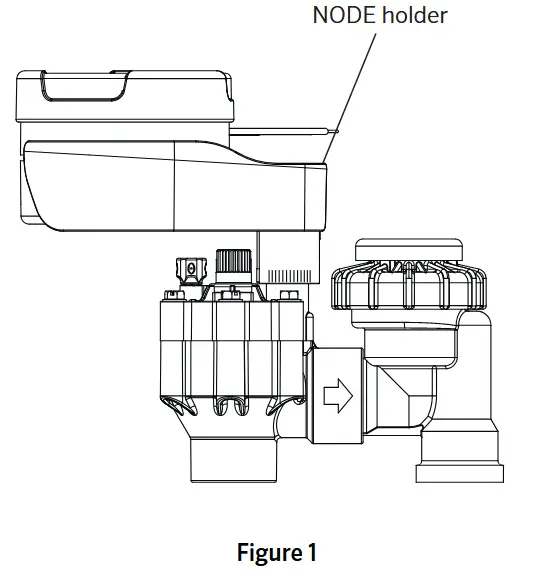
МОНТИРАЊЕ НА ЈАЗОЛОТ
NODE може лесно да се монтира на кој било пластичен вентил од Hunter. Специјално дизајнираната штипка за монтирање на вентилот ја прави инсталацијата лесна. Обезбедена е заштитна гумена обвивка за да се спречи насобирање нечистотија на површината на NODE.
За монтирање на NODE на вентил (Слика 1)
- Screw the Hunter DC latching solenoid (P/N 458200) into the valve bonnet.
- Set the small open end of the NODE holder on top of the solenoid.
- Set the NODE controller into the large open end of the NODE holder.
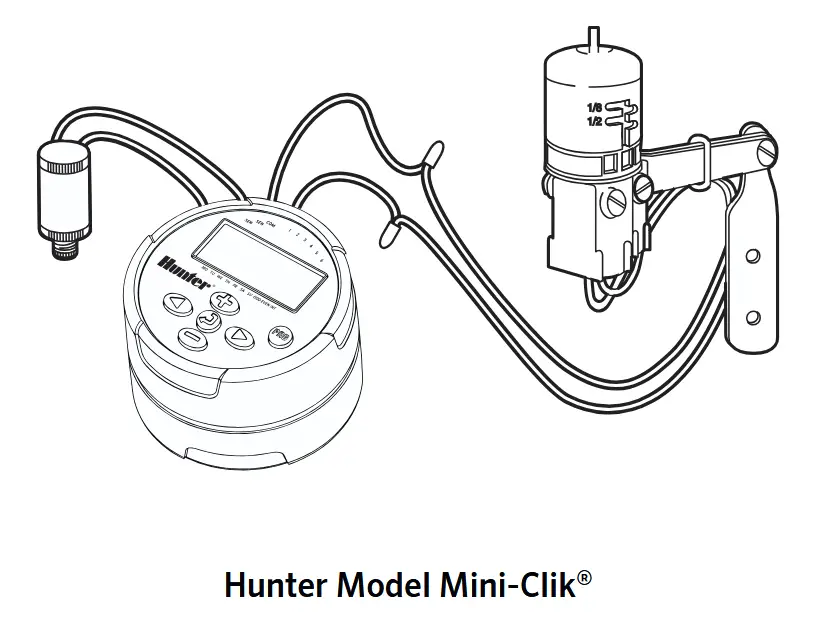
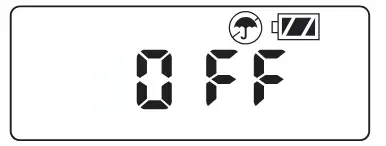
CONNECTING A WEATHER SENSOR
A Hunter Mini-Clik ® or Wired Rain-Clik® rain sensor can be connected to the NODE. The purpose of this sensor is to stop watering when weather conditions dictate.
![]() NOTE: When the Wired Rain Sensor is interrupting the watering, the display will show the System Off icon
NOTE: When the Wired Rain Sensor is interrupting the watering, the display will show the System Off icon ![]() , “OFF” and
, “OFF” and ![]() на дисплејот.
на дисплејот.
- Cut the yellow wire loop attached to the NODE at approximately the middle of the loop.
- Remove approximately ½” (13 mm) of insulation from each wire. Attach one yellow wire to each of the wires of the weather sensor. You can mount the rain sensor up to 100 ft (30 m) from the NODE controller (18 AWG/1 mm minimum wire size).
- Secure wire connections with waterproof connectors.
РЕЖИМ НА НЕДАВИД
Нормално, екранот на NODE ги прикажува времето и денот, денот од неделата, MV (ако е активирана опцијата за главен вентил) и индикаторот за траење на батеријата. По краток период на неактивност, екранот ќе се исклучи за да се задржи енергијата на батеријата. Притискањето на кое било копче ќе го внесе NODE во режим на мирување.

РЕЖИМ НА РАБОТЕЊЕ
Кога контролерот работи со програма, елементите прикажани на екранот ќе го вклучуваат бројот на станицата, буквата на програмата, преостанатото време на работа и трепкачката икона на роторот.

ПРОГРАМИРАЊЕ
The NODE uses standard Hunter controller programming with three programs (A, B, or C) and four start times per program. On standard Hunter controllers a dial is used to scroll between the programming functions. However, on the NODE the ![]() button is used to quickly and easily create the irrigation program. When programming, the flashing portion of the display can be changed by pressing the
button is used to quickly and easily create the irrigation program. When programming, the flashing portion of the display can be changed by pressing the ![]() or
or ![]() buttons. To change something that is not flashing, press the
buttons. To change something that is not flashing, press the ![]() or
or ![]() buttons until the desired item is flashing.
buttons until the desired item is flashing.
Поставување на датумот и времето
- Притиснете го
 копче до
 се прикажува иконата.
 - All four digits will be displayed representing the year. Use the
 or
or  buttons to change the year. Press the button to proceed to setting the month.
 - All four digits will be displayed with the two digits on the left representing the month flashing. Use the or buttons to change the month. Press the
 button to proceed to setting the day.
 - Only the two digits on the right side will be displayed and flashing, representing the day. Press the or buttons to change the day. Press the button to proceed with changing the hour. Press the button to proceed to setting the time.
- The AM/PM/24-hour time setting is shown flashing. Press the or button to change the time setting to AM, PM, or 24-hour time. Press the button to proceed to setting the hour.
- All four numbers are shown with the two numbers on the left flashing, representing the hour. Use the or buttons to change the hour. Press the button to proceed to setting the minutes.
- All four numbers are shown with the two numbers on the right flashing, representing the minutes. Use the or buttons to change the minutes. Pressing the button will advance to the year setting at Step 2.
- Притиснете го button to proceed to the next programming function or allow controller to return to idle mode.
Поставување на времето за почеток на наводнување
- Притиснете го копче до се прикажува иконата.
- The start time will be displayed flashing, along with the program letter (A, B, or C) and the start time number (1, 2, 3, or 4) in the upper left of the display. Up to 4 different start times can be set for each program.
- Користете го or buttons to change the start time for the program that is displayed. Each press of the button will change the start time in one-minute increments.
- Притиснете го button to add an additional start time to the program displayed. The start time number is shown in the upper left corner of the display.
- Притиснете го button to add start times to a different program.
- Притиснете го button to proceed to the next programming function or allow controller to return to idle mode.
![]() NOTE: After programming the run time for the last station press the
NOTE: After programming the run time for the last station press the ![]() button to display the total run time for the program.
button to display the total run time for the program.
Поставување на времето на извршување
- Притиснете го копче до се прикажува иконата.
- The run time will be displayed flashing. Also shown is the program letter (A, B, or C) and the active station number on the lower left side of the display. Press the or buttons to change the station run time from one minute to six hours.
- Притиснете го button to advance to the next station.
- Притиснете го button to add a run time to another program.
- Притиснете го button to proceed to the next programming function or allow controller to return to idle mode.
Поставување денови за наводнување
- Притиснете го копче до се прикажува иконата.
- The program letter (A, B, or C) will be displayed.
- Arrows point at the specific days of the week on which watering will occur. Press the
 or buttons to scroll though the days.
 - Притиснете го button to activate that day for the program displayed, or the button to cancel watering for that day. The arrow will show on the watering days for the active program.
- Притиснете го button to set days to water for a different program, if desired.
- Притиснете го button to proceed to the next programming function or allow controller to return to idle mode.
Избирање парни/непарни денови за наводнување
This feature uses numbered days of the month for watering instead of specific days of the week.
- Притиснете го копче до се прикажува иконата.
- Притиснете го button until the cursor is above either ODD or EVEN on the display.
- Притиснете го button to select, or the button to cancel either ODD or EVEN days to water.
- Once ODD or EVEN mode is activated, it will be the only cursor shown on the display.
Selecting Interval Days to Water
- Притиснете го копче до се прикажува иконата.
- Притиснете го button until the cursor is above ИНТ на дисплејот.
- Притиснете го button and a 1 will be flashing, indicating the number of days between watering.
- Притиснете го or buttons to select the number of days between watering days (1 to 31).
Поставување на сезонското прилагодување
- Press the button until the is displayed.
- Press the or button to increase or decrease the seasonal adjustment value from the default 100% (down to a minimum of 10% or a maximum of 150%).
- The value programmed for seasonal adjustment will be applied to all irrigation programs and will immediately be reflected in the run times displayed. For exampНа пример, ако се програмирани времиња на работа од 20 минути, а потоа сезонското прилагодување се промени од 100% на 50%, прикажаните времиња на работа ќе бидат 10 минути.

Исклучување на системот
To turn your controller off, press the ![]() копче до
копче до ![]() икона и ИСКЛУЧЕНО is displayed on screen. To return the controller to auto programming mode, press the
икона и ИСКЛУЧЕНО is displayed on screen. To return the controller to auto programming mode, press the![]() button. The controller will immediately return to auto programming mode and will display the time and battery-life indicator.
button. The controller will immediately return to auto programming mode and will display the time and battery-life indicator.
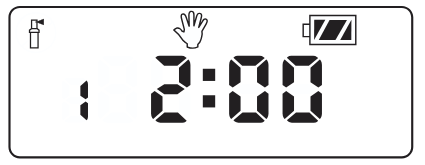
Рачно наводнување
Рачното наводнување му овозможува на корисникот да тестира секоја станица или програма за одредено време на работа. Состојбата на сензорот за време (доколку се користи) ќе биде занемарена во овој режим.
- Make sure the controller is in idle mode. Press and hold the копче до се прикажува иконата.
- The station number will be displayed in the lower left side of the display along with the run time.
- Користете го и buttons to select the desired station and the and buttons to set the manual watering time for the station shown.
- To manually activate a program, press the button. The program letter (A, B, or C) will show on the screen. If a different program is needed, press the копче додека не се прикаже саканата програма.
- To stop the Manual Watering cycle, press the button until the time is reduced to zero.
- Притиснете го button to proceed to the next programming function or allow controller to return to idle mode.
ЗАБЕЛЕШКА:
- Притискање на or buttons when a station is running in Manual Watering mode will modify the irrigation time for that station.
- Притискање на button when a station is running in Manual Watering mode will stop irrigation on the current station and advance to the next station.
- Притискање на button when a station is running in Manual Watering mode will stop irrigation on the current station and revert to the previous station.
Работа на сензорот
The NODE is compatible with Hunter Clik-type rain sensors, including Mini-Clik® , Freeze-Clik, and Wired Rain-Click® , as well as many other interrupt-type devices/sensors that do not require power. Simply connect the sensor to the NODE controller by cutting the yellow wire loop and connecting to the sensor wires.
NOTE: NODE is not compatible with Hunter Wireless Rain-Clik ® or other weather devices that require 24 VAC power.
When the sensor is activated, it will suspend irrigation and the ![]() иконата ќе се прикаже на екранот.
иконата ќе се прикаже на екранот.
НАПРЕДНИ КАРАКТЕРИСТИКИ ЗА ПРОГРАМИРАЊЕ
Сите напредни функции за програмирање се иницираат од режим на мирување, кој го прикажува времето, денот од неделата и индикаторот за траење на батеријата на екранот. Ако нешто трепка на екранот, тогаш контролерот е во еден од режимите на програмирање. По краток период на неактивност, контролерот ќе се врати во режим на мирување.
Сензор бајпас
- From the idle mode, press and hold the копче до се прикажува иконата.
- The display will show the umbrella icon flashing and НА.

- Притиснете го button to bypass the sensor. The display will show и ИСКЛУЧЕНО to indicate the weather sensor is bypassed. The icon will show on the display during normal operation, indicating the controller is in bypass mode.
- To reactivate the weather sensor, press and hold the копче до icon is displayed. Press the button to return to normal sensor mode.
Лесно преземање на меморијата
Оваа функција му овозможува на корисникот да зачува претпочитана програма во трајна меморија во контролерот, која може да се врати во секое време. Ова е одличен начин да се поништат направените промени и да се врати оригиналниот распоред за програмирање.
За да зачувате програма:
- Make sure that the controller is programmed with the preferred programming schedule.
- From idle mode, press and hold the и button for five seconds to save the current program.
- The screen will show three dashed lines moving from left to right to indicate the current program is being saved to permanent memory. The display will flash ГОТОВО кога процесот е завршен.

За да ја вратите зачуваната програма:
- From idle mode, press and hold the и копче пет секунди.
- The screen will show three dashed lines moving from right to left to indicate the preferred program is being retrieved from memory.
The controller now has the preferred program as the current program. The display will flash ГОТОВО кога процесот е завршен.
![]() ЗАБЕЛЕШКА: Бидете внимателни кога користите меморија за Easy Retrieve. Зачувувањето на програмските податоци во меморијата со користење на Easy Retrieve ќе ги земе информациите за тековната програма и ќе ги замени сите зачувани во трајната меморија. Кога зачувувате програмски податоци, проверете дали тековните програмски податоци се она што сакате да се зачуваат.
ЗАБЕЛЕШКА: Бидете внимателни кога користите меморија за Easy Retrieve. Зачувувањето на програмските податоци во меморијата со користење на Easy Retrieve ќе ги земе информациите за тековната програма и ќе ги замени сите зачувани во трајната меморија. Кога зачувувате програмски податоци, проверете дали тековните програмски податоци се она што сакате да се зачуваат.
Setting Master Valve Operation
(NODE-200, NODE-400, & NODE-600 Only)
Моделите NODE со повеќе станици (NODE-200, NODE-400 и NODE-600) можат да се програмираат со употреба на нормално затворен главен вентил. При програмирање со главниот вентил, ќе ја доделите Станицата 1 како главен вентил, со што ефикасно ќе ја изгубите употребата на Станицата 1 за активирање на станицата за наводнување.
- From the idle mode, press the копче до се прикажува иконата.
- Program A will be displayed along with the active station number on the lower left. Make sure the active station showing is “1.” The run time will be shown.
- Притиснете го копчето еднаш и на MV icon will display on the screen and the time will disappear. Station 1 is now acting as the master valve and will not be available in other programming screens.
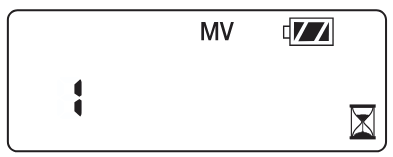
- When the master valve is activated, it will apply to all programs and the MV icon will stay displayed on the screen at all times.
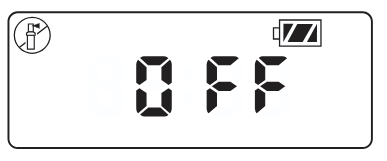
Програмабилно исклучување (до 99 дена)
Оваа функција му овозможува на корисникот да го запре програмираното наводнување за назначениот период од 1-99 дена. На крајот од програмираниот период на исклучување, контролерот ќе продолжи со нормална работа.
- From idle mode, press the копче до icon is displayed. Wait two seconds until OFF is shown on the display. The controller is now in System Off mode.
- Притиснете го button and a blinking “1” will be displayed, indicating the number of days the controller will stay off. Program the off days as desired, up to 99 days maximum.
- The display will show the number of days remaining in the ИСКЛУЧЕНО период.
- To interrupt the ИСКЛУЧЕНО period, press the button to return to the idle mode screen, showing the time of day and day of the week.
ИНДИКАТОР ЗА ЖИВОТ НА БАТЕРИЈАТА
Преостанатиот век на траење на батеријата може да се процени од индикаторот за век на траење прикажан на екранот. NODE може да работи со една батерија од девет волти или со две батерии од девет волти. Користењето на две батерии од девет волти ќе даде приближно двојно повеќе век на траење на батеријата од една батерија од девет волти. Табелата со индикатори за век на траење на батеријата подолу покажува проценка на преостанатиот век на траење на батеријата.
![]() Full: 100–60% remaining battery life
Full: 100–60% remaining battery life
![]() Med: 60–25% remaining battery life
Med: 60–25% remaining battery life
![]() Low: 25–0% remaining battery life
Low: 25–0% remaining battery life
![]() Заменете ја батеријата веднаш!
Заменете ја батеријата веднаш!
РЕСЕТИРАЊЕ НА КОНТРОЛЕРОТ
Ресетирањето на контролерот ќе ги избрише тековните податоци од програмата и ќе го рестартира контролерот. Сепак, ресетирањето не ја брише програмата зачувана во трајна меморија со помош на функцијата за лесно враќање на меморијата (видете ја страница 12) за да зачувате претпочитана програма.
- From idle mode, press and hold the , , и клучеви.
- After two seconds the screen will go blank. Continue to hold the , , и клучеви.
- 12:00 will flash on the display. Release the keys.
- The controller may show a countdown from 10 to 1 on the display, and then 12:00 am will be shown flashing when the reset is complete. The controller can now be reprogrammed.
ВОДИЧ ЗА РЕШАВАЊЕ ПРОБЛЕМИ

СПЕЦИФИКАЦИИ
Димензии: 3 ½”(89 mm) diameter, 2 ½”(64 mm) high
Сензорски влезови: Еден
Извор на енергија: One nine-volt alkaline battery (use two for extended battery life). Activates DC latching solenoids operating 9-11VDC (Hunter PN 458200).
Работна температура: 0ºF до 140ºF (-17ºC до 60ºC)
Одобрувања:
IP68
CE
FCC
Ц-крлеж
Документи / ресурси
 |
Hunter NODE контролер на батерии [pdf] Упатство за сопственикот NODE контролер на батерии, NODE, контролер на батерии, контролер на батерии, контролер |